
In part 1 and 2 of this series we provided an overview of how we would stand up a basic EKS Kubernetes cluster, configure all the associated IAM and security policies, and finally the installation of the AWS native CSI driver for the backend EBS storage. To get up and running and do something actually functional, we will need to:
- Deploy a simple application on our EKS cluster with dynamically provisioned persistent storage.
- Deploy Dell PowerProtect Data Manager and DDVE direct from the Amazon Market Place. Note: I have dealt with this exhaustively in previous posts here, so I will skirt through quickly enough in the video demo.
- Configure the integration between PPDM and the AWS Managed EKS control plane so that I can discover the Kubernetes namespaces I wish to protect.
- Configure a protection policy for backup to our DDVE storage repository, AWS S3.
A picture tells a thousand words:

Right so lets get started, we will cover steps 1 through 3 in this post and leave 4 for the final post in the series.
Just before we begin, we skipped over this step in the previous post. I got caught, yet again with an authentication type error. Make sure you have configured an IAM OIDC provider for your cluster, or else your POD’s won’t initialise properly. The documentation is here.
1. Deploy a simple application with dynamically provisioned persistent storage.
So there is a great guide/demo as to how to do this on the AWS documentation site and the AWS github for EBS CSI. I am using the simple pod from this site in my example, but amending it slightly to create a new namespace space ‘geos-ppdm’, and running through the configuration in a slightly different manner.
We already have our Storage Class applied in the last video and patched to make it the default. We just need two yaml files to stand up our simple application. The first our Persistent Volume Claim (PVC), which will point to already configured Storage Class: ( Highlighted Orange below)
cat <<EOF | tee ppdm-demo-pvc.yaml
apiVersion: v1
kind: PersistentVolumeClaim
metadata:
  name: pod-1-claim
spec:
  accessModes:
    - ReadWriteOnce
  storageClassName: ebs-sc
  resources:
    requests:
      storage: 4Gi
EOF
Next we will run the YAML to deploy our sample pod, named Pod-1. This is an incredibly sophisticated application that outputs to the terminal the time and date!! It serves a purpose…
cat <<EOF | tee ppdm-demo-pod-2.yaml
apiVersion: v1
kind: Pod
metadata:
  name: pod-2
spec:
  containers:
  - name: pod-2
    image: centos
    command: ["/bin/sh"]
    args: ["-c", "while true; do echo $(date -u) >> /data/out.txt; sleep 5; done"]
    volumeMounts:
    - name: persistent-storage
      mountPath: /data
  volumes:
  - name: persistent-storage
    persistentVolumeClaim:
      claimName: pod-1-claim
EOF
Before we apply the yaml files to our environment we just want to double check that our storage class is indeed up and running, otherwise our deployment will fail.

- Create a new namespace for the application, this will be handy when we integrate with PPDM.
kubectl create namespace geos-ppdm-namespace- Copy the YAML files to your working directory ( Copy and Paste or upload to Cloudshell as in my video)
- Kubectl Apply both to the newly created namespace
kubectl apply -f ppdm-demo-pvc.yaml -n geos-ppdm-namespace
kubectl apply -f ppdm-demo-pod-1.yaml -n geos-ppdm-namespace- check your persistent volume claim is in a bound state and your pod is up and running

Deploy and additional pod as per the diagram above. A couple of choices here: You could get lucky like me, as my second pod was scheduled to the same node via the scheduler, and came up successfully, I have 2 nodes, it was a 50/50 bet. In general though it will probably fail as the storage access method is RWO. Might be easier to create another PVC! Definitely use multiple PVC’s in the real world.
- Check my applications are doing stuff
In the end of the day we do want to push some data into DDVE. Change the default namespace to geos-ppdm-namespace and then run exec commands inside the container to expose the data being written to data/out.txt
kubectl config set-context --current --namespace=geos-ppdm-namespace
kubectl exec pod-1 -- cat /data/out.txt
If working correctly you should see recurrent date/time/year output. Pretty boring ! That is step completed and we know that our pod can mount storage on a persistent gp3 backed EBS volume.
Step 2: Deploy PPDM and DDVE direct from the marketplace.
As mentioned I have blogged about this in detail already, covering all the backend security groups, ACL’s, S3 endpoints, VPC setup etc. So I won’t hash through that in detail again. For the purposes of this demo, it will be very straightforward. One nice feature is that we can use a single Cloudformation template to deploy both the PPDM and DDVE instances. Moreover, the automation will also preconfigure the filesystem on DDVE pointing to our S3 Object store and configure the connectivity between PPDM and DDVE. We will showcase this in the video.

Step 3: Gather required information for cluster registration
The next logical step is to register our EKS cluster, with our namespace, application and pod data with PPDM. once that discovery process has happened then we can invoke policies and the inbuilt workflows to backup/restore/protect out kubernetes environment. We will do that via the PPDM GUI, but first we need to install some services on our EKS cluster and capture some identity data and certificate info.
- Download the RBAC Folder from your PPDM device and extract the contents to your local machine.

- Upload both YAML files ppdm-discovery.yaml and ppdm-controller-rbac.yaml to your kubectl working directory. I’m of course using CloudShell, but you could be using anything of your choice.

- Setup the PPDM discovery and controller account and RBAC permissions
kubectl apply -f ppdm-discovery.yaml
kubectl apply -f ppdm-controller-rbac.yaml- for K8s versions 1.24+ then you must manually create the secret for the ‘ppdm-discovery-serviceaccount’ service account using the following:
kubectl apply -f - <<EOF
apiVersion: v1
kind: Secret
metadata:
  name: ppdm-discovery-serviceaccount-token
  namespace: powerprotect
  annotations:
    kubernetes.io/service-account.name: ppdm-discovery-serviceaccount
type: kubernetes.io/service-account-token
EOF
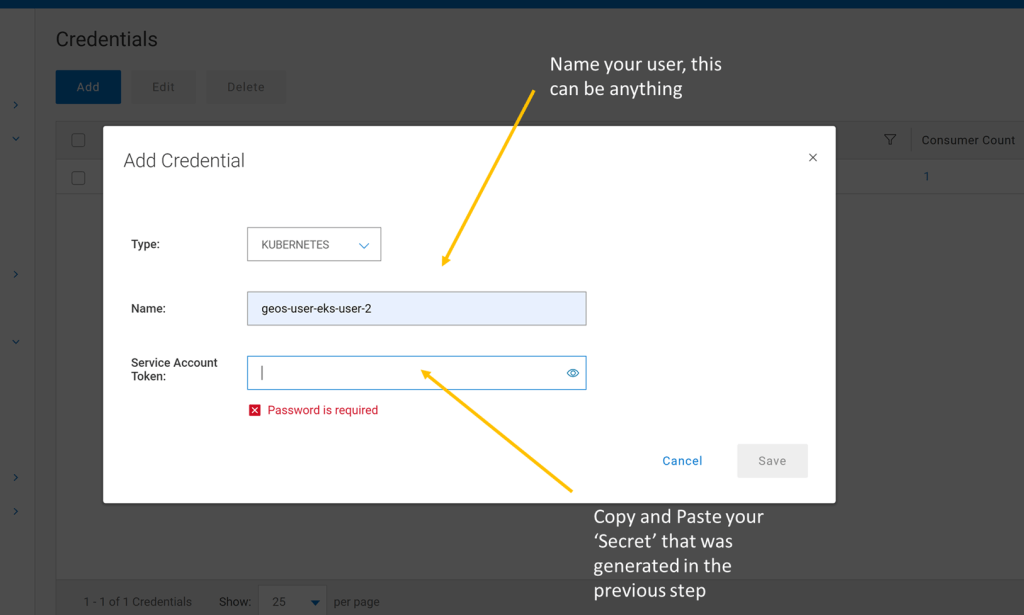
- Retrieve the base64-decoded service account token from the secret you just created. Copy to notepad for use when creating our user credentials in PPDM.
kubectl describe secret $(kubectl get secret -n powerprotect | awk '/disco/{print $1}') -n powerprotect | awk '/token:/{print $2}'- For EKS deployments you will need to use the cluster root CA when registering as an asset source. Grab the certificate using the following command. Copy to notepad
eksctl get cluster geos-ppdm-eks -o yaml | awk '/Cert/{getline; print $2}'
- Retrieve your cluster API endpoint info using the ‘kubectl cluster-info’ command. Redact the forwarding https:// and copy the address to notepad.
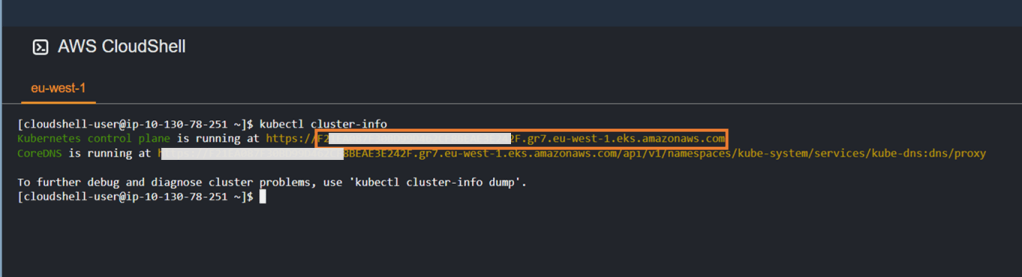
By the point we should have the following information to hand:
- PPDM service account secret.
- EKS cluster root CA.
- Cluster control plane address.
- EKS Cluster name.
We will use this information in the next step to register our EKS cluster with PPDM.
Step 4: Integrate PPDM with EKS
Using the information gathered in the previous step, then proceed as follows ( This is covered in the video also).
- Create Credentials and User


- Add Asset Source


- Add Root Certificate in Advanced Options

- Verify and Save

- Run Discovery on Kubernetes Asset Source

- Navigate to Assets and View Inventory

Video Demo
Attached video demonstration of the above. Stay tuned for the part 4 of this series, where we will configure and demo some protection policies for our EKS kubernetes cluster.
DISCLAIMER
The views expressed on this site are strictly my own and do not necessarily reflect the opinions or views of Dell Technologies. Please always check official documentation to verify technical information.
#IWORK4DELL
