Just before the New Year, PowerProtect DDVE on AWS 7.13 dropped. With it came official documented support for AWS S3 Intelligent Tiering. Indeed manual or direct tiering is supported also using S3 Lifecycle Management, but Intelligent Tiering is recommended as it, well just works, and with no nasty retrieval costs associated with it.
Here is the link to where it is documented in the release notes: ( Note you will need a logon)
Here is the relevant paragraph, scroll down to page 12:
So what does this mean?
Well, in short we save on backup costs from DDVE to S3. So now you get all the goodness of the native Dell deduplication features of DDOS and DDVE, coupled with all the cost saving optimisations of S3, that have been introduced by Amazon over the last couple of years:
For a small monthly object monitoring and automation charge, S3 will monitor access patterns and automatically move our backup objects to lower cost access tiers, with no retrieval performance or cost penalties. Bottom line, a no-brainer.
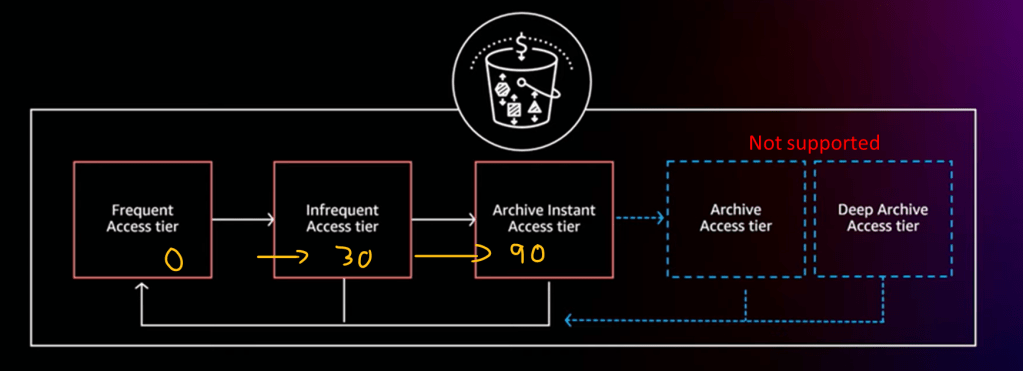
S3 automatically stores objects in three access tiers:
Tier 1: Frequent Access Tier
Tier 2: Infrequent Access Tier – (After 30 days of no access, 40% lower cost Tier)
Tier 3: Archive Instant Access Tier – (After 90 days of no access, 68% lower cost tier)
There are another 2 tiers (Archive Access Tier & Deep Archive Access Tier), that are positioned for data that does not require instant retrieval. These are currently untested/unsupported so please don’t use given the unpredictable times etc. You need to explicitly turn this feature on/opt-in in any regard, so no fear of misconfiguration.
Configuration, This is really straightforward.
Usually I would do an accompanying video demo, but this is relatively short and easy, so screenshots for now. Next month when we pass the 30 days, I will follow up with a video blog overviewing the re-hydration of our backup from the infrequent access tier.
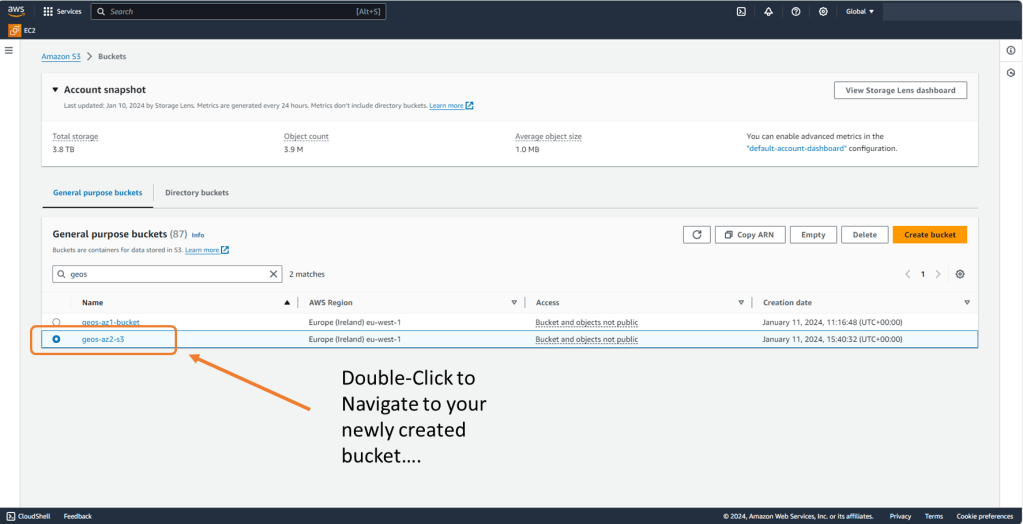
1. Create your bucket as normal
This is very straightforward, just make sure your bucket name is unique, usually unless I had some specific requirement I would accept all the defaults.
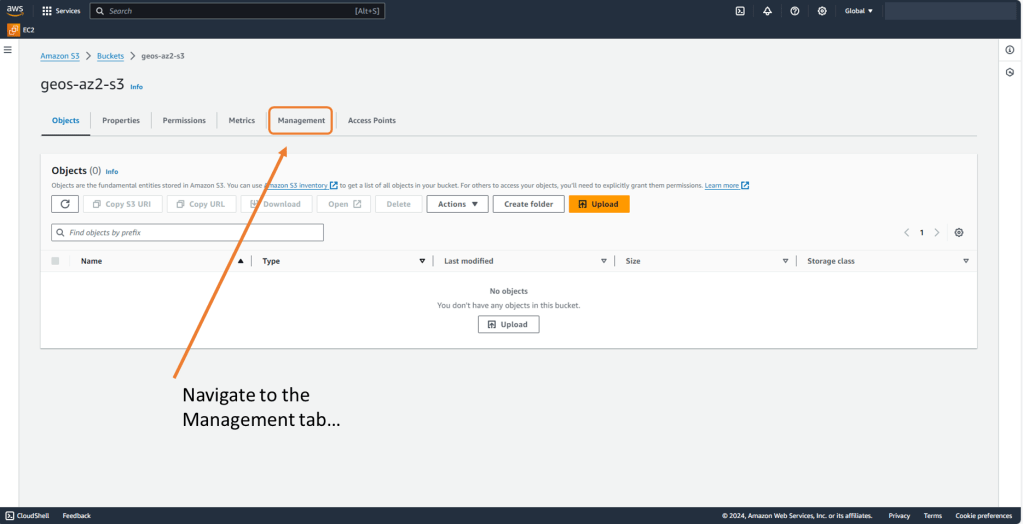
2. Create Lifecycle Policy for the new bucket
A Lifecycle Policy is used to apply the transition to Intelligent Tiering. DDVE requires that Standard Class S3 is used by DDVE. The lifecycle policy allows us to deploy with a Standard Class and transition over time to another S3 storage class, either by user policy (manual) or by intelligent tiering (automated).
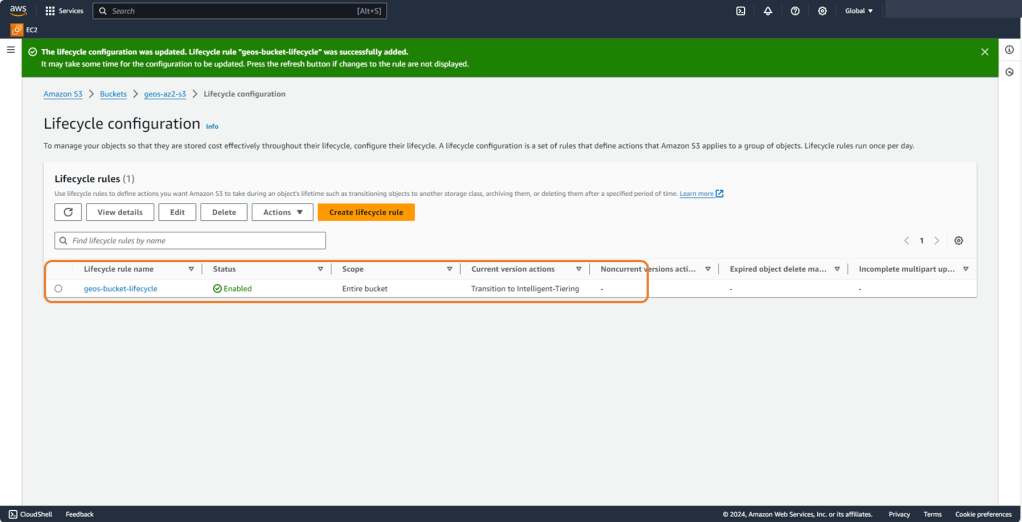
3. Configure Lifecycle rule
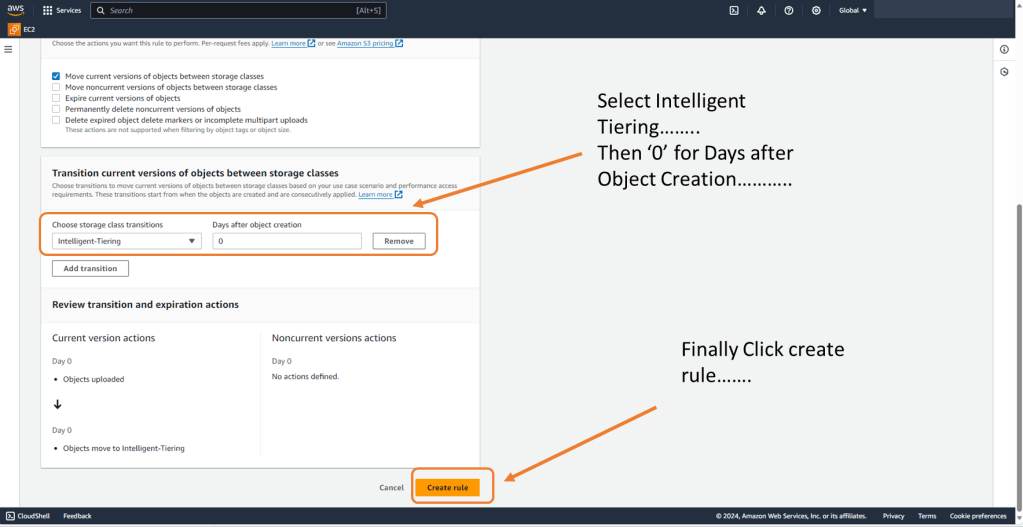
So as mentioned, DDVE will expect to see an S3 bucket configured with a Standard class. We adhere to this requirement but we set the lifecycle rule to transition everything to Intelligent Tiering, zero days after object creation. DDVE writes to a standard class as expected, but S3 via the lifecycle policy immediately transitions objects to the Intelligent Tiering class, so the clock starts to 30 days immediately.
We can also apply filters to the policy to push only certain objects in the Intelligent Tier and other configure other lifecycle options. For now though we will keep it simple.
Scroll down…. I couldn’t screen shot the full screen!
4. Verify your configuration
Lastly have a look at your new lifecycle policy and verify its configuration. Not a whole lot to see or verify as it really is straightforward.
Next Up.
Next month (after 30 days) we will revisit our environment and re-hydrate some EKS kubernetes workload from a PPDM policy. All going well she shouldn’t notice any difference in speed or performance. Overtime we should, if we are careful how we construct our PPDM polices, notice an improvement in our pocket!
DISCLAIMER The views expressed on this site are strictly my own and do not necessarily reflect the opinions or views of Dell Technologies. Please always check official documentation to verify technical information.
In part 1 and 2 of this series we provided an overview of how we would stand up a basic EKS Kubernetes cluster, configure all the associated IAM and security policies, and finally the installation of the AWS native CSI driver for the backend EBS storage. To get up and running and do something actually functional, we will need to:
Deploy a simple application on our EKS cluster with dynamically provisioned persistent storage.
Deploy Dell PowerProtect Data Manager and DDVE direct from the Amazon Market Place. Note: I have dealt with this exhaustively in previous posts here, so I will skirt through quickly enough in the video demo.
Configure the integration between PPDM and the AWS Managed EKS control plane so that I can discover the Kubernetes namespaces I wish to protect.
Configure a protection policy for backup to our DDVE storage repository, AWS S3.
A picture tells a thousand words:
Right so lets get started, we will cover steps 1 through 3 in this post and leave 4 for the final post in the series.
Just before we begin, we skipped over this step in the previous post. I got caught, yet again with an authentication type error. Make sure you have configured an IAM OIDC provider for your cluster, or else your POD’s won’t initialise properly. The documentation is here.
1. Deploy a simple application with dynamically provisioned persistent storage.
So there is a great guide/demo as to how to do this on the AWS documentation site and the AWS github for EBS CSI. I am using the simple pod from this site in my example, but amending it slightly to create a new namespace space ‘geos-ppdm’, and running through the configuration in a slightly different manner.
We already have our Storage Class applied in the last video and patched to make it the default. We just need two yaml files to stand up our simple application. The first our Persistent Volume Claim (PVC), which will point to already configured Storage Class: ( Highlighted Orange below)
Next we will run the YAML to deploy our sample pod, named Pod-1. This is an incredibly sophisticated application that outputs to the terminal the time and date!! It serves a purpose…
Before we apply the yaml files to our environment we just want to double check that our storage class is indeed up and running, otherwise our deployment will fail.
Create a new namespace for the application, this will be handy when we integrate with PPDM.
kubectl create namespace geos-ppdm-namespace
Copy the YAML files to your working directory ( Copy and Paste or upload to Cloudshell as in my video)
check your persistent volume claim is in a bound state and your pod is up and running
Deploy and additional pod as per the diagram above. A couple of choices here: You could get lucky like me, as my second pod was scheduled to the same node via the scheduler, and came up successfully, I have 2 nodes, it was a 50/50 bet. In general though it will probably fail as the storage access method is RWO. Might be easier to create another PVC! Definitely use multiple PVC’s in the real world.
Check my applications are doing stuff
In the end of the day we do want to push some data into DDVE. Change the default namespace to geos-ppdm-namespace and then run exec commands inside the container to expose the data being written to data/out.txt
If working correctly you should see recurrent date/time/year output. Pretty boring ! That is step completed and we know that our pod can mount storage on a persistent gp3 backed EBS volume.
Step 2: Deploy PPDM and DDVE direct from the marketplace.
As mentioned I have blogged about this in detail already, covering all the backend security groups, ACL’s, S3 endpoints, VPC setup etc. So I won’t hash through that in detail again. For the purposes of this demo, it will be very straightforward. One nice feature is that we can use a single Cloudformation template to deploy both the PPDM and DDVE instances. Moreover, the automation will also preconfigure the filesystem on DDVE pointing to our S3 Object store and configure the connectivity between PPDM and DDVE. We will showcase this in the video.
Step 3: Gather required information for cluster registration
The next logical step is to register our EKS cluster, with our namespace, application and pod data with PPDM. once that discovery process has happened then we can invoke policies and the inbuilt workflows to backup/restore/protect out kubernetes environment. We will do that via the PPDM GUI, but first we need to install some services on our EKS cluster and capture some identity data and certificate info.
Download the RBAC Folder from your PPDM device and extract the contents to your local machine.
Upload both YAML files ppdm-discovery.yaml and ppdm-controller-rbac.yaml to your kubectl working directory. I’m of course using CloudShell, but you could be using anything of your choice.
Setup the PPDM discovery and controller account and RBAC permissions
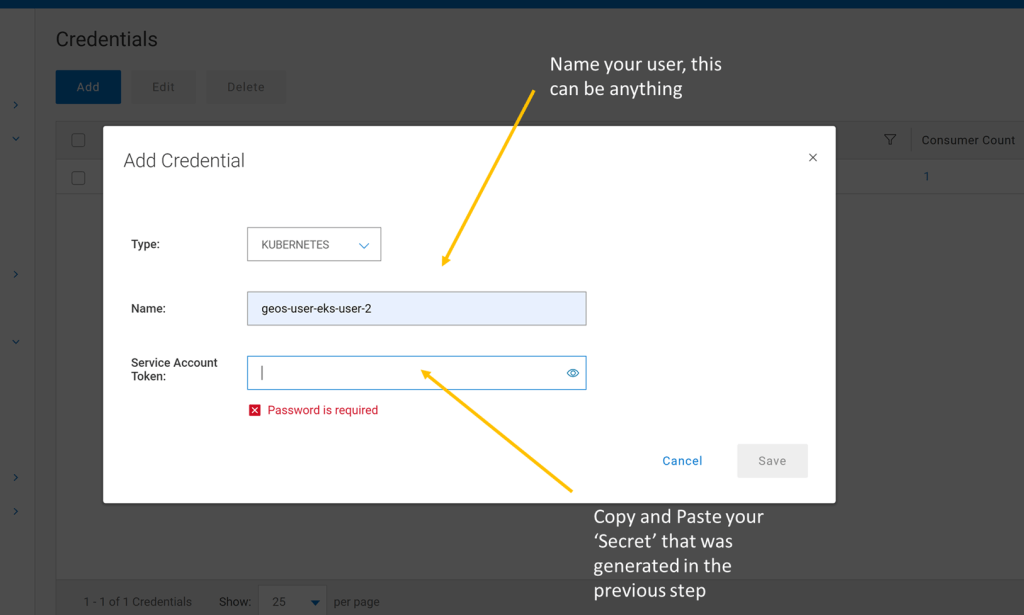
Retrieve the base64-decoded service account token from the secret you just created. Copy to notepad for use when creating our user credentials in PPDM.
For EKS deployments you will need to use the cluster root CA when registering as an asset source. Grab the certificate using the following command. Copy to notepad
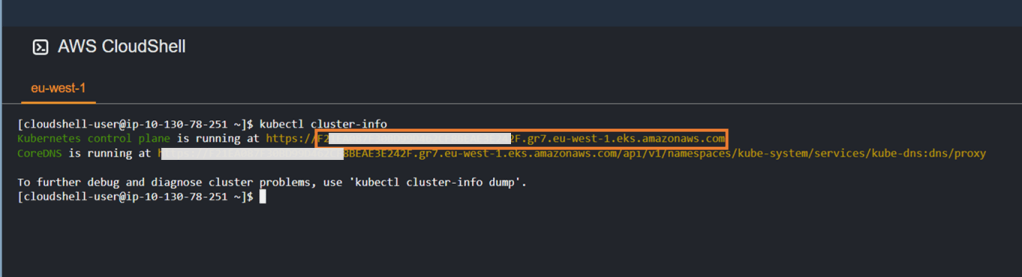
Retrieve your cluster API endpoint info using the ‘kubectl cluster-info’ command. Redact the forwarding https:// and copy the address to notepad.
By the point we should have the following information to hand:
PPDM service account secret.
EKS cluster root CA.
Cluster control plane address.
EKS Cluster name.
We will use this information in the next step to register our EKS cluster with PPDM.
Step 4: Integrate PPDM with EKS
Using the information gathered in the previous step, then proceed as follows ( This is covered in the video also).
Create Credentials and User
Add Asset Source
Add Root Certificate in Advanced Options
Verify and Save
Run Discovery on Kubernetes Asset Source
Navigate to Assets and View Inventory
Video Demo
Attached video demonstration of the above. Stay tuned for the part 4 of this series, where we will configure and demo some protection policies for our EKS kubernetes cluster.
DISCLAIMER The views expressed on this site are strictly my own and do not necessarily reflect the opinions or views of Dell Technologies. Please always check official documentation to verify technical information.
In the previous post we set up a very basic EKS environment with 2 EC2 worker nodes. Before we deploy a real application on this cluster and back it up using PPDM and DDVE, we will need to install the Amazon EBS CSI Driver on the cluster and use it leverage Kubernetes Volume Snapshots and gp3 backed EBS storage.
Slight change, in the format of this post. Video demo will be first up. Use the commentary in the blog to follow along.
Why do I need a CSI driver?
In our environment we are using native AWS EBS as storage for our pods, containers and workload etc. In brief a CSI is a specification that allows a Kubernetes system to implement a standardised interface to interact with a back end storage system, such as EBS. The main purpose of CSI is storage abstraction, in other words it allows Kubernetes to work with any storage device/provider for which an interface driver is available, such as Dell and AWS. Technically, they reside outside the core Kubernetes code, and rather than use in-tree plug-ins to the base code, they use API’s to enable third party vendor hardware to work ‘with’ a Kubernetes deployment versus ‘In’ a Kubernetes deployment.
The emergence of CSI was a game changer in terms of rapidly getting storage enhancements into kubernetes, driven by API versus having to go through the arduous task of integrating ‘in-tree’. This is a deep conversation in its own right ( deserving of its own blog post), but for the purpose of this blog let’s just say we need the AWS EBS CSI Driver installed in our cluster to allow Amazon EKS to manage the lifecycle the attached EBS volumes, and provide key features such as storage persistence, volume management, PVC’s and snapshots.
Deploying the CSI Driver
The EBS CSI driver is deployed as a set of Kubernetes Pods. These pods must have the permissions to perform API operations, such as creating and deleting volumes, as well as attaching volumes to EC2 worker nodes in the cluster. At the risk of repeating myself, permissions, permissions, permissions !!
1. Create and configure the IAM role
We have a couple of ways to do this, either AWS CLI, eksctl or the management console itself. this time around we will use AWS CLI. We will use the same cluster details, names etc from the previous post. When doing this yourself, just replace the fields in Orange with your own variables. I am also using the Cloudshell for all tasks, as per the last post. Refer to the video at the top of the post, where we run through every step in the process. This should help knit everything together.
Grab your cluster’s OIDC provider URL
aws eks describe-cluster --name geos-ppdm-eks --query "cluster.identity.oidc.issuer" --output text
You should get an output similar to the below
Grab your AWS account ID using the following command. Make note and copy this number. I won’t paste mine here for security reasons! but again we will demo in the video.
aws sts get-caller-identity --query "Account" --output text
Using your editor of choice create and save the following Json file. We will call this geos-aws-ebs-csi-driver-trust-policy.json. Copy the following code into it, using whatever editor you choose, I am using Notepad++, and then using Cloudshell to upload the file, rather than trying to edit on the fly within the bash shell. ( I generally make mistakes!). Replace the following Orange fields with the following:
111122223333 with your account ID you garnered above.
region.code with whatever region you deployed your EKS Cluster. Mine is ‘eu-west-1’. This will be available as part of the OIDC info you grabbed above also.
EXAMPLED539D4633E53DE1B71EXAMPLE with the id from the OIDC output above.
Create the IAM role. We will call it Geos_AmazonEKS_EBS_CSI_DriverRole
aws iam create-role \
  --role-name Geos_AmazonEKS_EBS_CSI_DriverRole \
  --assume-role-policy-document file://"geos-aws-ebs-csi-driver-trust-policy.json"
Attach the AWS Managed policy to the role
aws iam attach-role-policy \
  --policy-arn arn:aws:iam::aws:policy/service-role/AmazonEBSCSIDriverPolicy \
  --role-name Geos_AmazonEKS_EBS_CSI_DriverRole
2. Configure the snapshot functionality of the EBS CSI Driver
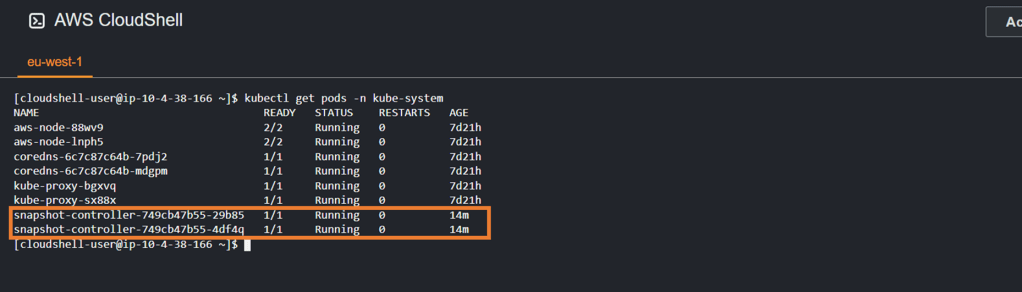
We want to use the snapshot functionality of the CSI driver. The external snapshotter must be installed before the installation of the CSI add-on ( which will be covered in the next step). If you are interested there is a wealth of information here on the external-snapshotter capability. Paste the following code into your Cloudshell terminal
use the kubectl get pods -n kube-system command to confirm that the pull from the git repository was successful and the snapshot controllers were successfully installed and are running.
4. Deploy the EBS CSI Driver Add-On
Again we have the option to do this via the GUI, eksctl or AWS CLI. I’m going to use AWS CLI this time around. If needed, replace the variables in orange. ( Note – 111122223333 is just in place of my real account ID)
5. Confirm CSI drivers have been installed and are in running state
Run the kubectl get pods -n kube-system command again. If all is well you should see your ebs-csi controllers in a running state
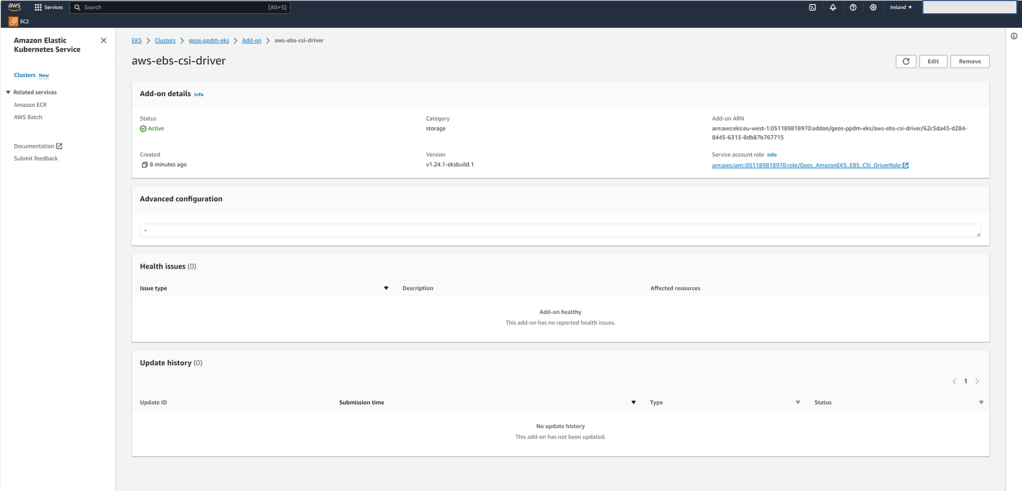
You can also leverage the GUI on the AWS console to verify all is operational and as expected.
6. Configure the Volume Snapshot Class
A Volume Snapshot is a request for a snapshot of a volume by a user, it is similar to a PersistentVolumeClaim. A VolumeSnapshotClass, allows you to specify different attributes belonging to a VolumeSnapshot. I probably don’t have to go into too much detail as to why these are so important in the realm of availability and backup/restore. We get to nice things like copying a volume’s contents at a point of time without creating an entirely new volume!! Key point here though is that snapshot functionality is only supported with CSI Drivers and not the native in-tree gp2 driver.
Create the Volume Snapshot Class YAML File. I’m deviated from the normal here, and pasting the file directly into the bash console:
All going well you should see the following output
7. Configure and deploy the default storage class
EKS defaults to using EBS storage class gp2 by default. We have a couple of issues here, namely as noted above we can’t use the snapshot capability, but more importantly PPDM does not support gp2. Therefore we need to create a new Storage Class and make this the default class. By default, the aws ebs csi driver leverages gp3, which of course is more feature rich, flexible and performant.
We now have got to the point whereby, we have a fully functional EKS environment, backed by persistent native EBS block storage. In part 3 of this series we will:
deploy a sample application ( don’t expect too much, far from a developer am I !!!. Plan is just to populate a new namespace for the purposes of a backup/restore demo).
Review what what we have already created/deployed in terms of Dell PPDM and Data Domain Virtual Edition. We have covered this extensively already in some previous posts, but we will recap.
Add our newly created EKS cluster as a Kubernetes Asset Source in Dell PPDM and complete the discovery process
Where to go for more info:
Thanks to Eli and Idan for their fantastic blogs on the subject on Dell Infohub. Infohub is a great technical resource btw.
DISCLAIMER The views expressed on this site are strictly my own and do not necessarily reflect the opinions or views of Dell Technologies. Please always check official documentation to verify technical information.
Protecting AWS EKS Container/Kubernetes workloads – Part 1 Introduction
In my last series of posts, we concentrated on setting up the backend AWS infrastructure and deploying PPDM with DDVE, both via the GUI and IAC ( Cloudformation, YAML etc.). So what next? Well we actually want to start protecting some workloads! That’s the whole reason I’m doing the blog.
Being in the cloud, what better workload to get started with than some cloud-native workloads. If like many, you are an AWS consumer, then you will most likely either using the Amazon managed Kubernetes service, Elastic Kubernetes Service (EKS), or will be considering using it in the future. To this end, I’m going to assume nothing and that we are all fresh to the topic, so we will start from the beginning, as if we are setting up a demo POC. You want to use EKS, but you have questions on how you provide a cost effective, efficient availability plan for your modern workloads. Of course that’s where Dell APEX Protection Storage (PPDM and DDVE) on AWS for EKS are a great match.
Standing up our demo AWS EKS Environment
So let’s get straight to it. The rest of this blog will step through the standup of a basic EKS environment. As per normal I have included a video demo of what we will discuss. I am going to use a mix of the command line ( ASW CLI, EKSCTL, KUBCTL) and the GUI. Of course we can execute a single EKSCTL command that will do everything in one go, but it’s nice to understand what we are actually doing under the hood.
Step1: Get your tools and documentation prepared.
I have leveraged the AWS documentation extensively here. It is clear, concise and easy to follow.
I am using AWS Cloudshell, usually I would use a Bastian host, but Cloudshell takes away much of the pain in ensuring that you have all the necessary tools installed. Find out more here:
We do need one other piece of software that isn’t included in the base Cloudshell setup. That is EKSCTL. Find out more at this link https://eksctl.io/ and installation guidance here https://eksctl.io/installation/. For convenience I have included the code here to deploy this tool on Cloudshell. Note the last line of the code snippet which moves EKSCTL to the local user BIN folder. This will make it persistent across reboot, unless of course you want to re-install every time you launch Cloudshell. I will also post on my Github
# for ARM systems, set ARCH to: `arm64`, `armv6` or `armv7`
ARCH=amd64
PLATFORM=$(uname -s)_$ARCH

curl -sLO "https://github.com/eksctl-io/eksctl/releases/latest/download/eksctl_$PLATFORM.tar.gz"

# (Optional) Verify checksum
curl -sL "https://github.com/eksctl-io/eksctl/releases/latest/download/eksctl_checksums.txt" | grep $PLATFORM | sha256sum --check

tar -xzf eksctl_$PLATFORM.tar.gz -C /tmp && rm eksctl_$PLATFORM.tar.gz

sudo mv /tmp/eksctl /usr/local/bin
Step 2 : Permissions, permissions and more permissions:
As with everything in AWS, you need to be authenticated and authorised to undertake pretty much everything. So if you aren’t the root user, make sure whoever has set you up as an IAM user has granted you enough permissions to undertake the task at hand. You can check your user identity on Cloudshell via the following command:
Step 3: Create a cluster IAM role and attach the required EKS IAM managed policy:
Kubernetes clusters managed by Amazon EKS make calls to other AWS services on your behalf to manage the resources that you use with the service. Permissions, permissions, permissions!
Create a file named geos-eks-cluster-role-trust-policy.json. I am using Notepad++ to create the file, but you could use any other editor. Add the following JSON code
Upload the file, using the ‘upload file’ feature in Cloudshell. I have shown this in the video
Cat to the file to make sure everything is ok
Create the IAM role using the following configuration. We will call the role Geos-EKSClusterRole ( Copy and Paste into the command line)
aws iam create-role \
  --role-name Geos-EKSClusterRole \
     --assume-role-policy-document file://"geos-eks-cluster-role-trust-policy.json"
Attach the managed policy to the role, again copy and paste directly into the command line
aws iam attach-role-policy \
  --policy-arn arn:aws:iam::aws:policy/AmazonEKSClusterPolicy \
  --role-name Geos-EKSClusterRole
Step 4: Deploy the EKS Control Plane using the GUI
This really is very straightforward, so just the video for guidance. For simplicity we will use defaults for everything. One thing to note is that it is a requirement to have a least two subnets spread across 2 availability Zones (AZ’s). This is to ensure EKS Kubernetes Control Plane redundancy, in the event you lose an AZ. Go grab Coffee or Tea, and come back in 15-20 minutes
Step 5: Configure kubectl to communicate with the EKS Control Plane
We now need to configure our Cloudshell to allow Kubectl talk to our newly created EKS Control Plane. Items in orange or variables, I have named my cluster geos-ppdm-eks, when i deployed via the GUI, in region eu-west-1
Step 6: Verify you can reach the Kubernetes EKS Control Plane
Using the kubectl get svc command you should be able to see the kubernetes cluster IP
[cloudshell-user@ip-10-2-2-8 ~]$ kubectl get svc

NAME         TYPE        CLUSTER-IP   EXTERNAL-IP   PORT(S)   AGE
kubernetes   ClusterIP   10.100.0.1   <none>        443/TCP   23m

[cloudshell-user@ip-10-2-2-8 ~]$
Step 7: Create an EC2 Instance IAM role and attach the required EC2 IAM managed policy:
Before we deploy our worker nodes, like we did with the EKS control plane, create an IAM role and attach an AWS managed IAM policy to it, to allow the EC2 instances to execute tasks on behalf of the control plane. the process is exactly the same
Create a file named geos-node-role-trust-policy.json using your editor of choice. The file should contain the following Json code. Upload to Cloudshell using the upload file feature, as shown in the video. Do a quick CAT to make sure that everything looks as it should.
Create the IAM role, by pasting the following into Cloudshell
aws iam create-role \
  --role-name GeosEKSNodeRole \
  --assume-role-policy-document file://"geos-node-role-trust-policy.json"
Attach the AWS Managed policies to the newly created role:
aws iam attach-role-policy \
  --policy-arn arn:aws:iam::aws:policy/AmazonEKSWorkerNodePolicy \
  --role-name GeosEKSNodeRole
aws iam attach-role-policy \
  --policy-arn arn:aws:iam::aws:policy/AmazonEC2ContainerRegistryReadOnly \
  --role-name GeosEKSNodeRole
aws iam attach-role-policy \
  --policy-arn arn:aws:iam::aws:policy/AmazonEKS_CNI_Policy \
  --role-name GeosEKSNodeRole
Step 8: Deploy the worker nodes on EC2
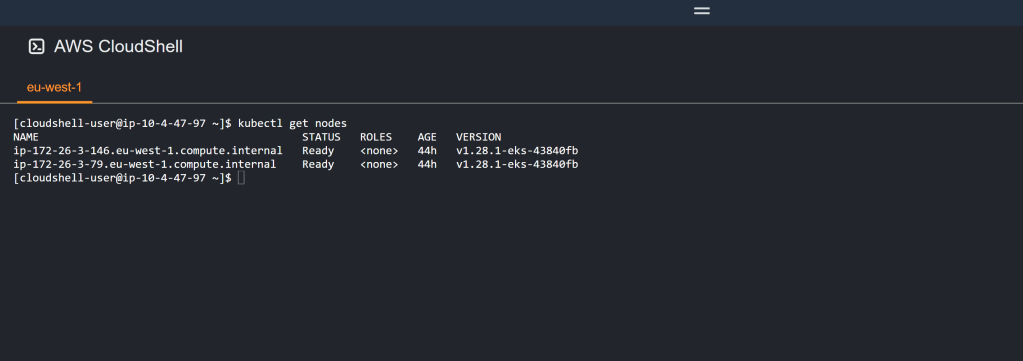
For this part we will again use the GUI. Follow the video demo, and choose the defaults. There are options to scale down the minimum amount of node active at one time and the the size/type of EC2 instance if you so wish. This process will take some time, so more tea/coffee is so required. once done execute the ‘kubectl get nodes’ following command in Cloudshell. If all is well you should see the following and we are in great shape.
Video Demo:
As mentioned rather than overbearing everybody with screenshots, I have run through the above process via video, using the same variables etc. So everything hopefully should be in context.
Coming Next:
Up next we will enable our cluster to work properly with Dell APEX PPDM. This involves installing som snapshotter updates and persistent container storage for AWS EBS storage. Stay tuned!
DISCLAIMER The views expressed on this site are strictly my own and do not necessarily reflect the opinions or views of Dell Technologies. Please always check official documentation to verify technical information.