Power Protect Data Manager Release 19.18 Highlights

Power Protect Data Manager 19.18 dropped earlier today. A fair bit to unpack but 3 main highlights for me. I hope to delve into more detail around these (especially around the exciting new anomaly detection feature) in future posts. In the meantime a quick overview:

1. NetApp as an explicit array type/NAS Asset Source

NetApp is added as an explicit array type that can be selected when adding a NAS asset source. This selection allows NetApp appliances to more easily integrate into NAS protection workflows.

This is pretty much hot off the press, but here is the link to the official NAS configuration guide where you can find more detail. You will need to register to view.

PowerProtect Data Manager 19.18 Network-Attached Storage User Guide

2. PowerMax Local Snapshot Management

Integrated PowerStore Snapshot Management allowing for the simple policy management for the creation and retention and deletion of array based snapshots has been available since PPDM release 19.14. Release 19.18, brings feature parity to the PowerMax array, and builds on the much tighter integration with PowerMax with Storage Direct introduced in Release 19.17. I blogged about this feature back in late July. Click here to view the blog on Storage Direct Protection.

Also check out the official documentation here:

Power Protect Data Manager PowerMax Administration Guide 19.18

Simple workflow integration:

Protection Policy executes on PPDM:

Snapshot created on remote PowerMax array:

3. Anomaly Detection

Last but not least, This is the new feature that was introduced as a Beta in 19.17, but now in Tech Preview in 19.18. ( Tech Preview basically means that it is officially released but not yet ready for full production use just yet). I have included a link below, where customers can send feature feedback .

Anomaly Detection generates reports based on unusual patterns in backup metadata that suggest possible security issues. Whilst enabling Anomaly Detection helps identify potential issues that may require further investigation, it does not replace antivirus, malware prevention, or endpoint detection and
response software. Ensure that you verify reported anomalies and maintain your existing security measures. ( Really just stating the obvious here… defense in depth and all that !)

Its worth noting that this feature adds an extra layer of security to data without adding any additional licensing or cost. Yep it’s included in the existing license.

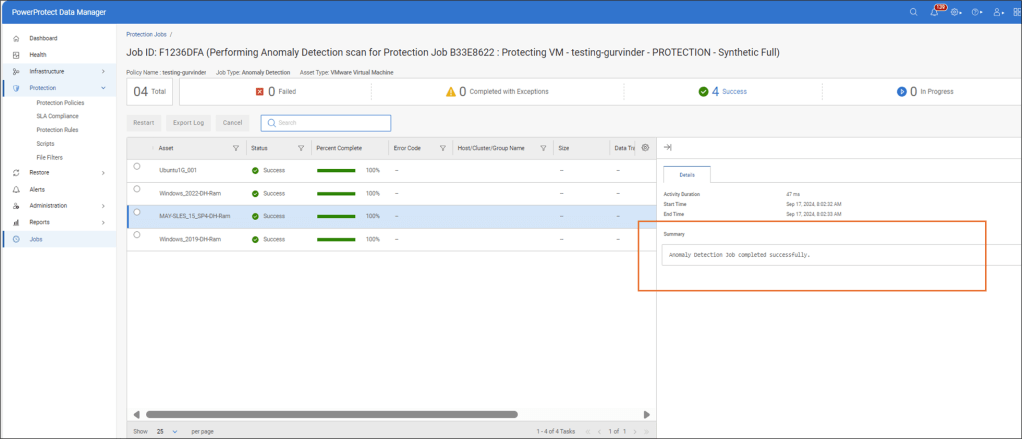
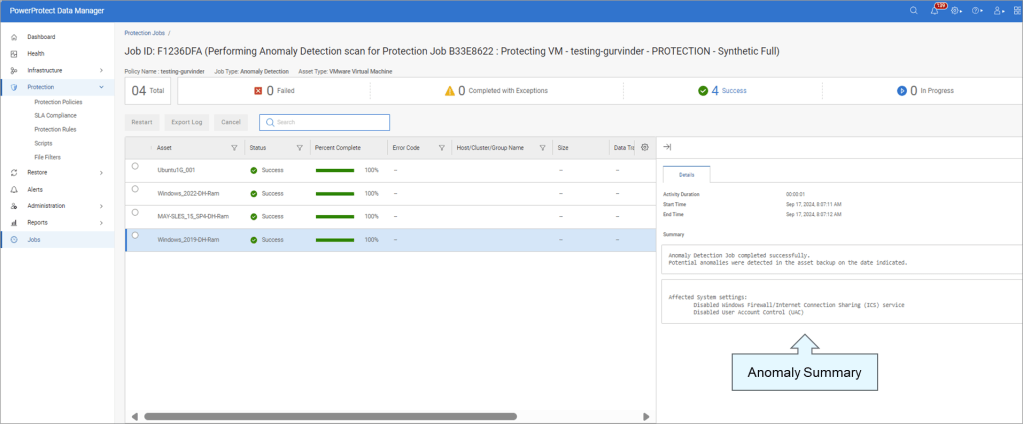
I’ve grabbed some screenshots from the latest release to give a ‘look and feel’ of this new functionality. As mentioned I will follow up with a more technically focused blog and demo.

Enabling Anomaly Detection within the Protection Policy Tab

Completed Job with no Anomaly Detected

Completed Job with Anomaly Detected

Jobs View with Anomaly Detected

Critical Alerts View

Anomaly Detection – Warning Alerts

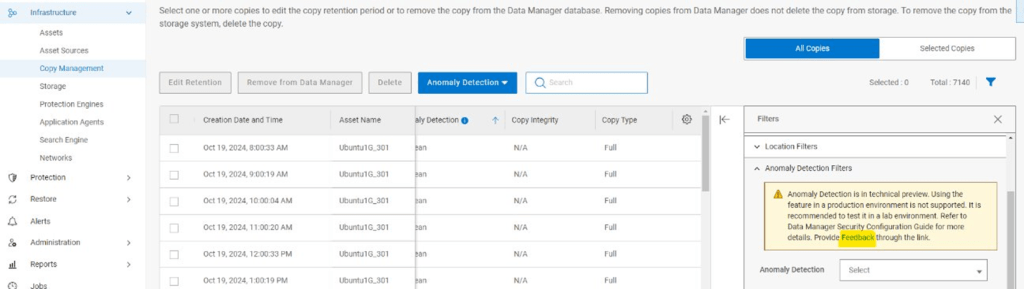
Copy Management View

Reporting View

Reports are available for download in case of suspicious copies.

Quarantine or Mark Copy Safe

Link to Provide Feature Feedback

As mentioned above, this feature is in Tech Preview. Please provide feedback via the following

Detail on feedback is also provided here in the Security Configuration guide.

Power Protect Data Manager 19.18 Security Configuration Guide

Lots of detail is included in Chapter 7 Anomaly Detection

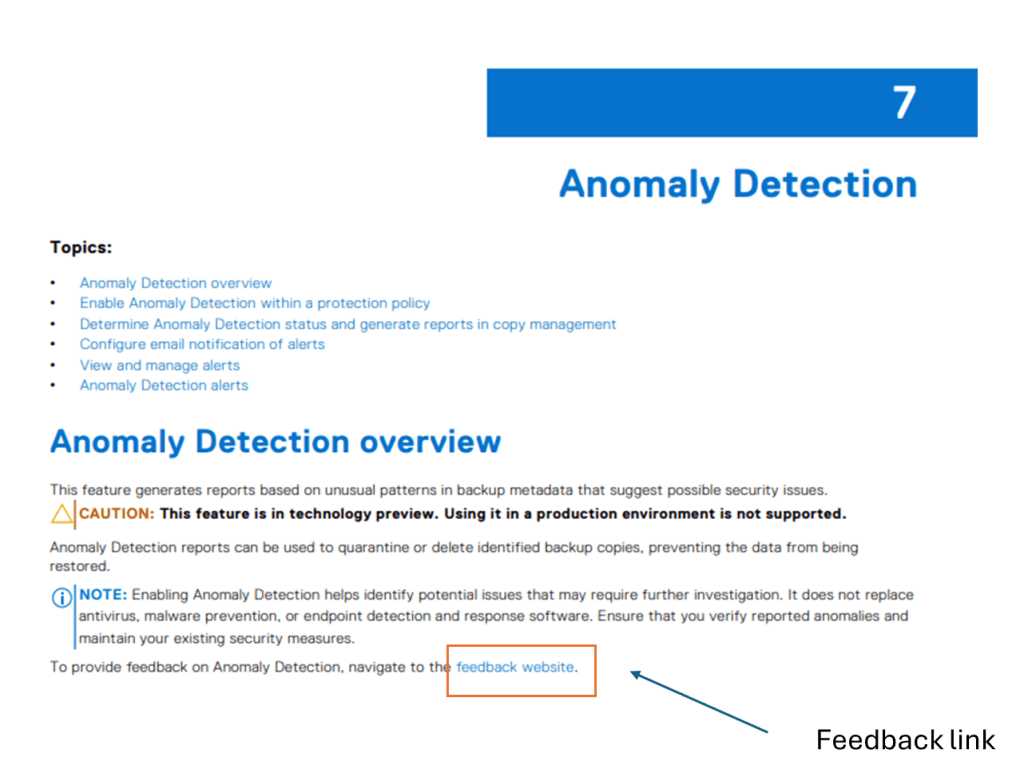
I admit the link is buried in the documentation. It can be located at the following: Note: I say this documentation set as it potentially is subject to change:

Link to Anomaly Detection Feedback Site

Other Links:

Main link to Dell Support Website for software downloads, release notes etc.

Dell Technologies Infohub for Power Protect related info.

Stay tuned for deeper dive into the exciting new Anomaly Detection feature in an upcoming post.

DISCLAIMER

The views expressed on this site are strictly my own and do not necessarily reflect the opinions or views of Dell Technologies. Please always check official documentation to verify technical information.

#IWORK4DELL

Introducing the new PowerProtect DD9910 and DD9410 with DDOS 8.0.0.10

The release of DD OS 8.0 (let’s call it that for short), late last month, was major release that introduced some significant security, cloud and manageability enhancements. I will unpack these in a little more detail in the following few posts. With this release however, Dell also introduced two brand new high-end Data Domain appliances based on the next-gen PowerEdge 16th Gen server platform.

The DD9910 and DD9410 are appliances positioned for larger Enterprises and commercial customers. The DD9410 starts at an entry level capacity of 192TBu and scales up to 768TBu when the appliance is at its max configuration, while the DD9910 starts at an entry level capacity of 576TBu and scales up to 1.5PBu respectively. These are direct replacements and enhancements to their predecessors, the DD9900 and DD9400.

PowerProtect Data Domain 9910 Front View and Dimensions

I’ll attach a link to the relevant datasheets at the end of this short post, but I thought it would be nice to take a little virtual tour of what the new platforms look like in the flesh. Everybody likes to get their hands on the hardware, so hopefully this will be the next best thing…..

PowerProtect Data Domain 9910 Slot/Port layout Rear View.

PowerProtect Data Domain 99XX internal view NVRAM and Battery Layout.

PowerProtect Data Domain 99xx internal view CPU/Memory.

As mentioned above, I will follow up over the next while with a a bit of a deeper dive into the both the software and hardware features of this release. In the meantime I have attached some handy links to official documentation/blogs etc. Note: To access these you may need a Dell partner/customer support logon.

Enjoy !

Itzik Reich’s Blog on the DDOS 8.0.0.10 release

PowerProtect Data Domain Public Landing Page on dell.com. Lots of useful sublinks from here.

PowerProtect Data Domain Data Sheet on dell.com

Link to 3D Demo.. This is nice!

Dell Data Protection infohub landing page. lots of publicly available information here.

Link to the Dell democenter. sign in required for the best experience. A great way to explore the platform in real life

Link to DD OS 8.0 Dell Support page. Logon required, but everything you need to know is here.

DISCLAIMER

The views expressed on this site are strictly my own and do not necessarily reflect the opinions or views of Dell Technologies. Please always check official documentation to verify technical information.

#IWORK4DELL

APEX Protection Storage for Public Cloud: Build your DDVE and PPDM Playground Part 2

Extended IAC YAML Script – Adds everything else to the recipe.

Short post this week.

My last blog post leveraged AWS CloudFormation and a YAML script to stand up the basic architecture required to deploy DDVE and PPDM in an AWS VPC. Link to post can be found here. As promised though, I have added a little bit more in order to make the process that bit easier when it comes to running through the DDVE/PPDM deployment process (More on that in upcoming future posts!)

The extended script can be found on Github. Please feel free to reuse, edit, plagiarise, or indeed provide some candid feedback (always welcome).

What this script adds.

  • Windows 2016 Bastion Host on T2.Micro Free Tier instance.
  • Security Group attached to Bastion host to allow RDP only from Internet
  • DDVE Security Group configured (will use when we deploy DDVE)
  • IAM Role and Policy configured to control DDVE access to S3 Bucket ( we will use when we deploy DDVE)
  • Outputs generated to include:
    • Public IP address for bastion host
    • Security Group name for DDVE
    • IAM Role ID
    • S3 Bucket Name

So all the base work has now been done, the next set of posts will get down to work in terms of deploying and configuring DDVE and PPDM. Stay tuned!

DISCLAIMER
The views expressed on this site are strictly my own and do not necessarily reflect the opinions or views of Dell Technologies. Please always check official documentation to verify technical information.

#IWORK4DELL

APEX Protection Storage for Public Cloud: Build your DDVE and PPDM Playground.

YAML Cloudformation Script for standing up the base AWS VPC architecture:

My last set of blogs concentrated around running through best practices and standing up the AWS infrastructure, so as to get to the point whereby we deployed DDVE in a private subnet, it was protected by a Security group, accessible via a Bastion host and the data path between it and its back end datastore was routed via an S3 VPC endpoint. Of course we leveraged the nicely packaged Dell Cloudformation YAML file to execute the Day 0 standup of DDVE.

Of course it would be great if we could leverage CloudFormation to automate the entire process, including the infrastructure setup. For a number of reasons:

  1. It’s just easier and repeatable etc, and we all love Infrastructure as Code (IAC).
  2. Some people just want to fast-forward to the exciting stuff… configuring DDVE, attaching PPDM etc. They don’t necessarily want to gets stuck in the weeds on the security and networking side of things.
  3. It makes the process of spinning up a POC or Demo so much easier.

Personally of course, I clearly have a preference for the security and network stuff, and I would happily stay in the weeds all day….. but I get it, we all have to move on….. So with that in mind……

What this template deploys:

After executing the script (I will show how in the video at the end), you will end up with the following:

  1. A VPC deployed in Region EU-West-1.
  2. 1 X Private Subnet and 1 X Public Subnet deployed in AZ1.
  3. 1 X Private Subnet and 1 X Public Subnet deployed in AZ2.
  4. Dedicated routing table attached to private subnets.
  5. Dedicated routing table attached to public subnets with a default route pointing to an Internet Gateway.
  6. An Internet Gateway associated to the VPC to allow external access.
  7. An S3 bucket, with a user input field to allocate a globally unique bucket name. This will be deployed in the same region that the CloudFormation template is executed in. Caution, choose the name wisely, if it isn’t unique the script will most likely fail.
  8. VPC S3 Endpoint to allow DDVE traffic from a private subnet reach the public interface of the S3 bucket.
  9. Preconfigured subnet CIDR and address space as per the diagram below. This can be changed by editing the script itself of course, or I could have added some variable inputs to allow do this, but I wanted to keep this as simple as possible.

Where to find the template:

The YAML file is probably a little too long to embed here, so I have uploaded to GitHub at the following link:

https://github.com/martinfhayes/cloudy/blob/main/AWSVPCfor%20DDVE.yml

Video Demo:

There a couple of ways to do this and we can execute directly form the CLI. In most instances though it may be just as easy to run it directly from the Cloudformation GUI. In the next post we will automate the deployment of the Bastion host, Security Groups etc. At that point we will demo how to run the CloudFormation IAC code direct from CLI.

Next up part 2, where we will automate the standup of a bastion host and associated security groups.

DISCLAIMER
The views expressed on this site are strictly my own and do not necessarily reflect the opinions or views of Dell Technologies. Please always check official documentation to verify technical information.

#IWORK4DELL

APEX Protection Storage for Public Cloud: DDVE on AWS End to End Installation Demo

Part 4: Automated Infrastructure as Code with AWS CloudFormation

The last in this series of blog posts. I’ll keep the written piece brief, given that the video is 24 minutes long. It passes quickly I promise! The original intent of this series was to examine how we build the security building blocks for a APEX Protection Storage DDVE deployment. Of course as it tuns out, at the end we get the bonus of actually automating the deployment of DDVE on AWS using Cloudformation

Quick Recap

Part 1: Policy Based Access Control to the S3 Object Store

Here we deep-dived into the the S3 Object store configuration, plus we created the AWS IAM policy and role which is used to allow DDVE securely access the S3 bucket, based on explicit permission based criteria.

Part 2: Private connectivity from DDVE to S3 leveraging VPC S3 Endpoints

In this post, we explored in depth the use of the AWS S3 endpoint feature, which allows us to securely deploy DDVE in a private subnet, yet allow it access to a publicly exposed service such as S3, without the need to traverse the public internet.

Part 3: Firewalling EC2 leveraging Security Groups

We examined the most fundamental component of network security in AWS, Security Groups. These control how traffic is allowed in and out of our EC2 instances and by default controlling the traffic that is allowed between instances. DDVE of course is deployed on EC2

What Next….

This post Part 4…will

  • Configure the VPC basic networking for the demo, including multiple AZ’s, public/private subnets and an Internet Gateway. So we will look something like the following: Note I greyed out the second VPC at the bottom diagram. Hold tough ! This is for another day. In the video we will concentrate on VPC1 (AZ1 and AZ2). Our DDVE appliance will be deployed in private subnet in VPC1/AZ2. Our Bastion host will be in the public subnet in VPC1/AZ1

  • Deploy and configure a windows based Bastian or Jump host, so that we can manage our private environment from the outside.
  • Configure and deploy the following:
    • S3 Object store
    • IAM Policy and Role for DDVE access to the S3 policy store
    • S3 Endpoint to allow access to S3 from a private subnet
    • Security Group to protect the DDVE EC2 appliance.
  • Finally, install Dell APEX Protection Storage for AWS (DDVE) direct from the AWS Marketplace
  • The installation will be done using the native AWS Infrastructure as Code offering, Cloudformation

Anyway, as promised, less writing, more demo! Hopefully, the video will paint the picture. If you get stuck, then the other earlier posts should help in terms of more detail.

Up Next…

So that was the last in this particular series. We have got the point where we have DDVE spun up. Next up, we look at making things a bit real….by putting Apex Protection Storage to work.

DISCLAIMER
The views expressed on this site are strictly my own and do not necessarily reflect the opinions or views of Dell Technologies. Please always check official documentation to verify technical information.

#IWORK4DELL

APEX Protection Storage for Public Cloud: Securing the AWS Environment – Part 3

Firewalling EC2 leveraging Security Groups

Quick recap.

In Part 1 and Part 2 of this series we concentrated on the relationship between the DDVE software running on EC2 and its target datastore, S3. As with anything cloud based permissions and IAM play a critical role and then we delved into the techniques used to securely connect to S3 from a private subnet.

But what about some of the more traditional elements to infrastructure security within the environment? How do we firewall our critical assets at Layer 3 and Layer 4 (IP and Port level). The nuts and bolts, the first layer of defense.

Referring back to our original diagram again, we can see that we use a Security Group to provide that protection to the EC2 instance itself, to allow only the traffic necessary ingress/egress the DDVE appliance.

What are Security Groups?

Security Groups are possibly the most fundamental component of network security in AWS, controlling how traffic is allowed into or out of your EC2 instances, and by default controlling the traffic that is allowed between instances. They are stateful (more on that in a minute) and applied in both an inbound and outbound direction. In the spirit of blogging, let’s try and run through this with an example, focused on the DDVE Security Group configuration. We will implement this example in the video demo at the end of this post.

The above diagram is an excerpt of the Security Group we will create and attach to our EC2 instance. For clarity I have just included a couple of rules. In the video we will configure all of the required rules as per the Dell Technologies best practice ( disclaimer: as always though please refer to the latest documentation for the most up to date guidance). Anyway, the purpose here is to demonstrate how this actual works and how we apply the rules. Ports and IP addresses will always invariably change.

In the above we have our EC2 Instance that has a Security Group attached. We have two rule sets as standard:

  1. The Inbound ruleset is configured to allow traffic from our Bastian server over SSH (22) and HTTPS(443) to communicate with DDVE. We have also explicitly defined the source port of the Bastian host. We will need HTTPS access from the Bastian host in order to configure the GUI
  2. The Outbound ruleset is configured to allow traffic from our DDVE instance to communicate to our S3 bucket via REST API HTTPS(443). Note I have included the destination as the prefix list, that was created when we configured the S3 endpoint in the last post. Technically we could open up all HTTPS outbound traffic, but we should where possible be restrictive as possible based on the principle of least privilege.

A couple of points to note here:

  1. Security Groups are Stateful. If you send a request from your instance, that is allowed by the Outbound ruleset, the response for that request is allowed by default, regardless of the Inbound ruleset, and vice versa. In the above example when the Bastian host initiates a HTTPS session over 443, then the return traffic will be via an ephemeral random port (32768 and above). There is no need to configure a rule allowing this traffic outbound.
  2. Security Groups are always permissive with an implicit deny at the end. You can’t create rules that deny access. We can do this using another security tool, Access Control Lists
  3. Nested References. We can refer to other security groups as a security group source. We haven’t used this here, but it is especially useful if we want to avoid the creation of multiple rules, that make the configuration unwieldy.
  4. Can be attached to multiple instances. This is especially handy if I have multiple EC2 instances that require the same security treatment
  5. Security groups are at VPC level. They are local only to the VPC they were configured
  6. Not processed by EC2 instance or ENI. The Security Group rules are processed outside the EC2 instance in AWS. This is clearly important to prevent flooding or DoS attacks based on load. If traffic is denied, the EC2 instance will never see the traffic.
  7. Default Behavior. If you create a new security group and don’t add any rules then all inbound traffic is blocked by default and all outbound is allowed. I’ve been caught by this once or twice.

What about Network Access Control Lists (NACLS)?

So we aren’t going to use these in the video demo, but it is good to understand how they differ from and sometimes complement Security Groups.

The principle difference is that SG’s allow specific inbound and outbound traffic at the resource level, such as the EC2 instance. Network access control lists (NACLs), on the other hare applied at the subnet level. ACL’s allow you to create explicit deny rules and are stateless, versus SG’s which only allow permit rules and are stateful.

Using our previous example, what would happen if we tried to use an ACL instead of a Security Group to permit traffic from the Bastian server to the DDVE EC2 instance over Port 443 (HTTPS)? Because the ACL has no concept of ‘State’, it does not realise that the return traffic is in response to a request from the Bastian server. It can’t knit the the ‘state’ of the flow together. The result now of course is that we would need to create another ACL to permit the outbound traffic based on the high order ephemeral port range we discussed earlier. As you can imagine, this will get very complex, very quickly, if we have to write multiple outbound/inbound ACL rules to compensate for the lack of statefullness.

However…. remember SG’s have there own limitation. We cannot write deny rules. With ACL’s we can and this can be done at the subnet level. Which gives us the power to filter/block traffic at a very granular level. Using our example, consider a scenario whereby we notice a suspicious IP address sending over port 443 to our Bastian server (remember this is on a public subnet). Say this address is coming from source 5.5.5.5. With ACL’s we can write a simple deny rule at the subnet level to deny traffic from this source, yet till allow everything else configured with our security group.

Security Group Rule Configuration for AWS

So earlier in this post we identified a couple rules that we need for S3 access outbound, SSH/HTTPS access inbound etc. In the following video example we will configure some more to enable other common protocol interactions such as DD Boost/NFS, Replication, System Management etc. Of course, the usual caveat applies here, please refer to official Dell Technologies Product Documentation ( I’ll post a few links at the bottom of the post), for the most up to date best practice and guidance. The purpose of this post is to examine the ‘why’ and the ‘how’, the specific ‘what’ is always subject to change !

Outbound Sample Ruleset

Inbound Sample Ruleset

Video Demo

Short and sweet this time, we will dive straight into creating a Security Group with the inbound/outbound ruleset as defined above. In the next post, we will do a longer video, from which we will go through the complete process from start to finish. VPC setup, IAM configuration, S3 Endpoint standup, Security Group configuration all brought together using Infrastructure as Code (IAC) and CloudFormation!

Quick Links

As promised a couple of handy references. Note: You may need Dell customer/partner privilege to access some content . Next up the full process end to end……

APEX Storage for Public Cloud Landing Page

Dell Infohub Introduction to DDVE

AWS Security Group Guide

PowerProtect DDV on AWS 7.10 Installation and Administration Guide

DISCLAIMER
The views expressed on this site are strictly my own and do not necessarily reflect the opinions or views of Dell Technologies. Please always check official documentation to verify technical information.

#IWORK4DELL

APEX Protection Storage for Public Cloud: Securing the AWS Environment – Part 2

Private connectivity from DDVE to S3 leveraging VPC S3 Endpoints.

Where we are at ?

In Part 1 we talked about securing the relationship between the DDVE instance and the target S3 instance. This was a permissions based approach leveraging the very powerful native IAM features and key management capabilities of AWS. A very Zero-Trust approach, truth being told… always authenticate every API call, no implicit trust etc.

We have a little problem though, our IAM stuff won’t work yet, but the reason is by design. Referring back to our original diagram ( Forgive the rather crude mark up – but it serves a purpose). Before we do that, just a brief word on the format of this series. The first few will introduce concepts such as IAM, VPC endpoints, Security Groups etc. The last in the series, will tie everything together and we will run through a full deployment, leveraging CloudFormation. First things first however!

Public versus Private Subnets

The DDVE appliance is considered a back-end server. It should never be exposed directly to the internet, hence that is why it sits in a ‘Private Subnet’, as per the diagram. A private subnet is one that is internal to the VPC and has no logical route in or out of the environment. At most it can see all the other internal devices within its local VPC. The purpose of course is that this minimises the attack surface by not exposing these devices to the internet.

Of course we have the concept of a ‘Public Subnet’ also. Referring to the diagram you can see our ‘Bastion host’ (fancy name for a jump box), sitting in the public subnet. As its name implies, it is facing the public or internet. There are various ways we can achieve this leveraging IGW, NAT etc., that we won’t delve into here. Suffice to say our ‘Bastion Host’ can reach the internet and devices private to the VPC.

The above is somewhat simplistic, in that we can get much more granular in terms of reachability leveraging Security Groups and Access Control Lists (ACLs). You will see how we further lock down the attack surface of the DDVE appliance in the next post leveraging Security Groups. For now, we have enough to progress with the video example below.

So what’s the problem?

S3 is a publicly accessible, region based AWS offering. It is accessed via what is called a ‘Public Service Endpoint’. To reach this endpoint an EC2 device must have access to this ‘Public Service Endpoint’, external to its VPC. By definition Private Subnets have no way out of their VPC so S3 access will fail.

Possible Solutions

  1. Move the DDVE EC2 instance to the Public VPC.
    • I’ve included this as a possible option, clearly we won’t do this. Bad idea!
  2. Leverage a NAT gateway deployed in the Public Subnet.
    • This is a valid option in that the private address is ‘obscured’ by the NAT translation process. It’s IP address still remains private and not visible externally.
    • Traffic from the private subnet would be routed towards the NAT device residing in the Public subnet
    • Once in the public subnet, then it can reach the S3 Public Service Endpoint via a route through the VPC Internet Gateway (IGW).
    • It is important to note here that even though traffic destined for S3 Public Service Endpoint, traverses the Internet Gateway, it does not leave the AWS network. So there is no security implication in this regard.

Considerations around using NAT

So yes we have a solution… well kind of. You have two NAT options

  1. NAT Instance: Where you manage your own EC2 instance to host the NAT software. Technically you aren’t paying anything for the NAT service from AWS, but this is going to be complicated in terms of configuration, performance and lifecycle management. Even so, dependent on the throughput you require, you may need a beefy EC2 instance. This of course will be billed.
  2. AWS NAT Gateway. An AWS managed service, so complications around performance, configuration, and lifecycle management are offloaded to AWS. of course the issue now becomes cost. You will be charged for the privilege. The cost structure is based on throughput, processing and egress, so if you are shifting a lot of data, as you may well be, then the monthly cost may come as a bit of a surprise. Scalability shouldn’t be too much of a concern, a gateway can scale to 100Gbps, but who knows!

A Better Solution: Leveraging VPC Gateway Endpoints (A.K.A S3 Endpoint)

Thankfully, the requirement for private subnet connectivity to regional pan AWS services is well known use case. AWS have a solution called Gateway Endpoints, to allow internally routed access to services such as S3 and DynamoDB. Once deployed, traffic from your VPC to Amazon S3 or DynamoDB is routed to the gateway endpoint.

The process is really very straightforward and is essentially just a logical routing construct managed by AWS directly. When a Gateway endpoint is stood up, a route to the S3 service endpoint ( defined by a prefix list), via the assigned gateway, is inserted in the Private subnets routing table. We will see this in more detail via the video example. Suffice to say the construct has many other powerful security features baked in leveraging IAM etc., that we will discuss during a later post. In summary:

  • Endpoints allow you to connect to AWS services such as S3 using a Private network instead of the Public network. No need for IGW’s, NAT Gateways, NAT instances etc., Plus they are free!
  • Endpoint devices are logical entities that scale horizontally, are highly redundant/available and add no additional bandwidth overhead to your environment. No need to worry about Firewall throughput or packet per second processing rates.
  • There are two types of endpoints. The first we have discussed here, the Endpoint Gateway. The second, the Interface Endpoint which leverages PrivateLink and ENI’s, and for which there is charge. These are architected differently but add more functionality in terms of inter region/inter VPC connectivity etc. In most, if not all cases for DDVE to S3, the Endpoint Gateway will suffice.

Video Demo

In the video demo we will follow on from the last post.

  • VPC setup is already in place, including private and public subnets, internet gateways, S3 bucket and the S3 IAM policy we created in the previous post.
  • We will deploy a bastion host as per the diagram, apply the IAM policy and test connectivity to our S3 bucket. All going well this will work.
  • We will then deploy an EC2 instance to mirror the DDVE appliance in the private subnet, apply the same IAM policy and test connectivity to the same S3 bucket. This will of course fail as we have no connectivity to the service endpoint.
  • Finally we will deploy a VPC Endpoint Gateway for S3 and retest connectivity. Fingers crossed all should work!

Next Steps

The next post in the series will examine how we lock down the surface attack area of the DDVE appliance even further using Security Groups.

DISCLAIMER
The views expressed on this site are strictly my own and do not necessarily reflect the opinions or views of Dell Technologies. Please always check official documentation to verify technical information.

#IWORK4DELL

.

APEX Protection Storage: Securing the AWS Environment

Part 1: Policy Based Access Control to the S3 Object Store

APEX Protection storage is based on the industry leading PowerProtect DD Virtual Edition. Going forward Dell will leverage the new branding for the cloud based offer. In this series of technical blogs, we will look to explore how we can secure its implementation based on industry, Dell and AWS best practice. As ever this is only guidance only, and I will endeavor where possible to add publicly available reference links. If in doubt consult your Dell or Dell partner technical/sales resources!

Amazon Simple Storage Service (Amazon S3) is an object storage service offering industry-leading scalability, data availability, security, and performance. Customers of all sizes and industries can store and protect any amount of data for virtually any use case, such as data lakes, cloud-native applications, and mobile apps. Of course it is also the backend object datastore for PowerProtect DDVE/APEX Protection Storage. When both are paired together then customers can enjoy significant savings on their monthly AWS bills, due to the native deduplication capabilities of DDVE and the enhanced portability, flexibility and security capabilities of DDVE versus the standard cloud offering. Better together!

If you are familiar with S3 however, it can also be configured to be widely accessible and open to the internet ( although this is no longer the default behavior). Nonetheless, it is absolutely paramount that we take steps to implement security controls to limit access based on the ‘principle of least privilege’. In reality only DDVE should have access to the S3 datastore.

AWS have published a good set of guidelines on how to achieve this as a best practice white paper, available at the following link. https://docs.aws.amazon.com/AmazonS3/latest/userguide/security-best-practices.html. Dell have also published a good document which covers the subject available on infohub.

I thought it would be a good idea to step through some of these in practical terms, starting with the bedrock of how we control the implementation of the concept of ‘least privilege’, of course Identity and Access Management (IAM). I have a previous post here, that covers the broader topic of IAM in more detail. In future nuggets, I will cover some of the other controls we can use to protect the environment, including VPC endpoints, encrypted access, security groups and the VPC architecture.

The following schematic gives an overview of what a fully functional DDVE architecture will look like in AWS. The purpose of this blog is to provide an overview of the fundamental concept of how we control access from the DDVE appliance (EC2) to the target S3 bucket, leveraging the native IAM capabilities of the AWS cloud. The red line between both entities below.

What we are trying to achieve?

Referring to the above schematic (we will refer heavily to this in the next post also):

  • Logging into the AWS environment with enough user privileges to configure IAM policies. In this demo I have logged in as the ‘root’ user. Clearly we wouldn’t do that under normal circumstances.
  • Deploying an S3 bucket as a target for DDVE. In this instance we have done this as a first step. but it can be done after the fact either manually or via a Cloudformation template.
  • Configure an IAM Identity-Based policy to allow list, read, write to the ‘Resource’, the AWS S3 Bucket.
  • Configure an IAM role and attach to the EC2 instance. The role will reference the Identity-Based Policy we have configured in the previous step. An identity based policy attaches the policy to the ‘user’, in this scenario the user is EC2 instance running DDVE.

Step 1: Create S3 Bucket

  • Logon to AWS and navigate to S3 -> Create a bucket

In this instance I have created a bucket named ‘ddvedemo1’ in region eu-west-1. Note the bucket name as we will need this to configure the JSON based IAM policy.

Step 2: Create the IAM Identity-Based Policy

Navigate to Services -> All Services -> IAM. Ignore my lack of MFA for root user and access permissions for alarms etc… !!!! Click on policies under IAM resources.

Click on Create Policy on the next screen

In the Specify permissions page, we will want to create the policy using JSON. Click on the JSON tab and you will navigate to the ‘Specify permissions’ page.

In the policy editor, enter the following JSON code, using the S3 bucket name you have defined earlier.

Here is the code snippet:

{
     "Version": "2012-10-17",
     "Statement": [
         {
             "Effect": "Allow",
             "Action": [
                 "s3:ListBucket",
                 "s3:GetObject",
                 "s3:PutObject",
                 "s3:DeleteObject"
             ],
             "Resource": [
                 "arn:aws:s3:::ddvedemo1",
                 "arn:aws:s3:::ddvedemo1/*"
             ]
         }
     ]    
} 

Click next and navigate to the ‘Review and create’ tab. give your policy a meaningful name. I’m calling mine ‘ddveiampolicy’. its always a good idea to add a tag also. Click ‘Create Policy’

Congratulations you have just created a ‘customer managed’ IAM policy. Note the ‘AWS managed’ policies have the little AWS icon beside them.

Step 3: Create the Role for the EC2 Instance running DDVE

Next step is to create an IAM role and attach it to the EC2 instance. This is a relatively straightforward process as follows:

On the IAM pane, navigate to Roles -> Create Role

Select trusted entity type AWS Service EC2. Note the description, where it specifies that this option allows an EC2 instance to make calls to AWS services on your behalf. This is exactly what we are trying to achieve.

Click next to add permissions to the the new role. Here you will see the policy that we have created earlier. Select the policy ‘ddveiampolicy’ and click next.

Finally add a meaningful role name. You will need to remember this later on. I have called it ‘DDVES3’. Review the rest of the configuration and add a tag if you wish. Finalise by clicking ‘Create Role’

On the roles page you are now presented with the new role ‘DDVES3’. When we deploy the EC2 instance running DDVE, either via the Cloudformation template or indeed manually, we will then attach the IAM role.

Summing up and next steps:

So yes there are other ways of doing this even leveraging other IAM techniques. Attaching an IAM role to the instance however has some significant advantages in terms credential and access key management. When leveraging IAM roles, the EC2 instance talks directly to the metadata service to get temporary credentials for the role. EC2 then in turn, uses these temporary credentials to talk to services, such as S3. The benefits to this are pretty clear in terms of there being no need to maintain shared/secret keys and credentials on the server itself ( always a risk), and there is automatic credential rotation which is tunable. This further lessens the impact of any accidental credential loss/leak.

As for next steps, we will start to look at the VPC architecture itself and examine what tools and controls we can leverage to safeguard the environment further.

Introducing Dell PowerProtect Cyber Recovery 19.13 and Cybersense 8.2

Late last week, Dell dropped its newest release of its Cyber Recovery Management software, Dell PowerProtect Cyber Recovery 19.13. Here is the link to the latest set of release notes (note you will need a registered logon to access). A relatively short post from me this time but here are some of the key highlights:

Multilink Support between Vault DD and CyberSense

This is a quite a significant feature addition. For those customers with Cyber Recovery 19.13 paired with CyberSense 8.2, then for the first time you can leverage multiple links between CyberSense and the DataDomain system in the vault to improve CyberSense analysis performance, when the network is the bottleneck. I will follow up with a future blog post, in terms of how configuration will look like, upgrade options, routing implications, interaction with DDBoost and how that load balances flows for maximum utilisation, but for now, suffice to say it has been a much requested feature that is now available.

Other Enhancements

  • Users can now orchestrate an automated recovery with PowerProtect Data Manager within the AWS vault using AWS EBS snapshots. (Stay tuned for a future deep dive of the Cyber Recovery AWS architecture)
  • Analytics can be processed on Avamar and PowerProtect DP backups of Hyper-V workloads to ensure integrity of the data for recovery against cyberattacks.
  • Users can generate on-demand or scheduled job reports directly from the Cyber Recovery UI.
  • The new Vault application wizard allows users to add backup and analytic applications into the vault, such as CyberSense, Avamar, networker, PPDM amongst others.
  • Multiple Cyber Recovery vaults can be configured in the same AWS cloud region.
  • CyberSense dynamic license metering calculates the daily active data indexed for accurate licensing and renewals.   Automatically remove stale hosts from license capacity and simplified process and licensing to move/migrate the CyberSense server.
  • Simpler format for alerts and emails to comprehend statistics of analysed jobs with actionable capabilities.  Messages can now be sent to syslog that can include directories of suspect files after an attack.
  • UI Driven Recovery to alternate PPDD workflow, streamlining the ability to recover to an alternate PPDD and allowing the administrator to run multiple recoveries concurrently. 

Where to find more information:

Note: You may need to register in order to access some/all of the following content:

Power Protect Cyber Recovery 19.13 Releases Notes

CyberSense 8.2 User Interface Guide

Dell PowerProtect Cyber Recovery Public Landing Page

Power Protect Data Manager Public Landing Page

Power Protect Data Domain Appliance Public Landing Page

Power Protect Data Domain Virtual Edition Data Sheet

Dell Infohub for Cyber Recovery Portal

DISCLAIMER
The views expressed on this site are strictly my own and do not necessarily reflect the opinions or views of Dell Technologies. Please always check official documentation to verify technical information.

#IWORK4DELL

NIS 2: Regulating the Cyber Security of Critical Infrastructure across the EU

What is Directive (EU) 2022/2555 and why it matters?

Everybody should be aware of the White House Executive order (EO 14028) and the mandate to strengthen security across the federal landscape and by definition the enterprise. However, on this side of the pond, the EU in somewhat typically understated fashion have introduced their own set of directives, that are equally impactful in terms of depth and scope.

NIS 2 was published on the 27th December 2022 and EU Member States have until 17 October 2024 to adopt and publish the provisions necessary to comply with the Directive. A short runway in anybody’s language.

Note the first word in the title, ‘Directive’. This is not a recommendation, and holds comparable if not more weight within the EU, than the White House Executive Order does in the U.S.

There will be a significant widening of scope as to what organisations will be affected by the new directive, as compared to NIS1. Operators of services such utility providers, Data Centre service providers and public government services will be deemed “essential” at a centralised pan European level using the ‘size-cap’ rule. So once, you are deemed as a medium or large entity operating within the sector or providing services covered within the sector, you are bound by the regulation, no matter what member-state you reside in. Member states no longer have the wiggle room to determine what qualifies or doesn’t qualify, with one interesting exception, they can circumvent the size-cap rule to include smaller entities in the relevant sectors. So you have ‘wiggle room’ as long as it means regulating more versus less! Indeed, in some instances, size won’t matter and the ‘size-cap rule’ will not apply at all, once the service is deemed critically essential. e.g. public electronic communications.

Other critical sectors will be defined as ‘important’, such as the manufacture of certain key products and delivery of certain services e.g. Postal Services. They will be subject to less regulatory oversight than the “essential” category, but compliance will still be mandatory and the undertaking will still be significant.

So what areas does the directive cover, I will defer to a future post(s) to explore in a little more depth what this may mean, but Article 21 Paragraph 2 covers some of the following. I briefly flirted with the idea of quoting the entire “Paragraph 2” but I promised myself to keep this brief. Key message here is that this ‘Directive’ is all encompassing and far reaching, across both process, procedures and technical controls, I have highlighted/paraphrased just a few here, because they re-enforce much of what we have talked about in this blog series thus far:

Article 21 Paragraph 2 – Interesting Snippets

  • (c) Business Continuity, backup management, disaster recovery and crisis management.
  • (d) Supply Chain security, including the security-related aspects concerning the relationships between each entity and its direct suppliers and service providers.
  • (f) Policies and procedures regarding the use of cryptography and where appropriate encryption.
  • (j) The use of multi-factor authentication or continuous authentication solutions, secured voice, video and text communications and secured emergency communications systems within the entity, where appropriate.

Clearly (c) needs to be framed in response to the prevalence and ongoing negative impact of ransomware. This blog focused late last year on the Dell CR offering and there is much more to come in this regard over the next couple of months. Remembering of course the distinction between Business Continuity (BC) and traditional Disaster Recovery(DR), as many organisations are discovering to their cost after the ‘cyber breach’ fact. DR does not guarantee BC in the presence of a ransomware attack! We need guarantees around data immutability, cyber resilience and leverage vaulting technology if and where we can.

We have also touched in this blog around Dell Secure Software Development (SDL) processes and end to end secure supply chain. Here is the link back to the great session that my colleagues Shakita and Marshal did in December 2022, on the work Dell is doing around SBOM for instance. More on this broader topic in the future posts.

Finally, its hard read anything on this topic without being struck by the focus on policy, encryption, multi-factor/continuous authentication and network segmentation. Sounds very ‘Zero-Trustesque’, that’s because NIS2 shares many of the same principles and tenets. Indeed, I’ll finish with a direct quote from the directive introductory paragraph.

More to come……

Essential and important entities should adopt a wide range of basic cyber hygiene practices, such as zero-trust principles, software updates, device configuration, network segmentation, identity and access management or user awareness, organise training for their staff and raise awareness concerning cyber threats, phishing or social engineering techniques. Furthermore, those entities should evaluate their own cybersecurity capabilities and, where appropriate, pursue the integration of cybersecurity enhancing technologies, such as artificial intelligence or machine-learning systems to enhance their capabilities and the security of network and information systems.

DISCLAIMER
The views expressed on this site are strictly my own and do not necessarily reflect the opinions or views of Dell Technologies. Please always check official documentation to verify technical information.

#IWORK4DELL