APEX Protection Storage for Public Cloud: Securing the AWS Environment – Part 3

Firewalling EC2 leveraging Security Groups

Quick recap.

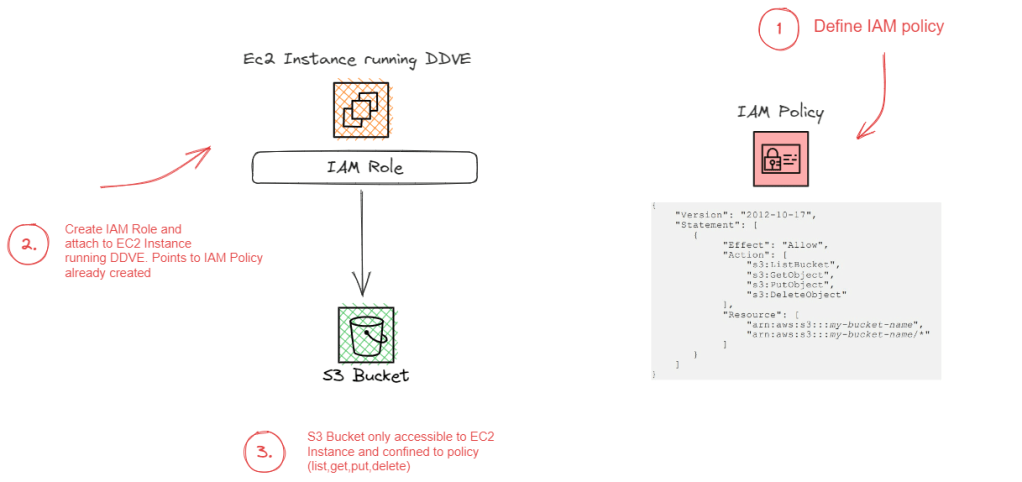
In Part 1 and Part 2 of this series we concentrated on the relationship between the DDVE software running on EC2 and its target datastore, S3. As with anything cloud based permissions and IAM play a critical role and then we delved into the techniques used to securely connect to S3 from a private subnet.

But what about some of the more traditional elements to infrastructure security within the environment? How do we firewall our critical assets at Layer 3 and Layer 4 (IP and Port level). The nuts and bolts, the first layer of defense.

Referring back to our original diagram again, we can see that we use a Security Group to provide that protection to the EC2 instance itself, to allow only the traffic necessary ingress/egress the DDVE appliance.

What are Security Groups?

Security Groups are possibly the most fundamental component of network security in AWS, controlling how traffic is allowed into or out of your EC2 instances, and by default controlling the traffic that is allowed between instances. They are stateful (more on that in a minute) and applied in both an inbound and outbound direction. In the spirit of blogging, let’s try and run through this with an example, focused on the DDVE Security Group configuration. We will implement this example in the video demo at the end of this post.

The above diagram is an excerpt of the Security Group we will create and attach to our EC2 instance. For clarity I have just included a couple of rules. In the video we will configure all of the required rules as per the Dell Technologies best practice ( disclaimer: as always though please refer to the latest documentation for the most up to date guidance). Anyway, the purpose here is to demonstrate how this actual works and how we apply the rules. Ports and IP addresses will always invariably change.

In the above we have our EC2 Instance that has a Security Group attached. We have two rule sets as standard:

  1. The Inbound ruleset is configured to allow traffic from our Bastian server over SSH (22) and HTTPS(443) to communicate with DDVE. We have also explicitly defined the source port of the Bastian host. We will need HTTPS access from the Bastian host in order to configure the GUI
  2. The Outbound ruleset is configured to allow traffic from our DDVE instance to communicate to our S3 bucket via REST API HTTPS(443). Note I have included the destination as the prefix list, that was created when we configured the S3 endpoint in the last post. Technically we could open up all HTTPS outbound traffic, but we should where possible be restrictive as possible based on the principle of least privilege.

A couple of points to note here:

  1. Security Groups are Stateful. If you send a request from your instance, that is allowed by the Outbound ruleset, the response for that request is allowed by default, regardless of the Inbound ruleset, and vice versa. In the above example when the Bastian host initiates a HTTPS session over 443, then the return traffic will be via an ephemeral random port (32768 and above). There is no need to configure a rule allowing this traffic outbound.
  2. Security Groups are always permissive with an implicit deny at the end. You can’t create rules that deny access. We can do this using another security tool, Access Control Lists
  3. Nested References. We can refer to other security groups as a security group source. We haven’t used this here, but it is especially useful if we want to avoid the creation of multiple rules, that make the configuration unwieldy.
  4. Can be attached to multiple instances. This is especially handy if I have multiple EC2 instances that require the same security treatment
  5. Security groups are at VPC level. They are local only to the VPC they were configured
  6. Not processed by EC2 instance or ENI. The Security Group rules are processed outside the EC2 instance in AWS. This is clearly important to prevent flooding or DoS attacks based on load. If traffic is denied, the EC2 instance will never see the traffic.
  7. Default Behavior. If you create a new security group and don’t add any rules then all inbound traffic is blocked by default and all outbound is allowed. I’ve been caught by this once or twice.

What about Network Access Control Lists (NACLS)?

So we aren’t going to use these in the video demo, but it is good to understand how they differ from and sometimes complement Security Groups.

The principle difference is that SG’s allow specific inbound and outbound traffic at the resource level, such as the EC2 instance. Network access control lists (NACLs), on the other hare applied at the subnet level. ACL’s allow you to create explicit deny rules and are stateless, versus SG’s which only allow permit rules and are stateful.

Using our previous example, what would happen if we tried to use an ACL instead of a Security Group to permit traffic from the Bastian server to the DDVE EC2 instance over Port 443 (HTTPS)? Because the ACL has no concept of ‘State’, it does not realise that the return traffic is in response to a request from the Bastian server. It can’t knit the the ‘state’ of the flow together. The result now of course is that we would need to create another ACL to permit the outbound traffic based on the high order ephemeral port range we discussed earlier. As you can imagine, this will get very complex, very quickly, if we have to write multiple outbound/inbound ACL rules to compensate for the lack of statefullness.

However…. remember SG’s have there own limitation. We cannot write deny rules. With ACL’s we can and this can be done at the subnet level. Which gives us the power to filter/block traffic at a very granular level. Using our example, consider a scenario whereby we notice a suspicious IP address sending over port 443 to our Bastian server (remember this is on a public subnet). Say this address is coming from source 5.5.5.5. With ACL’s we can write a simple deny rule at the subnet level to deny traffic from this source, yet till allow everything else configured with our security group.

Security Group Rule Configuration for AWS

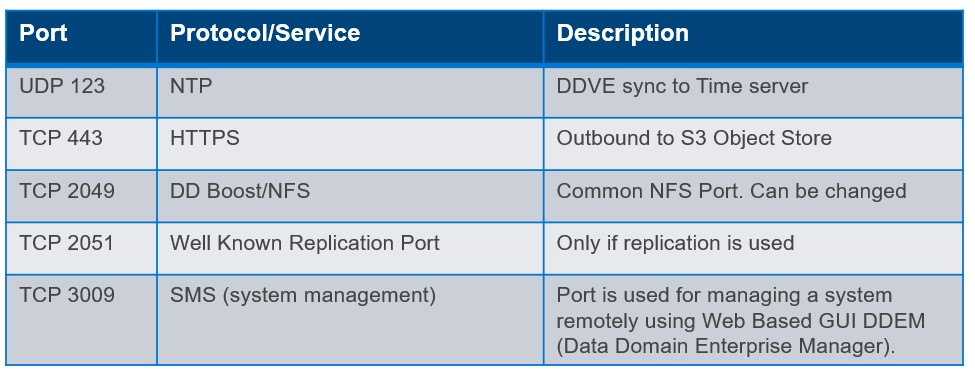
So earlier in this post we identified a couple rules that we need for S3 access outbound, SSH/HTTPS access inbound etc. In the following video example we will configure some more to enable other common protocol interactions such as DD Boost/NFS, Replication, System Management etc. Of course, the usual caveat applies here, please refer to official Dell Technologies Product Documentation ( I’ll post a few links at the bottom of the post), for the most up to date best practice and guidance. The purpose of this post is to examine the ‘why’ and the ‘how’, the specific ‘what’ is always subject to change !

Outbound Sample Ruleset

Inbound Sample Ruleset

Video Demo

Short and sweet this time, we will dive straight into creating a Security Group with the inbound/outbound ruleset as defined above. In the next post, we will do a longer video, from which we will go through the complete process from start to finish. VPC setup, IAM configuration, S3 Endpoint standup, Security Group configuration all brought together using Infrastructure as Code (IAC) and CloudFormation!

Quick Links

As promised a couple of handy references. Note: You may need Dell customer/partner privilege to access some content . Next up the full process end to end……

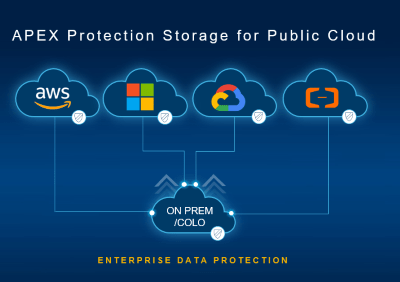
APEX Storage for Public Cloud Landing Page

Dell Infohub Introduction to DDVE

AWS Security Group Guide

PowerProtect DDV on AWS 7.10 Installation and Administration Guide

DISCLAIMER
The views expressed on this site are strictly my own and do not necessarily reflect the opinions or views of Dell Technologies. Please always check official documentation to verify technical information.

#IWORK4DELL

APEX Protection Storage for Public Cloud: Securing the AWS Environment – Part 2

Private connectivity from DDVE to S3 leveraging VPC S3 Endpoints.

Where we are at ?

In Part 1 we talked about securing the relationship between the DDVE instance and the target S3 instance. This was a permissions based approach leveraging the very powerful native IAM features and key management capabilities of AWS. A very Zero-Trust approach, truth being told… always authenticate every API call, no implicit trust etc.

We have a little problem though, our IAM stuff won’t work yet, but the reason is by design. Referring back to our original diagram ( Forgive the rather crude mark up – but it serves a purpose). Before we do that, just a brief word on the format of this series. The first few will introduce concepts such as IAM, VPC endpoints, Security Groups etc. The last in the series, will tie everything together and we will run through a full deployment, leveraging CloudFormation. First things first however!

Public versus Private Subnets

The DDVE appliance is considered a back-end server. It should never be exposed directly to the internet, hence that is why it sits in a ‘Private Subnet’, as per the diagram. A private subnet is one that is internal to the VPC and has no logical route in or out of the environment. At most it can see all the other internal devices within its local VPC. The purpose of course is that this minimises the attack surface by not exposing these devices to the internet.

Of course we have the concept of a ‘Public Subnet’ also. Referring to the diagram you can see our ‘Bastion host’ (fancy name for a jump box), sitting in the public subnet. As its name implies, it is facing the public or internet. There are various ways we can achieve this leveraging IGW, NAT etc., that we won’t delve into here. Suffice to say our ‘Bastion Host’ can reach the internet and devices private to the VPC.

The above is somewhat simplistic, in that we can get much more granular in terms of reachability leveraging Security Groups and Access Control Lists (ACLs). You will see how we further lock down the attack surface of the DDVE appliance in the next post leveraging Security Groups. For now, we have enough to progress with the video example below.

So what’s the problem?

S3 is a publicly accessible, region based AWS offering. It is accessed via what is called a ‘Public Service Endpoint’. To reach this endpoint an EC2 device must have access to this ‘Public Service Endpoint’, external to its VPC. By definition Private Subnets have no way out of their VPC so S3 access will fail.

Possible Solutions

  1. Move the DDVE EC2 instance to the Public VPC.
    • I’ve included this as a possible option, clearly we won’t do this. Bad idea!
  2. Leverage a NAT gateway deployed in the Public Subnet.
    • This is a valid option in that the private address is ‘obscured’ by the NAT translation process. It’s IP address still remains private and not visible externally.
    • Traffic from the private subnet would be routed towards the NAT device residing in the Public subnet
    • Once in the public subnet, then it can reach the S3 Public Service Endpoint via a route through the VPC Internet Gateway (IGW).
    • It is important to note here that even though traffic destined for S3 Public Service Endpoint, traverses the Internet Gateway, it does not leave the AWS network. So there is no security implication in this regard.

Considerations around using NAT

So yes we have a solution… well kind of. You have two NAT options

  1. NAT Instance: Where you manage your own EC2 instance to host the NAT software. Technically you aren’t paying anything for the NAT service from AWS, but this is going to be complicated in terms of configuration, performance and lifecycle management. Even so, dependent on the throughput you require, you may need a beefy EC2 instance. This of course will be billed.
  2. AWS NAT Gateway. An AWS managed service, so complications around performance, configuration, and lifecycle management are offloaded to AWS. of course the issue now becomes cost. You will be charged for the privilege. The cost structure is based on throughput, processing and egress, so if you are shifting a lot of data, as you may well be, then the monthly cost may come as a bit of a surprise. Scalability shouldn’t be too much of a concern, a gateway can scale to 100Gbps, but who knows!

A Better Solution: Leveraging VPC Gateway Endpoints (A.K.A S3 Endpoint)

Thankfully, the requirement for private subnet connectivity to regional pan AWS services is well known use case. AWS have a solution called Gateway Endpoints, to allow internally routed access to services such as S3 and DynamoDB. Once deployed, traffic from your VPC to Amazon S3 or DynamoDB is routed to the gateway endpoint.

The process is really very straightforward and is essentially just a logical routing construct managed by AWS directly. When a Gateway endpoint is stood up, a route to the S3 service endpoint ( defined by a prefix list), via the assigned gateway, is inserted in the Private subnets routing table. We will see this in more detail via the video example. Suffice to say the construct has many other powerful security features baked in leveraging IAM etc., that we will discuss during a later post. In summary:

  • Endpoints allow you to connect to AWS services such as S3 using a Private network instead of the Public network. No need for IGW’s, NAT Gateways, NAT instances etc., Plus they are free!
  • Endpoint devices are logical entities that scale horizontally, are highly redundant/available and add no additional bandwidth overhead to your environment. No need to worry about Firewall throughput or packet per second processing rates.
  • There are two types of endpoints. The first we have discussed here, the Endpoint Gateway. The second, the Interface Endpoint which leverages PrivateLink and ENI’s, and for which there is charge. These are architected differently but add more functionality in terms of inter region/inter VPC connectivity etc. In most, if not all cases for DDVE to S3, the Endpoint Gateway will suffice.

Video Demo

In the video demo we will follow on from the last post.

  • VPC setup is already in place, including private and public subnets, internet gateways, S3 bucket and the S3 IAM policy we created in the previous post.
  • We will deploy a bastion host as per the diagram, apply the IAM policy and test connectivity to our S3 bucket. All going well this will work.
  • We will then deploy an EC2 instance to mirror the DDVE appliance in the private subnet, apply the same IAM policy and test connectivity to the same S3 bucket. This will of course fail as we have no connectivity to the service endpoint.
  • Finally we will deploy a VPC Endpoint Gateway for S3 and retest connectivity. Fingers crossed all should work!

Next Steps

The next post in the series will examine how we lock down the surface attack area of the DDVE appliance even further using Security Groups.

DISCLAIMER
The views expressed on this site are strictly my own and do not necessarily reflect the opinions or views of Dell Technologies. Please always check official documentation to verify technical information.

#IWORK4DELL

.

APEX Protection Storage: Securing the AWS Environment

Part 1: Policy Based Access Control to the S3 Object Store

APEX Protection storage is based on the industry leading PowerProtect DD Virtual Edition. Going forward Dell will leverage the new branding for the cloud based offer. In this series of technical blogs, we will look to explore how we can secure its implementation based on industry, Dell and AWS best practice. As ever this is only guidance only, and I will endeavor where possible to add publicly available reference links. If in doubt consult your Dell or Dell partner technical/sales resources!

Amazon Simple Storage Service (Amazon S3) is an object storage service offering industry-leading scalability, data availability, security, and performance. Customers of all sizes and industries can store and protect any amount of data for virtually any use case, such as data lakes, cloud-native applications, and mobile apps. Of course it is also the backend object datastore for PowerProtect DDVE/APEX Protection Storage. When both are paired together then customers can enjoy significant savings on their monthly AWS bills, due to the native deduplication capabilities of DDVE and the enhanced portability, flexibility and security capabilities of DDVE versus the standard cloud offering. Better together!

If you are familiar with S3 however, it can also be configured to be widely accessible and open to the internet ( although this is no longer the default behavior). Nonetheless, it is absolutely paramount that we take steps to implement security controls to limit access based on the ‘principle of least privilege’. In reality only DDVE should have access to the S3 datastore.

AWS have published a good set of guidelines on how to achieve this as a best practice white paper, available at the following link. https://docs.aws.amazon.com/AmazonS3/latest/userguide/security-best-practices.html. Dell have also published a good document which covers the subject available on infohub.

I thought it would be a good idea to step through some of these in practical terms, starting with the bedrock of how we control the implementation of the concept of ‘least privilege’, of course Identity and Access Management (IAM). I have a previous post here, that covers the broader topic of IAM in more detail. In future nuggets, I will cover some of the other controls we can use to protect the environment, including VPC endpoints, encrypted access, security groups and the VPC architecture.

The following schematic gives an overview of what a fully functional DDVE architecture will look like in AWS. The purpose of this blog is to provide an overview of the fundamental concept of how we control access from the DDVE appliance (EC2) to the target S3 bucket, leveraging the native IAM capabilities of the AWS cloud. The red line between both entities below.

What we are trying to achieve?

Referring to the above schematic (we will refer heavily to this in the next post also):

  • Logging into the AWS environment with enough user privileges to configure IAM policies. In this demo I have logged in as the ‘root’ user. Clearly we wouldn’t do that under normal circumstances.
  • Deploying an S3 bucket as a target for DDVE. In this instance we have done this as a first step. but it can be done after the fact either manually or via a Cloudformation template.
  • Configure an IAM Identity-Based policy to allow list, read, write to the ‘Resource’, the AWS S3 Bucket.
  • Configure an IAM role and attach to the EC2 instance. The role will reference the Identity-Based Policy we have configured in the previous step. An identity based policy attaches the policy to the ‘user’, in this scenario the user is EC2 instance running DDVE.

Step 1: Create S3 Bucket

  • Logon to AWS and navigate to S3 -> Create a bucket

In this instance I have created a bucket named ‘ddvedemo1’ in region eu-west-1. Note the bucket name as we will need this to configure the JSON based IAM policy.

Step 2: Create the IAM Identity-Based Policy

Navigate to Services -> All Services -> IAM. Ignore my lack of MFA for root user and access permissions for alarms etc… !!!! Click on policies under IAM resources.

Click on Create Policy on the next screen

In the Specify permissions page, we will want to create the policy using JSON. Click on the JSON tab and you will navigate to the ‘Specify permissions’ page.

In the policy editor, enter the following JSON code, using the S3 bucket name you have defined earlier.

Here is the code snippet:

{
     "Version": "2012-10-17",
     "Statement": [
         {
             "Effect": "Allow",
             "Action": [
                 "s3:ListBucket",
                 "s3:GetObject",
                 "s3:PutObject",
                 "s3:DeleteObject"
             ],
             "Resource": [
                 "arn:aws:s3:::ddvedemo1",
                 "arn:aws:s3:::ddvedemo1/*"
             ]
         }
     ]    
} 

Click next and navigate to the ‘Review and create’ tab. give your policy a meaningful name. I’m calling mine ‘ddveiampolicy’. its always a good idea to add a tag also. Click ‘Create Policy’

Congratulations you have just created a ‘customer managed’ IAM policy. Note the ‘AWS managed’ policies have the little AWS icon beside them.

Step 3: Create the Role for the EC2 Instance running DDVE

Next step is to create an IAM role and attach it to the EC2 instance. This is a relatively straightforward process as follows:

On the IAM pane, navigate to Roles -> Create Role

Select trusted entity type AWS Service EC2. Note the description, where it specifies that this option allows an EC2 instance to make calls to AWS services on your behalf. This is exactly what we are trying to achieve.

Click next to add permissions to the the new role. Here you will see the policy that we have created earlier. Select the policy ‘ddveiampolicy’ and click next.

Finally add a meaningful role name. You will need to remember this later on. I have called it ‘DDVES3’. Review the rest of the configuration and add a tag if you wish. Finalise by clicking ‘Create Role’

On the roles page you are now presented with the new role ‘DDVES3’. When we deploy the EC2 instance running DDVE, either via the Cloudformation template or indeed manually, we will then attach the IAM role.

Summing up and next steps:

So yes there are other ways of doing this even leveraging other IAM techniques. Attaching an IAM role to the instance however has some significant advantages in terms credential and access key management. When leveraging IAM roles, the EC2 instance talks directly to the metadata service to get temporary credentials for the role. EC2 then in turn, uses these temporary credentials to talk to services, such as S3. The benefits to this are pretty clear in terms of there being no need to maintain shared/secret keys and credentials on the server itself ( always a risk), and there is automatic credential rotation which is tunable. This further lessens the impact of any accidental credential loss/leak.

As for next steps, we will start to look at the VPC architecture itself and examine what tools and controls we can leverage to safeguard the environment further.

Boxes and Lines: Whiteboard Nugget 1 Dell Trusted Infrastructure

Introducing the ‘Boxes and Lines’ Whiteboard Nugget Series

I’ve been spending a lot more time in the office recently and naturally I’m tending to bump into colleagues and fellow team members in the corridor ( I know maybe I should be spending more time at my desk!). Interestingly enough however, if we do get into a conversation around infrastructure security, which is quite often, then nobody has the time to digest a verbalised version of ‘PowerPoint Martin’.

More often that not, they are looking for a quick explainer of what a particular feature/function is and in what context does it sit within the ‘Big Picture’. Upon reflection, in a world pre-pandemic, this is something I used to do all the time in my role as a ‘technologist’. Sure, we still need to delve deep into the architecture every now and again, as I have and will continue to do in this blog around Zero Trust, Cyber Resilience and the NIST Framework in particular. However, most people I deal with tend to be pretty industry and tech savvy, and readily understand the big picture, or the ‘why’. Like my ‘corridor friends’ they are really looking to understand quickly the ‘what’ and the ‘how’ with a large dash of ‘brevity’ on the side.

Still, in pre-pandemic reflection mode, I was thinking how I had done this before? Anybody who knows me, will have just virtually ‘rolled their eyes’ in anticipation of the answer. I like to draw, scribble, more often than not scrawl, ‘boxes and lines’ on a whiteboard, to articulate the ‘how’. So there you have it, the purpose and title of this blog within a blog. My firm commitment, that I will adhere to unwaveringly, is that there will be no PowerPoint, not even a screengrab. If I can’t scribble it on a whiteboard and talk about it for 5-10 minutes then it won’t be here…..

So where to begin? Apologies I am going to do exactly what I said I wouldn’t do…. a brief nugget on the big picture. I’ll forgive myself on this occasion as context is important for future ‘nuggets’ in the series. So what is the Dell Trusted Infrastructure?

Very broadly… brevity is beautiful as they say. Dell Trusted Infrastructure’ is propped up by three key pillars.

  • Protect Data and Systems:
    • Data at Rest Encryption (D@RE), Safe BIOS, RBAC/MFA, Tamper proof secure Logging and Auditing, Automated compliance monitoring, Hardware Root of Trust, secure boot chain of trust, digitally signed secure updates etc. The list is pretty long
  • Enhance Cyber Resilience:
    • So here we have not just the product platform focus around Power Protect Cyber Recovery and the other CR based platforms but also some other offerings and features across the portfolio that help detect threats before they happen. For example AI/ML based storage monitoring and anomaly detection. CloudIQ Cybersecurity is a key offering underpinning this pillar, as well as the next
  • Overcome Security Complexity:
    • Advanced Services, partner integrations, CloudIQ, Storage and Security Automation etc.

All three pillars transcend the Dell portfolio offering from Storage, Server, HCI, Data Protection and Networking. Ultimately underpinned by industry standards, frameworks and recommended best practices such as the NIST Cyber Security Framework , with a keen eye on Zero Trust as the emerging industry wide security North Star.

Phew, That was pretty brief and hopefully to the point. Clearly there is an awful lot of great innovation going on within each of the pillars. The next post in ‘Boxes and Lines’ series will dig into into a little deeper into and intrinsic feature or two within the ‘Protect Data and Systems’ pillar perhaps.

Stay tuned…..

DISCLAIMER
The views expressed on this site are strictly my own and do not necessarily reflect the opinions or views of Dell Technologies. Please always check official documentation to verify technical information.

#IWORK4DELL