Introducing Dell PowerProtect Cyber Recovery Part 2 – Setting up the Production Side (DDVE)

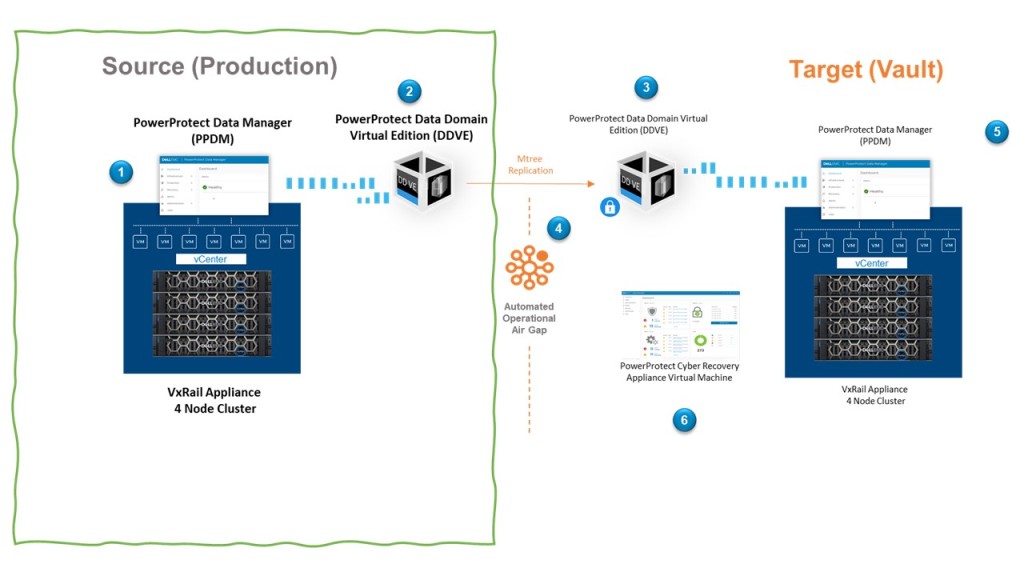
Last week we overviewed the big picture (Diagram Below), and very briefly discussed the end to end flow (Steps 1 through 6) During this post we will start to break this up into consumable chunks and digest in a little more detail. Whether you are deploying the Cyber Recovery solution in one fell swoop or you have already have a data protection architecture leveraging Dell Power Data Protect Manager with Data Domain and you are investigating attaching the vault as a Day 2 activity, then hopefully you will find this post of interest.

Production Side

This post will concentrate on part of the ‘Big Curvy Green Box’ or the left side of the diagram. I am leveraging a VxRail with an embedded vCenter, for a couple of reasons a) I’m lucky to have one in my lab and b) it’s incredibly easy. This has been pre-deployed in my environment. Obviously, if you are following this blog, you can use any host/vCenter combination of your choosing.

This post will focus on how we stand up the Data Domain Virtual Edition appliance, with a view to leveraging this for the Cyber Recovery use-case only. Health Warning – this is for demo purposes only and we will absolutely not be making any claims with regards to best practices or the suitability of this setup for other use-cases. In the spirit of blogging, the goal here is to build our understanding of the concepts.

We will follow up next week to overview the basic setup of PPDM in the Production side and how it integrates with vSphere vCenter and the PowerProtect DDVE appliance.

Sample Bill of Materials Production Side

I’ve been careful here to call out the word sample. This is what I have used for this blog post, of course in production we need to revert to the official interoperability documentation. Just stating the obvious…. :).That being said this is what I have used in my setup.

  • VMware ESXi Version 7.0.3 (Build 19898904)
  • VMware vCenter Server 7.0.3 00500
  • Dell PowerProtect Data Manager 19.11.0-14
  • Dell PowerProtect DD VE 7.9.0.10-1016575

Prerequisites

As per the diagram I’m running this on 4 node VxRail cluster, so my TOR switches are setup properly, everything is routing nicely etc. The VxRail setup also configures my cluster fully with a VSAN Datastore deployed, vMotion, DRS, HA, and a Production VDS.

This won’t come as surprise but the following are critical:

  • Synchronised Time everywhere leveraging an NTP server
  • DNS Forward and Reverse lookup everywhere.

In some instances during installation you may be given the option to deploy devices, objects etc., leveraging IP addresses only. My experience with that approach isn’t great so DNS and NTP everywhere are your friend.

Assumptions

As per my previous post, I’m going to attempt brevity and to be as concise as possible. For partners/Dell employees reading this, then you will have access to more of the in-depth guidance. I urge everybody to familiarise themselves with the documentation if possible.

I’ll publish an ‘end to end’ configuration/demo video at the end of this series. In the interim I like using the ‘Gallery’ and ‘Images’ so readers can pause and review in their own time.

Some Lower Level Detail

The following is the low-level setup, which should help guide through the screengrabs.

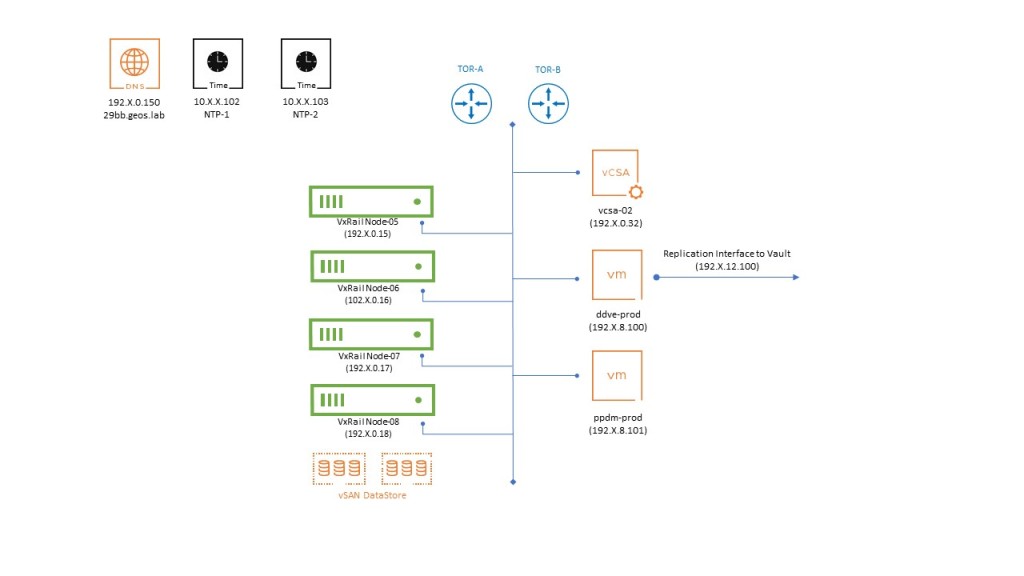
This is all very straightforward. We have:

  • Our 4 VxRail Nodes with a vSAN Datastore pre-built.
  • Embedded VxRail vCenter server pre-deployed on the first host.
  • VMware Virtual Distributed Switch (VDS) with ESXi Management, vMOTION and a couple of other networks provisioned.
  • Routing pre-configured on two Dell TOR switches. Some very basic routing between:
    • The internal VxRail networks (Management, vMotion, and some other Managment networks we have provisioned)
    • Reachability to the Vault network via a Replication interface (More on that in a while)
    • Reachability to the IP services layer (DNS & Redundant NTP servers)
  • DNS forward and reverse lookup configured and verified for all components.

Step 1: Deploy PowerProtect DDVE

First step is to download the PowerProtect DDVE OVA from the Dell Data Domain Virtual Edition support site (you will need to register). Here you will also have access to all the official implementation documentation. As ever I urge you to refer to this, as I will skip through much of the detail here. I’m making the bold assumption we know how to deploy OVF’s etc. We will capture the process as mentioned in the wrap up video.

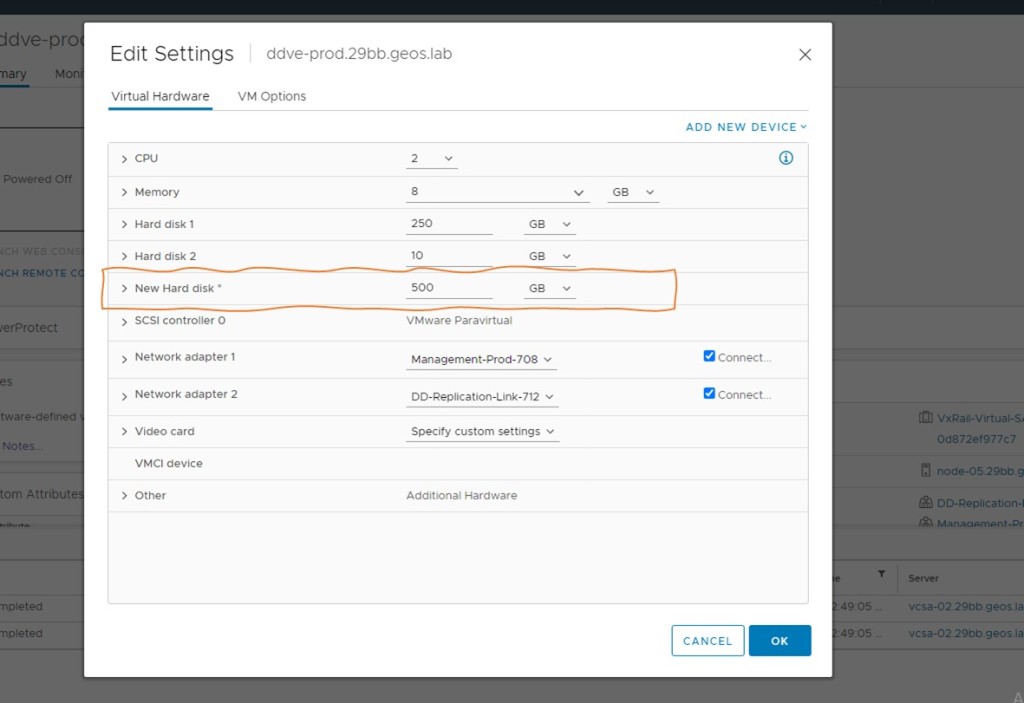
During the OVA setup you will be asked what configuration size you wish. This is a demo so go for the smallest 8TB -2CPUs, 8GB Memory.

The OVA setup will also ask you to select the destination networks for each source network or NIC. This is important as we will leverage the first for the ‘Management network’ and the second as the ‘Replication Network’ as per the previous diagram. In my setup I am using VLAN 708 for Management and VLAN 712 for the DD Replication Network.

Skip through the rest of the OVA deployment. We will deploy on the default VSAN datastore and inherit that storage policy. Of course we have everything else deployed here also, which clearly isn’t best practice but this is of course a demo!

Once the OVA has deployed successfully, do not power on just yet. We need to add target storage for replication. You can get by with circa 250GB, but I’m going to add 500GB as the 3rd hard disk. Right click in the VM, Edit Settings and ‘Add New Device’.

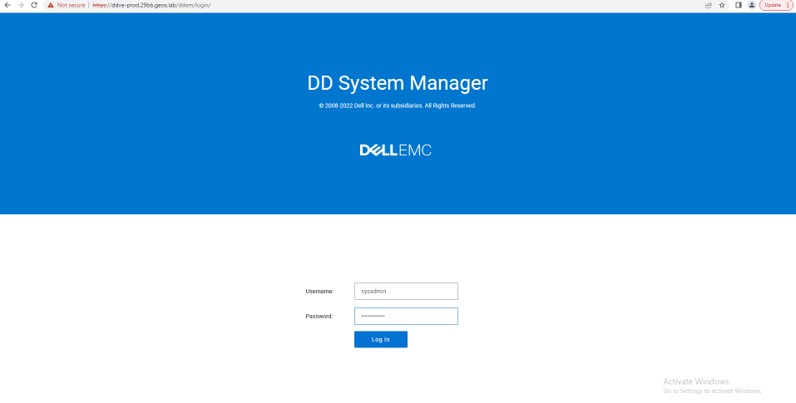
At this point you can power on the VM, open the web console and wait. It will take some time for the VM to initialise and boot. once booted you will be prompted to logon. Use the default combination of sysadmin/changme (you will be immediately prompted to change the password)

By default, the management NIC will look for an IP address via DHCP. If you have a DHCP service running, then you can browse to the IP address and run the setup from there. Of course in most instances, this won’t be the case and we will assign IP addresses manually. I’m going to be a little ‘old skool’ in any regard, I like the CLI.

  • Tab through the E-EULA and enter your new password combination, my demo will use Password123!. Incredibly secure I know.
  • Answer ‘Yes’ when asked to create a security officer. pick a username, I am using ‘crso’. the password needs to be different from your newly created sysadmin password.
  • Answer ‘no’ when prompted to use the GUI.
  • Answer ‘yes’ when asked to configure the network.
  • Answer ‘no’ when asked to use DHCP.
  • Follow the rest as prompted:
    • Hostname – your full FQDN
    • Domainname
    • ethV0 (used for Management)
    • eth V1 (we will use for replication to the vault)
    • Default Gateway (will be the gateway of ethV0)
    • IPv6 – Skip this by hitting return
    • DNS Servers
  • You will be presented with the summary configuration, if all good then ‘Save’.
  • When prompted to configure e-licenses, type ‘no’. we will be using the fully functioning 90 day trial
  • When prompted to ‘Configure System at this time’ – type ‘no’
  • You will then be presented with a message, ‘configuration complete’

Step 2: Initial Configuration of DDVE

Now browse to the DDVE appliance via the FQDN you have assigned. This should work if everything is setup correctly.

Logon using sysadmin and the password you created earlier.

You will be presented with a screen similar to the following. At this point we have no file system configured.

Note: There is a 6 step wizard we could have initiated earlier, but for for the purposes of the Cyber Recovery Demo, it is helpful to get a ‘look and feel’ of the DDVE interface from the start. This is just my preference.

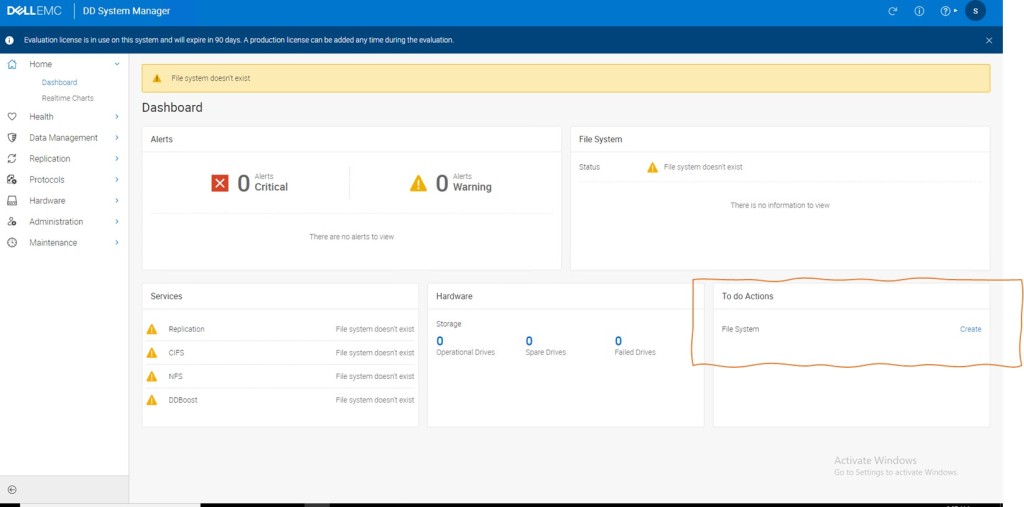
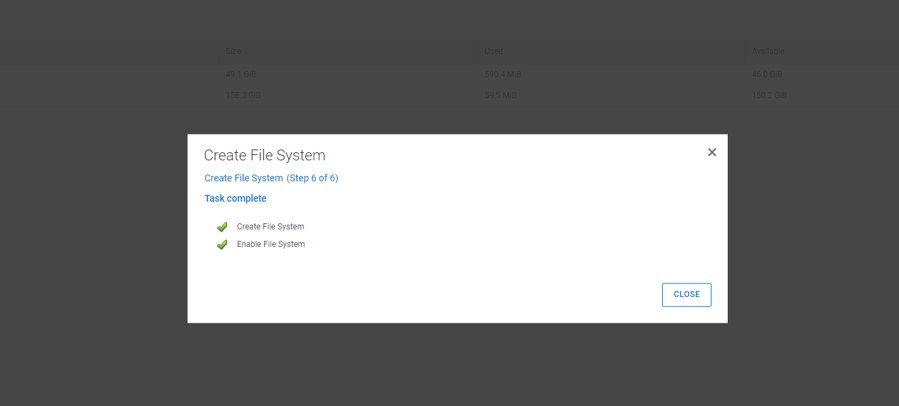
Follow the wizard on screen to create the file system, when presented with the ‘cloud tier’ warning, click next and ignore. Click ‘SKIP ASSESMENT’ in step 4, and then click ‘Finish’. Step 6 will take some time process.

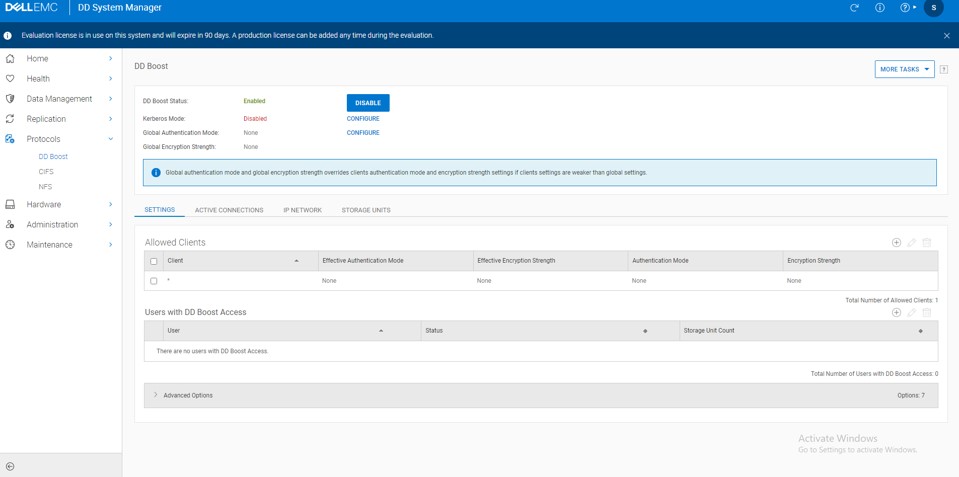
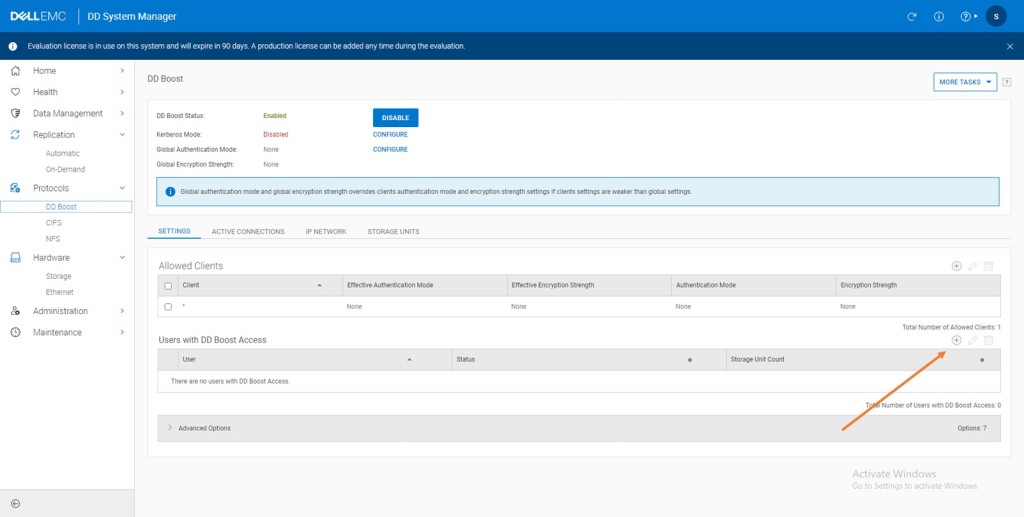
Enable DD Boost and Add User

We need to enable the DD Boost Protocol to make the deduplication process as efficient as possible and implement client side offload capability. We will see where that fits in during a future post.

Navigate to Protocols -> DD Boost and Click Enable

We want to add DD Boost user with Admin rights. Firstly create the user by navigating to Administration -> Access -> Local Users -> Create

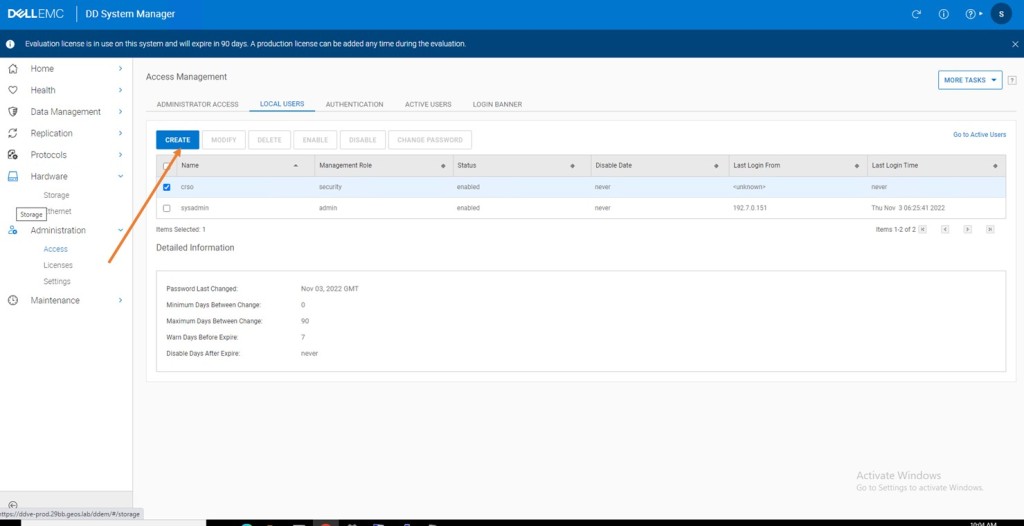
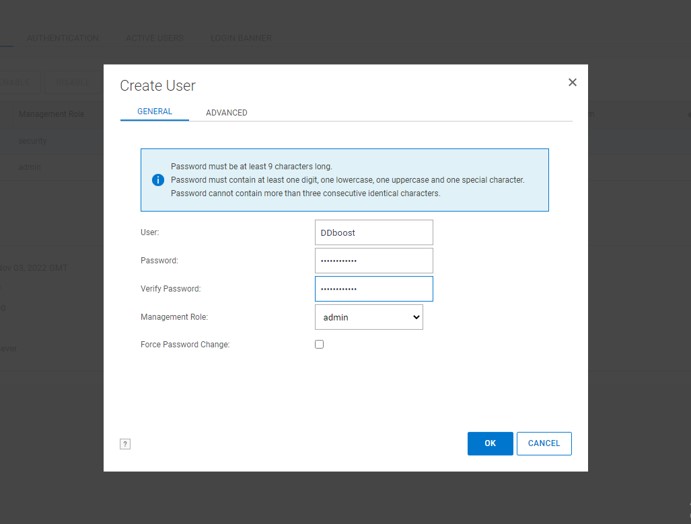
Add this newly created user as a user with DD Boost Access. Follow the workflow and ignore the warning that this user has Admin access.

Wrap Up

So there you have it, a quick overview of our demo environment and we have stood up the Production side DDVE appliance, with a very basic configuration. In the next post we will stand up the production side PowerProtect Data Manager and knit these two components with vCenter.

As mentioned earlier I have skimmed through quite a bit of detail here in terms of the setup. The end goal is for us to dig deeper into our understanding of the Cyber recovery solution proper. So the above is no way representative of best practice as regards DDVE design (the DD storage is on the same VSAN Datastore that the DDVE VM and the machines it protects reside upon for instance ! Definitely not best practice).

For best practice always always refer to Dell official documentation

Thanks for taking the time to read this, and if you have any questions/comments, then please let me know

Cheers

Martin

DISCLAIMER
The views expressed on this site are strictly my own and do not necessarily reflect the opinions or views of Dell Technologies. Please always check official documentation to verify technical information.

#IWORK4DELL

Introducing Dell PowerProtect Cyber Recovery – Architecture Basics – A Practical Example

Vault 101 – Simple Questions, Simple Answers

We all suffer from terminology/lingo/jargon overload when discussing something new and multi-faceted, especially in the information security space. I am all too often guilty of venturing far too easily into the verbose depths…… In this instance however, I’m going to try and consciously keep this introductory post as high level as possible and to stick to the fundamentals. For sure I will likely miss something along the way, but we can fill in the blanks over time.

Brevity is beautiful….

To that end, this post will concentrate on providing simple concise answers to the following questions.

  1. What do we need in order to create an operational Vault?
  2. How do we close and lock the door in the ‘vault’?
  3. How do we move data into the vault, and use that data to re-instantiate critical applications?

This implies, we will not discuss some very key concepts such as the following.

  • Are we sure the Data hasn’t changed during the process of placing the ‘Data’ into the Vault? (Immutability)
  • Tools and processes to guarantee immutability?
  • Who moved the Data and were they permitted to do so, what happened? (AAA, RBAC, IAM)
  • How fast and efficiently we moved the ‘Data’ to make sure the ‘Vault’ door isn’t open for too long (Deduplication, Throughput)
  • Where is the ‘Source’ and where is the ‘Vault’? (Cloud, On-Premise, Remote, Local). How many vaults do we have?

Of course, in the real world these are absolutely paramount and top of mind when discussing technical and architectural capability. Rest assured we will revisit these topics in detail along with where everything fits within the NIST and COBIT frameworks in later posts.

What do we need in order create an operational ‘Vault’?

Let’s start with a pretty common real-world example. A customer running mixed workloads on a VMware infrastructure. Of course, they have a Dell VxRail cluster deployed!

In the spirit of keeping this as simple as possible, the following represents the logical setup flow:

  1. We need some mechanism to backup our Virtual Machines (VM’s) that are deployed on the vSphere cluster. We have a couple of choices; in this instance we will leverage Dell PowerProtect Data Manager. We have others such as Avamar and Networker, that we will explore in a later post, but PPDM is a great fit for protecting VMware based workloads.
  2. PowerProtect Data Manager (PPDM) does the backup orchestration, but it needs to store the data somewhere. This is where Dell PowerProtect Data Domain enters the fray. This platform comes in all shapes and sizes, but again for this VMware use case, the virtual edition, Dell PowerProtect DD Virtual Edition (DDVE) is a good option
  3. We need to get the Data into the ‘Vault’. We do this by pairing the Production DDVE with a DDVE that physically sits on a server in the Vault. The vault could of course be anywhere, in the next aisle, in the cloud. At this point, there is no need to get into too much detail around how they are connected, other than to say there is a ‘network’ that connects them. What we do with this network is a key component of the vaulting process. More on that in a while.
  4. Once we pair the DDVE appliances across the network, we create an MTree replication pair using the DDOS software. We’ll see this in action in a future post. The replication software copies the data from the source DDVE appliance to the Vault DDVE appliance. Power Protect Cyber Recovery will leverage these MTree pairs to initiate replication between the production side and the Vault.
  5. We will deploy another PowerProtect Data Manager in the vault, this will be available on the vault network but left in an unconfigured state. It will be added as an ‘application asset’ to the Cyber Recovery appliance. Power Protect Cyber Recovery will leverage an automated workflow to configure the vault PPDM when a data recovery workflow is initiated.
  6. Once we have the basic infrastructure setup as above, then we deploy the PowerProtect Cyber Recovery software in the vault. We will deploy this on the VxRail appliance. During setup, the Cyber Recovery appliance is allocated storage ‘Assets’, a mandatory asset is the DDVE

So, there you go, a fully functional Cyber Recovery Vault leveraging software only. Of course, when we talk about scale and performance, then the benefits of the physical Data Domain appliances will begin to resonate more. But for now, we have an answer to the first question.

Of course, the answer to the second question we posed is key…….

How do we close the vault and lock the door?

This part is fairly straightforward as the Cyber Recovery software automates the process. Once the storage asset is added to Cyber Recovery and a replication policy is enabled then the vault will automatically lock. Don’t worry we will examine what the replication policy looks like and how we add a storage asset in a future post.

Of course, I still didn’t answer the question. In short, the process is fairly straightforward. As mentioned earlier, I skipped over the importance of ‘network’ connectivity between the ‘Production’ side DDVE and the ‘Vault Side’ DDVE above.

Remembering that the Cyber Recovery software now controls the Vault side DDVE appliance (asset) then:

  1. When a Policy action (such as SYNC) is initiated by Cyber Recovery, then the software administratively opens the replication interface on the DDVE appliance. This allows the Data Domain software to perform the MTree replication between the Production Side and Vault.
  2. When the Policy action is complete, then the Cyber Recovery software closes the vault by administratively shutting down the replication interface on the vault side DDVE appliance.
  3. The default state is admin down. or locked.

This is in essence the logic behind the ‘Operational Airgap’. Again, we will dig into this in more depth in a future post, but for now I’m going to move on to the third question. Brevity is beautiful!

How do we use a copy of the ‘Data’ in the vault if required to re-instantiate a business function and/or application?

The cyber recovery software is a policy driven UI which includes:

  • Policy creation wizards allowing for point in time and scheduled execution of tasks replication and copy tasks.
  • Recovery assistance with the ability to easily recover data to the recovery host(s). e.g., VxRail cluster in our example.
  • Automated recovery capability for products such as Networker, Avamar and PowerProtect Data Manager. For example, using point-in-time (PIT) copies to rehydrate PPDM data in the Cyber Recovery Vault.

We have skipped over this last question to an extent, but I think it is deserving of its own post. For example, we will cover in depth how we leverage PPDM in the Vault to re-hydrate an application or set of VM’s

Up next

Hopefully you will find this useful. Clearly the subject is much more extensive, broader and deeper than what we have described thus far. The intent though was to start off with a practical example of how we can make the subject ‘real’. How does this work at a very basic architectural level using a common real-world example? Keeping it brief(ish) and keeping it simple…. we will add much more detail as we go.

Stay tuned for my next post in the series, which will cover how we stand up the Production side

DISCLAIMER
The views expressed on this site are strictly my own and do not necessarily reflect the opinions or views of Dell Technologies. Please always check official documentation to verify technical information.

#IWORK4DELL

Blog Post Zero: A Framework for Cyber Resilience 101

I’m sure at this stage that everybody is very much aware of the increased threat of ransomware based cyber-attack, and the importance of cyber security. To that end, and to the relief of all, I’m going to pleasantly surprise everybody up front, by not quoting Gartner or IDC. I think we are past having to have the industry analysts reaffirm what we already know. This is the here and now.

That said, I think it is important to call out one important emerging trend. Organisations in every industry are moving from a ‘threat prevention strategy’ to a more rounded ‘cyber resilience model’ for a holistic approach to Cyber Security. Bottom line, your organisation will be the subject of an attack. Hopefully, your threat prevention controls will be enough, alas I suspect not, and increasingly there is a tacit acceptance that prevention will never be 100% successful. This creates a problem.

More and more, the question is not ‘how did you let it happen?’ but rather ‘what did you do about it?’ All too often, even the largest organisations have struggled with an answer to the latter and have panicked in the eye of the cyber storm… too late of course at that point. Damage done or worse damage still being done whilst we look on like a helpless bystander, desperately seeking coping strategies to manage our reputation and minimise loss.

Damage limitation whilst the damage is still happening, is not a good place to be.

We are in ‘coping’ mode and certainly not in control. Again, we all know of high visibility examples of ransomware cyber-attacks, where ‘hoping for the best but expecting the worst’ are the order of the day. Fingers crossed or more accurately in the dam…

How do we shift the dial from ‘Cope and Hope’ to ‘Resilience and Control’?

Thankfully we have some very mature methodologies/frameworks that can help us develop a cohesive plan and strategy to take back control.  The ‘Five Functions’ as defined by the NIST Cybersecurity Framework is an example of a methodology which helps us both frame the problem and define a resilient solution. Perhaps a cohesive response to ‘what did you do about it?’……

Organisations need the tools and capability to ‘Detect’, ‘Respond’ and ‘Recover’ from an attack, mitigating the damage and assure data integrity to restore business function and reputation. 

NIST, focusses on restorative outcomes. It’s inferred that the cybersecurity instances will happen, it’s what you do about it that matters most. For example:

“Ensuring the organization implements Recovery Planning processes and procedures to restore systems and/or assets affected by cybersecurity incidents.”

Practical Steps towards NIST like outcome(s).

Dell PowerProtect Cyber Recovery is one such solution that aids in the implementation of not only the ‘Respond’ pillar but also of course ‘Detect’ and ‘Recover’.  Over the coming weeks, we will delve into what this means in practical terms.

Properly implemented, the adoption of a cohesive framework such as NIST, together with well-structured policies and controls, help to shift the dial towards us taking back resilient control and away from the chaos of ‘cope and hope’.

However, as somebody very famous once said, “there is nothing known as ‘perfect’. It’s only those imperfections which we choose not to see”. Or more accurately that we can’t see yet. So clearly an effective cyber resilient architecture must constantly evolve and be flexible enough to respond to future threats not yet defined. This is why the fluidity offered by framework such as NIST is so useful.

There are other exciting developments on the way, that will further shift the balance away from the bad actors, such as Zero Trust and Zero Trust Architectures. (These fit nicely into the Identity and Protect pillars) This blog series will look to deep dive into these areas in the coming months also.

This will not be a marketing blog however, there are way better people at that than I. I’ll happily leverage their official work where necessary (Citation via Hyperlinks are my friend!). The intent is that this will be a practical and technical series, with the goal to peel back the layers, remove the jargon where possible and provide practical examples of how Dell Technologies products and services, amongst others and our partners can help meet the challenges outlined above. (Disclosure & Disclaimer: Even though I work for Dell, all opinions here are my own and do not necessarily represent those of Dell, you’ll see me repeat that quite a bit !!)

What is a Resilient Architecture?

To conclude, we should think of a Resilient Architecture as an entity that is adaptive to its surroundings. It is impermeable to the natural, accidental or intentional disasters it may have to face in its locale/environs.

Resilient Architectures are not new, we have been building Data Centers for decades in high-risk environments such as earthquake zones and flood plains, where we expect failure and disaster. It will happen. Death and Taxes and all that….

Our DC Storage, Compute and Network architectures have been resilient to such challenges for years, almost to the point where it is taken for granted.  This tree certainly is under stress, but is hasn’t blown down…

Unfortunately, the security domain, hasn’t quite followed in lockstep. It isn’t until relatively recently that it has begun to play catch up, previously wedded in the belief that we could prevent everything by building singular monolithic perimeters around the organization. Anything that got through the perimeter we could fix. Clearly, this is no longer the case.

The mandates around Zero Trust and Zero Trust architectures are acknowledgement that this approach must change, in lieu of the proliferation of the multi-cloud and ever more mobile workforce and the failure of organisations to deal with cybersecurity attacks in a resilient, controlled fashion that protected their assets, revenue, reputation and IP.

One thing is for sure, these challenges are not going away, the security threat landscape is becoming infinitely more complex and markedly more unforgiving. Thankfully, flexible, modular frameworks such as NIST and ZTA, in addition to emerging technical tools, controls and processes will allow us deliver architectures that are both secure but ultimately and more importantly resilient.

DISCLAIMER
The views expressed on this site are strictly my own and do not necessarily reflect the opinions or views of Dell Technologies. Please always check official documentation to verify technical information.

#IWORK4DELL

  1. Unknown's avatar
  2. Unknown's avatar
  3. Unknown's avatar
  4. Unknown's avatar
  5. Unknown's avatar