

In the previous post we set up a very basic EKS environment with 2 EC2 worker nodes. Before we deploy a real application on this cluster and back it up using PPDM and DDVE, we will need to install the Amazon EBS CSI Driver on the cluster and use it leverage Kubernetes Volume Snapshots and gp3 backed EBS storage.
Slight change, in the format of this post. Video demo will be first up. Use the commentary in the blog to follow along.
Why do I need a CSI driver?
In our environment we are using native AWS EBS as storage for our pods, containers and workload etc. In brief a CSI is a specification that allows a Kubernetes system to implement a standardised interface to interact with a back end storage system, such as EBS. The main purpose of CSI is storage abstraction, in other words it allows Kubernetes to work with any storage device/provider for which an interface driver is available, such as Dell and AWS. Technically, they reside outside the core Kubernetes code, and rather than use in-tree plug-ins to the base code, they use API’s to enable third party vendor hardware to work ‘with’ a Kubernetes deployment versus ‘In’ a Kubernetes deployment.
The emergence of CSI was a game changer in terms of rapidly getting storage enhancements into kubernetes, driven by API versus having to go through the arduous task of integrating ‘in-tree’. This is a deep conversation in its own right ( deserving of its own blog post), but for the purpose of this blog let’s just say we need the AWS EBS CSI Driver installed in our cluster to allow Amazon EKS to manage the lifecycle the attached EBS volumes, and provide key features such as storage persistence, volume management, PVC’s and snapshots.
Deploying the CSI Driver
The EBS CSI driver is deployed as a set of Kubernetes Pods. These pods must have the permissions to perform API operations, such as creating and deleting volumes, as well as attaching volumes to EC2 worker nodes in the cluster. At the risk of repeating myself, permissions, permissions, permissions !!
1. Create and configure the IAM role
We have a couple of ways to do this, either AWS CLI, eksctl or the management console itself. this time around we will use AWS CLI. We will use the same cluster details, names etc from the previous post. When doing this yourself, just replace the fields in Orange with your own variables. I am also using the Cloudshell for all tasks, as per the last post. Refer to the video at the top of the post, where we run through every step in the process. This should help knit everything together.
- Grab your cluster’s OIDC provider URL
aws eks describe-cluster --name geos-ppdm-eks --query "cluster.identity.oidc.issuer" --output text
- You should get an output similar to the below

- Grab your AWS account ID using the following command. Make note and copy this number. I won’t paste mine here for security reasons! but again we will demo in the video.
aws sts get-caller-identity --query "Account" --output text
- Using your editor of choice create and save the following Json file. We will call this geos-aws-ebs-csi-driver-trust-policy.json. Copy the following code into it, using whatever editor you choose, I am using Notepad++, and then using Cloudshell to upload the file, rather than trying to edit on the fly within the bash shell. ( I generally make mistakes!). Replace the following Orange fields with the following:
- 111122223333 with your account ID you garnered above.
- region.code with whatever region you deployed your EKS Cluster. Mine is ‘eu-west-1’. This will be available as part of the OIDC info you grabbed above also.
- EXAMPLED539D4633E53DE1B71EXAMPLE with the id from the OIDC output above.
{
  "Version": "2012-10-17",
  "Statement": [
    {
      "Effect": "Allow",
      "Principal": {
        "Federated": "arn:aws:iam::111122223333:oidc-provider/oidc.eks.region-code.amazonaws.com/id/EXAMPLED539D4633E53DE1B71EXAMPLE"
      },
      "Action": "sts:AssumeRoleWithWebIdentity",
      "Condition": {
        "StringEquals": {
          "oidc.eks.region-code.amazonaws.com/id/EXAMPLED539D4633E53DE1B71EXAMPLE:aud": "sts.amazonaws.com",
          "oidc.eks.region-code.amazonaws.com/id/EXAMPLED539D4633E53DE1B71EXAMPLE:sub": "system:serviceaccount:kube-system:ebs-csi-controller-sa"
        }
      }
    }
  ]
}- Create the IAM role. We will call it Geos_AmazonEKS_EBS_CSI_DriverRole
aws iam create-role \
  --role-name Geos_AmazonEKS_EBS_CSI_DriverRole \
  --assume-role-policy-document file://"geos-aws-ebs-csi-driver-trust-policy.json"
- Attach the AWS Managed policy to the role
aws iam attach-role-policy \
  --policy-arn arn:aws:iam::aws:policy/service-role/AmazonEBSCSIDriverPolicy \
  --role-name Geos_AmazonEKS_EBS_CSI_DriverRole
2. Configure the snapshot functionality of the EBS CSI Driver
We want to use the snapshot functionality of the CSI driver. The external snapshotter must be installed before the installation of the CSI add-on ( which will be covered in the next step). If you are interested there is a wealth of information here on the external-snapshotter capability. Paste the following code into your Cloudshell terminal
kubectl apply -f https://raw.githubusercontent.com/kubernetes-csi/external-snapshotter/master/client/config/crd/snapshot.storage.k8s.io_volumesnapshotclasses.yaml
kubectl apply -f https://raw.githubusercontent.com/kubernetes-csi/external-snapshotter/master/client/config/crd/snapshot.storage.k8s.io_volumesnapshotcontents.yaml
kubectl apply -f https://raw.githubusercontent.com/kubernetes-csi/external-snapshotter/master/client/config/crd/snapshot.storage.k8s.io_volumesnapshots.yaml
kubectl apply -f https://raw.githubusercontent.com/kubernetes-csi/external-snapshotter/master/deploy/kubernetes/snapshot-controller/rbac-snapshot-controller.yaml
kubectl apply -f https://raw.githubusercontent.com/kubernetes-csi/external-snapshotter/master/deploy/kubernetes/snapshot-controller/setup-snapshot-controller.yaml
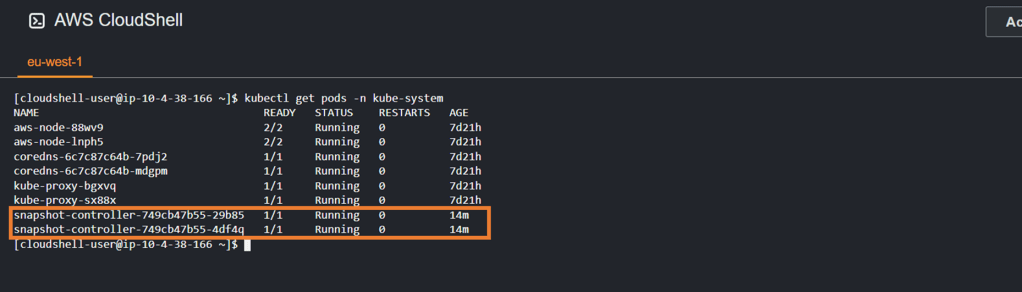
3. Confirm that the snapshot pods are running
use the kubectl get pods -n kube-system command to confirm that the pull from the git repository was successful and the snapshot controllers were successfully installed and are running.
4. Deploy the EBS CSI Driver Add-On
Again we have the option to do this via the GUI, eksctl or AWS CLI. I’m going to use AWS CLI this time around. If needed, replace the variables in orange. ( Note – 111122223333 is just in place of my real account ID)
aws eks create-addon --cluster-name geos-ppdm-eks --addon-name aws-ebs-csi-driver \
  --service-account-role-arn arn:aws:iam::111122223333:role/Geos_AmazonEKS_EBS_CSI_DriverRole
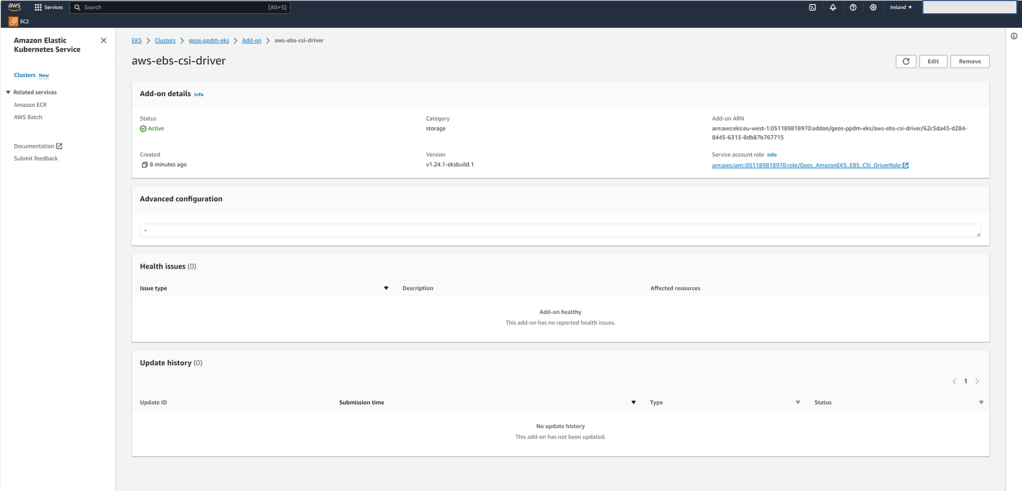
5. Confirm CSI drivers have been installed and are in running state
Run the kubectl get pods -n kube-system command again. If all is well you should see your ebs-csi controllers in a running state

You can also leverage the GUI on the AWS console to verify all is operational and as expected.
6. Configure the Volume Snapshot Class
A Volume Snapshot is a request for a snapshot of a volume by a user, it is similar to a PersistentVolumeClaim. A VolumeSnapshotClass, allows you to specify different attributes belonging to a VolumeSnapshot. I probably don’t have to go into too much detail as to why these are so important in the realm of availability and backup/restore. We get to nice things like copying a volume’s contents at a point of time without creating an entirely new volume!! Key point here though is that snapshot functionality is only supported with CSI Drivers and not the native in-tree gp2 driver.
- Create the Volume Snapshot Class YAML File. I’m deviated from the normal here, and pasting the file directly into the bash console:
cat <<EOF | tee snapclass.yaml
apiVersion: snapshot.storage.k8s.io/v1
kind: VolumeSnapshotClass
metadata:
   name: csi-aws-vsc
driver: ebs.csi.aws.com
deletionPolicy: Delete
EOF- Create the Snapshot Class:
kubectl apply -f snapclass.yaml- Check that it is deployed
kubectl get volumesnapshotclass
All going well you should see the following output

7. Configure and deploy the default storage class
EKS defaults to using EBS storage class gp2 by default. We have a couple of issues here, namely as noted above we can’t use the snapshot capability, but more importantly PPDM does not support gp2. Therefore we need to create a new Storage Class and make this the default class. By default, the aws ebs csi driver leverages gp3, which of course is more feature rich, flexible and performant.
- Create the Storage Class YAML file.
cat <<EOF | tee ebs-sc.yaml
apiVersion: storage.k8s.io/v1
kind: StorageClass
metadata:
   name: ebs-sc
   annotations:
     storageclass.kubernetes.io/is-default-class: "true"
provisioner: ebs.csi.aws.com
volumeBindingMode: WaitForFirstConsumer
EOF- Create the storage class
kubectl apply -f ebs-sc.yaml
- Make ebs-sc the defualt storage class and check same.
kubectl patch storageclass gp2 -p "{\"metadata\": {\"annotations\":{\"storageclass.kubernetes.io/is-default-class\":\"false\"}}}"

Up Next
We now have got to the point whereby, we have a fully functional EKS environment, backed by persistent native EBS block storage. In part 3 of this series we will:
- deploy a sample application ( don’t expect too much, far from a developer am I !!!. Plan is just to populate a new namespace for the purposes of a backup/restore demo).
- Review what what we have already created/deployed in terms of Dell PPDM and Data Domain Virtual Edition. We have covered this extensively already in some previous posts, but we will recap.
- Add our newly created EKS cluster as a Kubernetes Asset Source in Dell PPDM and complete the discovery process
Where to go for more info:
Thanks to Eli and Idan for their fantastic blogs on the subject on Dell Infohub. Infohub is a great technical resource btw.
The official AWs guide, is also a great way to start. Not to heavy.
Getting started with Amazon EKS – Amazon EKS
Hopefully I have peeked some interest in all things CSI/CSM, and maybe CNI ( In the future).
CSI Drivers | Dell Technologies
Support for Container Storage Interface (CSI) Drivers Series | Drivers & Downloads | Dell US
DISCLAIMER
The views expressed on this site are strictly my own and do not necessarily reflect the opinions or views of Dell Technologies. Please always check official documentation to verify technical information.
#IWORK4DELL

[…] have covered this in detail, when we discussed PPDM in an EKS environment. Link to this is here. For now though, follow the following […]
LikeLike