

Part 1: Deploy RKE2 with SUSE Rancher
Late last year I did a series on protecting EKS based cloud workloads in AWS using DDVE and PPDM, or to give its official term, Dell APEX Protection Storage for AWS. This was a real from the ‘ground up’ exercise and it assumed that no infrastructure existed, so we covered off the setup of the VPCs, Security groups, deployment of PPDM and DDVE in the cloud, AWS EBS CSI driver installation and finally a workload failover demonstration. The complete end to end experience.
This time around, I’ve decided to get my head out of the clouds and get back to ‘terra firma’, and do a series based completely with on-premise in mind. Again though, from the ground up. We will build out the RKE2 Kubernetes environment leveraging SUSE Rancher , deploy the Dell CSI driver for Dell PowerScale, create some sample container workloads bound to Persistent Volume Claims (PVC’s), stand up and configure a fresh new install of PPDM and DDVE, add our RKE2 cluster as a data source to PPDM and well… you get the picture… the full story end to end.
So let’s get started.
Deploy SUSE Rancher on Docker
SUSE Rancher is an open-source software platform designed to manage and deploy Kubernetes clusters at scale. It provides a comprehensive set of tools for DevOps teams to run containerized workloads while addressing the operational and security challenges of managing multiple Kubernetes clusters across various infrastructures. For the purposes of this demonstration it is extremely easy to spin up a fully functioning version of SUSE Rancher running on Docker. I will build on the architectural diagram as we go, but at its very simplest we will be deploying:
- SUSE Rancher v2.9.1. Deployed on a docker container running Ubuntu Server 22.0.4LTS. This is really very straightforward. Note, the docker based setup is for test and POC purposes only and is not supported in production environment. The link to the official documentation is here.
- RKE2 running Kubernetes v1.29.8
SUSE RKE2 is an enterprise-grade Kubernetes distribution, provided by SUSE, that is designed to provide a secure and reliable foundation for containerized workloads. It is built on the lightweight, CNCF-certified RKE2 Kubernetes distribution, which is optimized for security and compliance. SUSE RKE2 offers a streamlined installation process and simplified operations, making it suitable for on-premise, hybrid, and edge environments. We will use Rancher to orchestrate the installation and initial configuration of our RKE2 Kubernetes environmenet.
Finally, In my lab scenario we will deploy everything in a VMware vSphere environment which is currently running version 8.0.3. Note that Rancher can directly integrate with vCenter directly via API and provision resources directly into the vSphere managed environment, in a cloud like operating model. For our demo, whilst using vSphere, we will not be using the cloud model, but rather our target Ubuntu virtual machines will appear as bare-metal to both Rancher and RKE2 when deployed. This will become a little clearer during the demonstration video.
Note: Before we get started, please save yourself a world of pain and make sure you have NTP and forward/reverse DNS configured everywhere in your environment..
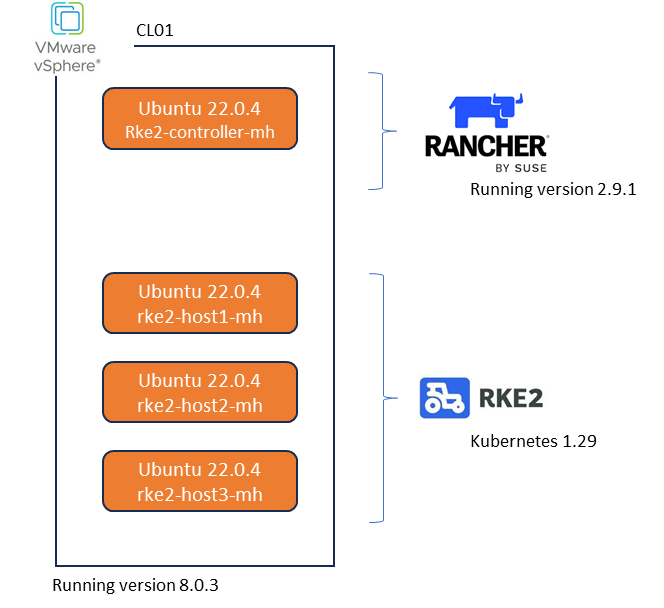
So let’s get started. As you see in the above diagram we have our vSphere environment and 4 Vanilla servers running Ubuntu 22.0.4. I have provisioned each with 64GB of memory, 4 vCPU’s and a single 800GB Hard Disk. Most definitely overkill, but I am lucky enough to have the resources in my lab. Everything is running on a routable flat network connected to a simple vswitch, so nothing fancy going on here.

1. Install Docker your Target Rancher Server.
On the host you wish to deploy Rancher on, execute the following to install Docker. Make sure the version of docker is compatible with the Ubuntu server and Rancher version. Link here. In my case it is version 26.0 according to the support matrix.
curl https://releases.rancher.com/install-docker/26.0.sh | sh
2. Verify docker has installed properly.

3. Install the Rancher Docker Container with rancher generated self-signed certificate.
docker run -d --restart=unless-stopped \
  -p 80:80 -p 443:443 \
  --privileged \
  rancher/rancher:latest
4. Confirm Rancher container has been deployed and is running

5. Browse to the FQDN or IP address of the Ubuntu server hosting Rancher (Port 80 or 443)

6. Configure Local Rancher Password
After browsing to the main logon screen, copy the bootstrap command. We will need to extract the docker container ID and amend this command
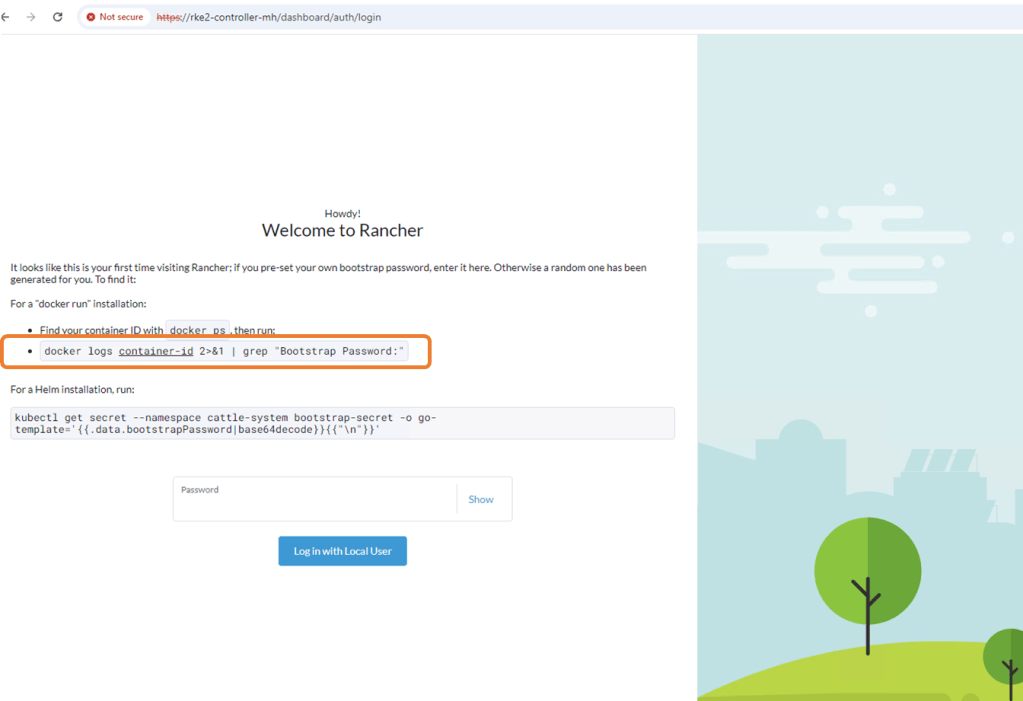
Next, SSH to the machine and run the ‘Sudo Docker PS’ command to identify the container ID. Amend this to the command above

Next run the docker logs command and grep the bootstrap password.
docker logs 9347261e9125 2>&1 | grep "Bootstrap Password:"

Copy the bootstrap password use to logon to Rancher for the first time.
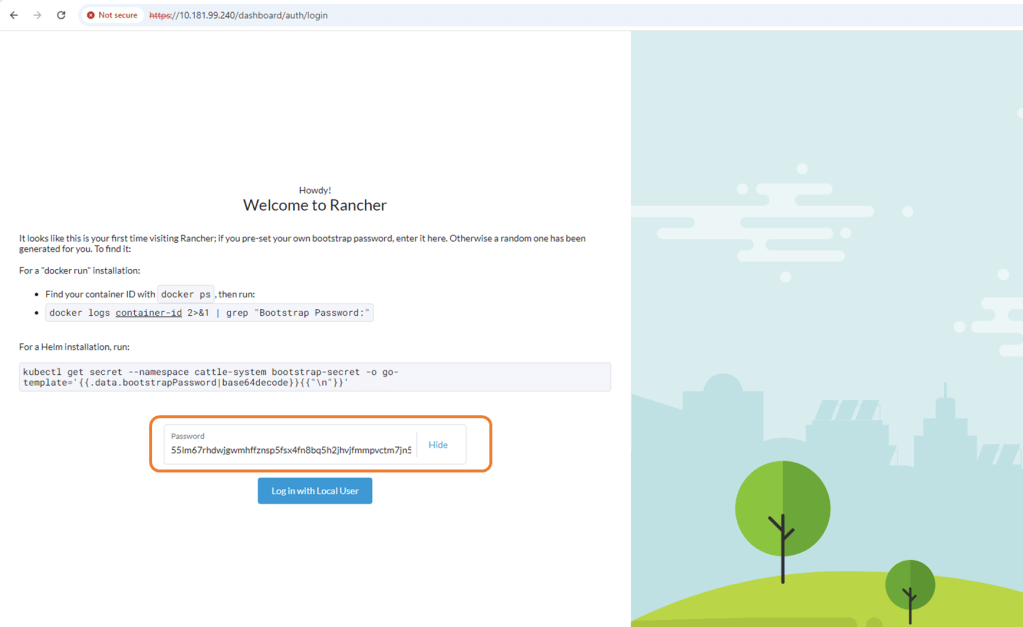
Configure new password and accept EULA.

Log in to Rancher for the first time.
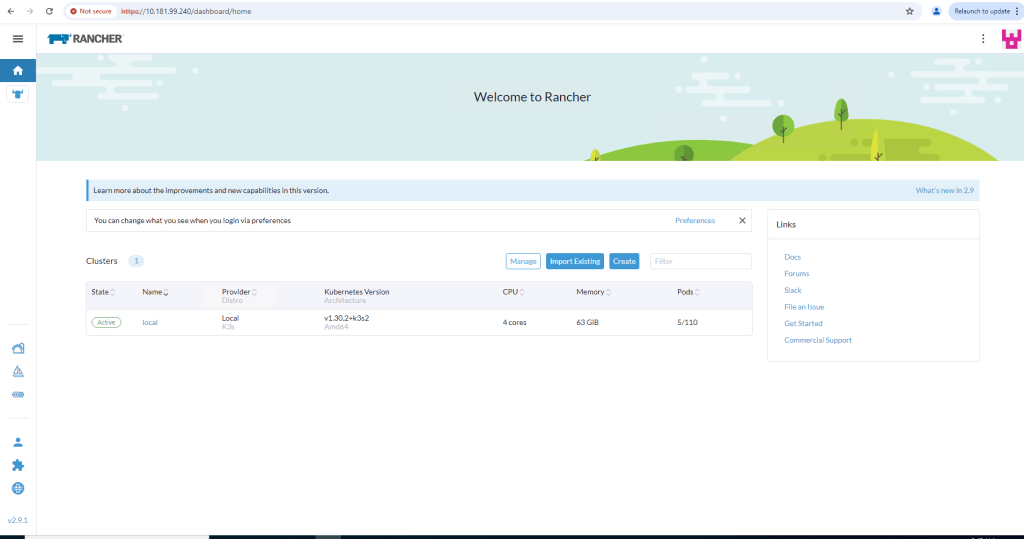
Deploy RKE2 Kubernetes cluster using Rancher
Now that we have Rancher up and running, it really is very straightforward to get a 3 node fully functioning RKE2 cluster up and running. I’ve covered off all the required steps in the accompanying video also.
Step 1: Create Cluster.
Navigate to the ‘Cluster Management’ tab and from there, click ‘Create’

Next up, click on the custom tab and not the VMware vSphere button. Whilst we will be deploying on a test vSphere environment, we will not be leveraging the vSphere integrations with Rancher. We will be emulating a ‘Bare-Metal’ on premise types installation.

Configure the cluster, Give it a cluster name such as ‘ppdm-demo’. I have accepted all the defaults including the CNI integration Calico but I have stepped back one iteration of K8S version – v1.29.8. Leave the default cloud provider as is and click ‘Create’

My test cluster is going to consist of 3 hosts, all assigned etcd, control plane and worker node functionality. We will need 3 for a quorum. Again this process is very easy. To make life easier and as this is a demo environment then check the ‘Skip the TLS verification’ box under the registration command. Copy the Registration command

Open a putty session to our 3 target hosts and paste the copied Registration Command. Note: you may need to amend ‘sudo’ to the start of the command.
CATTLE_AGENT_FALLBACK_PATH="/opt/rke2/bin" curl --insecure -fL https://10.181.99.240/system-agent-install.sh | sudo CATTLE_AGENT_FALLBACK_PATH="/opt/rke2/bin" sh -s - --server https://10.181.99.240 --label 'cattle.io/os=linux' --token q58qzdvfv7swdvn6wkzwl8l6wgswjnwjbkrdl4g6cmkqk894bwpj6h --ca-checksum 6a2f919eab47ecdfd7302b97f658d35d01cd45db7f24fb83ed96aad320131ee0 --etcd --controlplane --worker

Rancher starts the process of deploying RKE2 to the 3 nodes.

Step 2: Monitor provisioning Status
Navigate to the ‘Provisioning Log’ tab on the Rancher Cluster Management tab. You should see the deployment progress.

Step 3: Validate the deployment
This can be done both via the Rancher GUI and the embedded Kubectl function within Rancher. In the next post we will set up our management machine with Kubectl installed and permissions attached to allow us to talk directly to the cluster via the API. For now though we will leverage Rancher directly.
Via the GUI, navigate to the ‘Machines’ tab to verify the cluster health

Next Navigate back to the Cluster Dashboard. You should see our new cluster on the left hand pane. You can see a graphical representation of our active Pods, workloads, apps etc. At the moment we have nothing configured. On the top right hand corner of the GUI the ‘Kubectl Shell’ button sits. Click on this to open the shell for the cluster

Click to open the shell and verify the node status using the ‘kubectl get nodes’ command and examine any running Pods in all available namespaces using the ‘kubectl get pods -A’ command

Video Demo
Attached, video run through of the above.
Up Next
Now we have Rancher installed, next up vanilla install of Dell Power Protect Data Manager and Dell Data Domain Virtual Edition. Once that is up and running , we will integrate with Rancher, configure some sample workloads and demo some recovery scenarios.
DISCLAIMER
The views expressed on this site are strictly my own and do not necessarily reflect the opinions or views of Dell Technologies. Please always check official documentation to verify technical information.
#IWORK4DELL

[…] Part 1, we stood up the Rancher managed RKE2 in our vSphere environment (mirroring a bare metal […]
LikeLike
[…] Part 1, we stood up the Rancher Manager and deployed our 3 Node bare-Metal RKE2 cluster. In Part 2, we […]
LikeLike
[…] Rancher Managed RKE2 Cluster deployed. Link to blog post here. […]
LikeLike