
So a very quick recap of where we are at:
In Part 1, we stood up the Rancher Manager and deployed our 3 Node bare-Metal RKE2 cluster. In Part 2, we deployed Dell PowerProtect Data Manager 19.17 and paired it with a fresh installation of Dell APEX Protection Storage On-Premise running DDoS version 8.1 (Previously known as Data Domain Virtual Edition – or DDVE for short).
I probably could have reversed the order here and done the following after part 1, but I wanted to get straight into some context around PPDM ( This is after all what this series is ultimately about!).
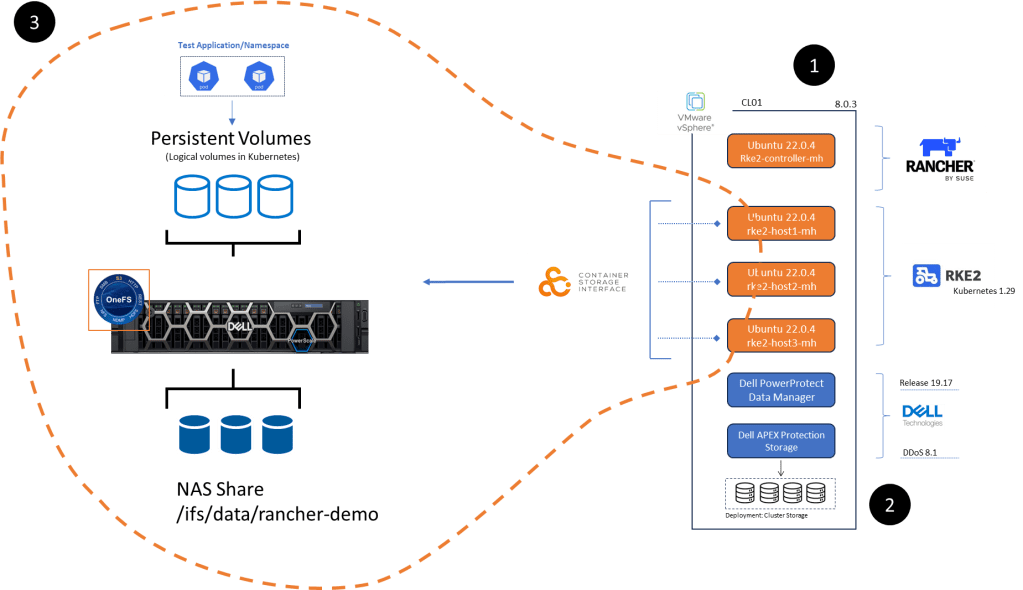
Bottom line we need to deploy some applications to protect. To that end Part 3 will focus on everything inside the orange dashed line, namely:
- Configuration of NAS, NFS share on Dell PowerScale appliance running OneFS 9.8. I am running a virtualised version in my lab but this of course could be a physical appliance. This is already up an running so I won’t run though the setup in this series.
- Dell CSI (Container Storage Interface) for PowerScale installation and configuration on our pre-existing RKE2 cluster ( the one we configured in Part 1 of the series). We will point the cluster to write to Persistent volumes created on the PowerScale NFS share.
- Setup of demo application RKE2 POD in the environment to test everything is working as it should be….. be nice as I am no developer! This will be short, simple and to the point!
Step 1: Configure PowerScale NAS Share and Present to RKE2 Cluster
This really is incredibly straightforward. You do not have to be an expert to navigate yourself around the OneFS interface.
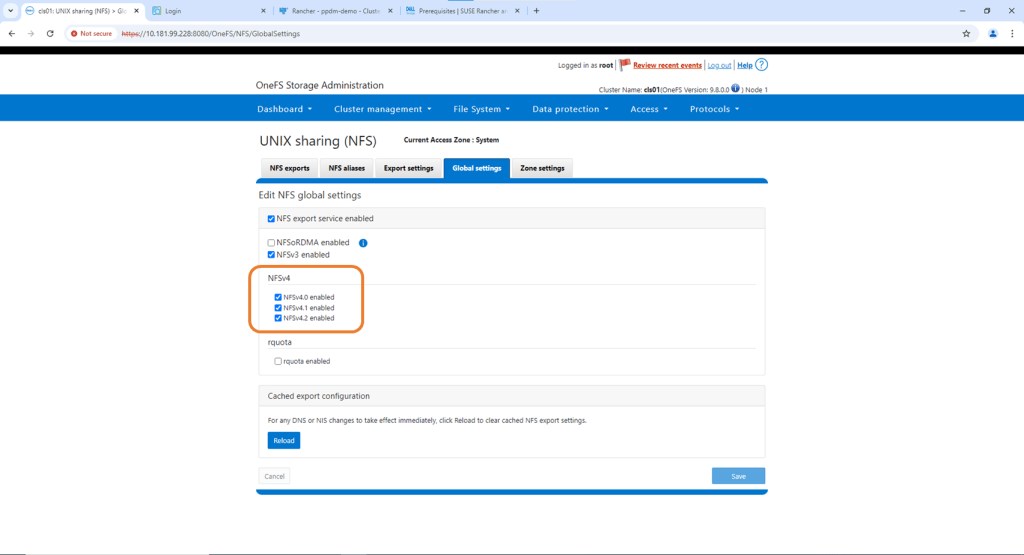
Configure NFS Share on OneFS
Under the protocols tab navigate to Global Settings and confirm that NFS v4 is has been enabled.
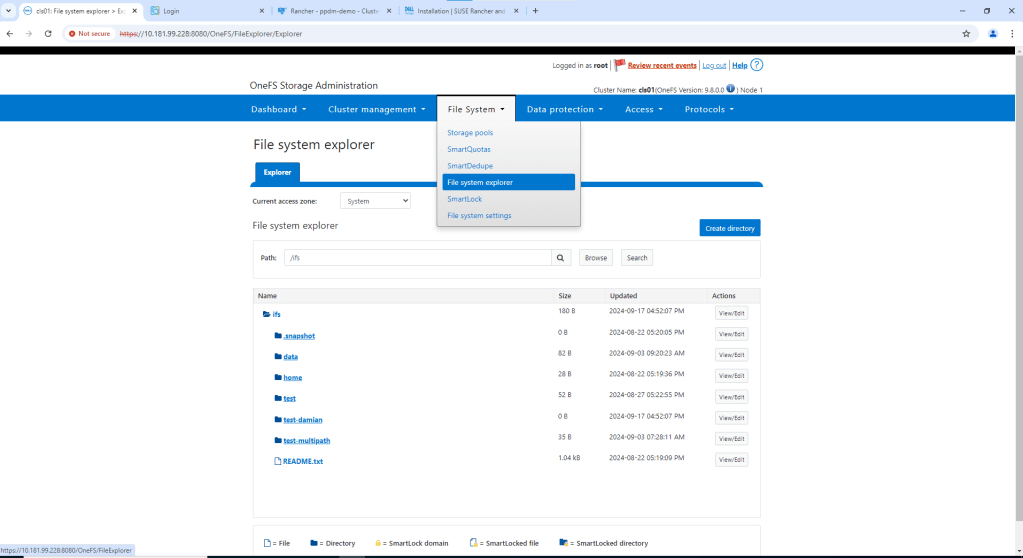
Navigate to File System -> File System Explorer. Then click ‘Create Directory’
Check that your path and permissions are set appropriately. Note, this is a test environment, so I will enable everything. Click ‘Create directory’ again.

Navigate to the newly created directory using the File System explorer. Check the path is as expected. There should be no data in the directory.

Navigate back to the ‘Protocols’ tab and to UNIX sharing (NFS). Click ‘Create Export’.

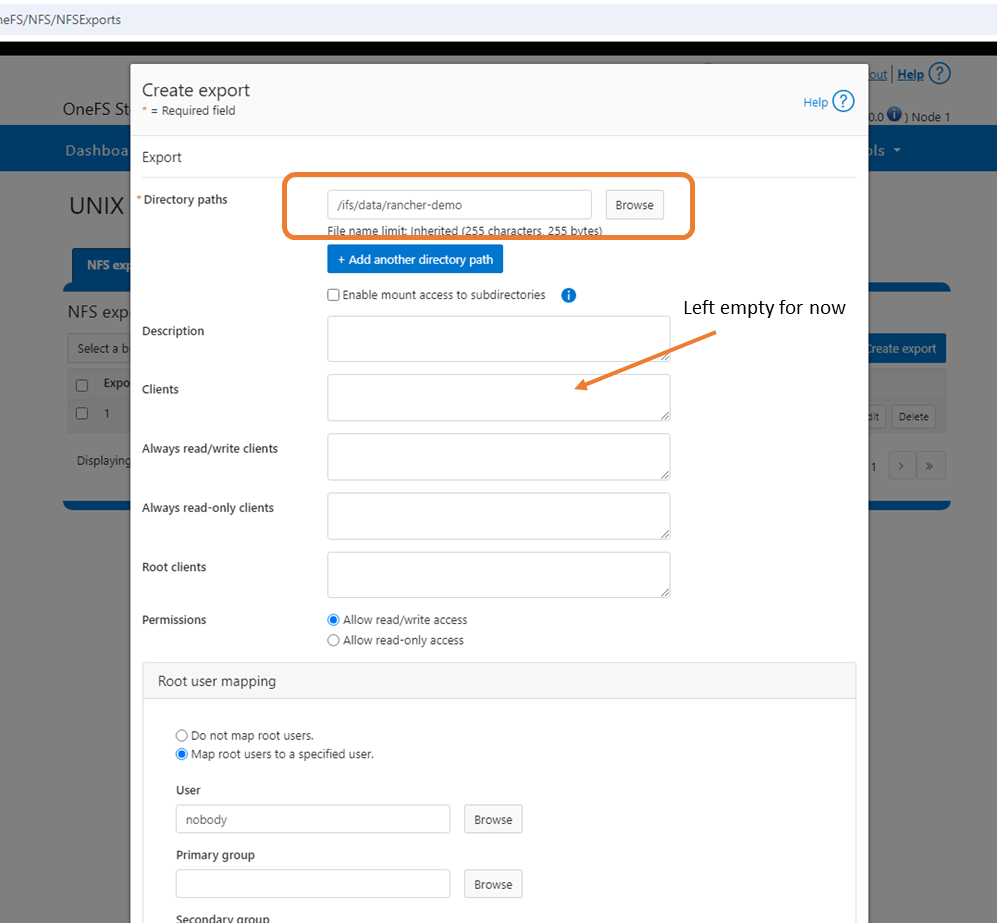
Create the export by adding the Directory Path /ifs/data/rancher-demo. Again this is a test environment, so I have left all my default settings as is. I also didn’t populate the clients tab, which will add another layer of access authorisation. By leaving blank we give everybody access. Scroll down and ‘Create export’.
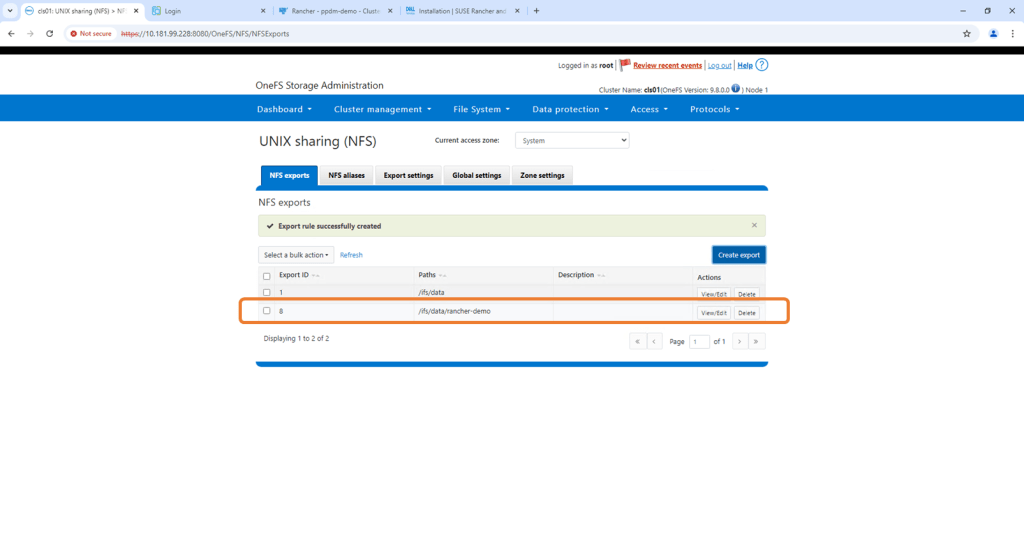
Verify NFS Export exists and the configured path is correct
Step 2: Install Dell CSI on RKE2 Cluster
In a future post we will do all of the following via code (blog around PowerFlex integration). For now though we will use the Rancher interface. This really simplifies the process. I will attach links to the GitHub etc. at the bottom of this post , where everything is really well documented.
Prerequisites
1. Create namespace named isilon
Navigate to the RKE2 Cluster we created in Rancher. Navigate to the Projects/Namespaces tab and ‘Create Namespace’.
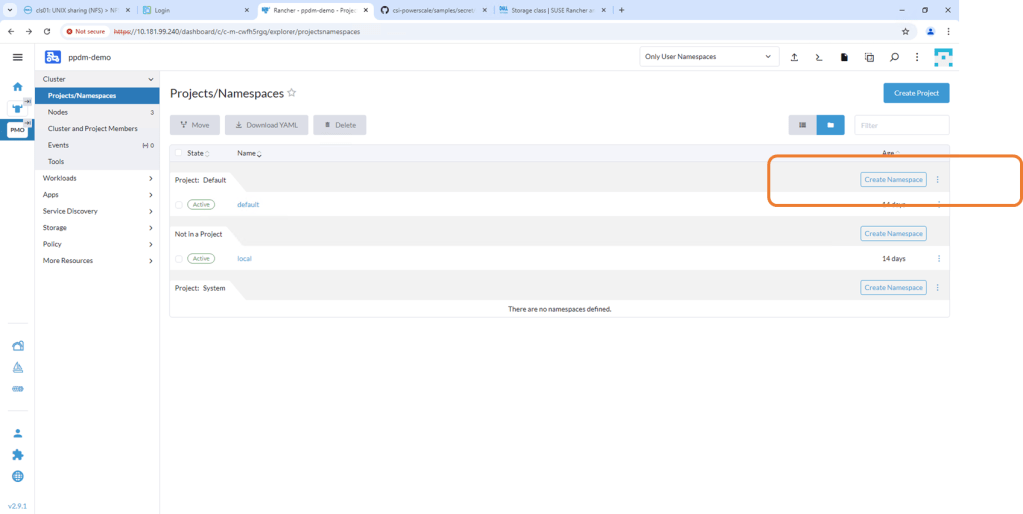
Leave the defaults but make sure that the namespace is named correctly as ‘isilon’.

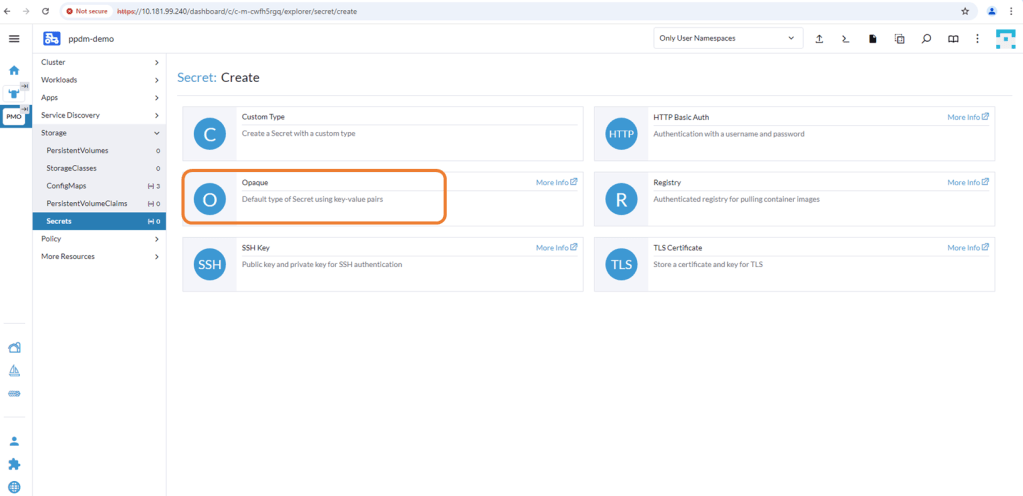
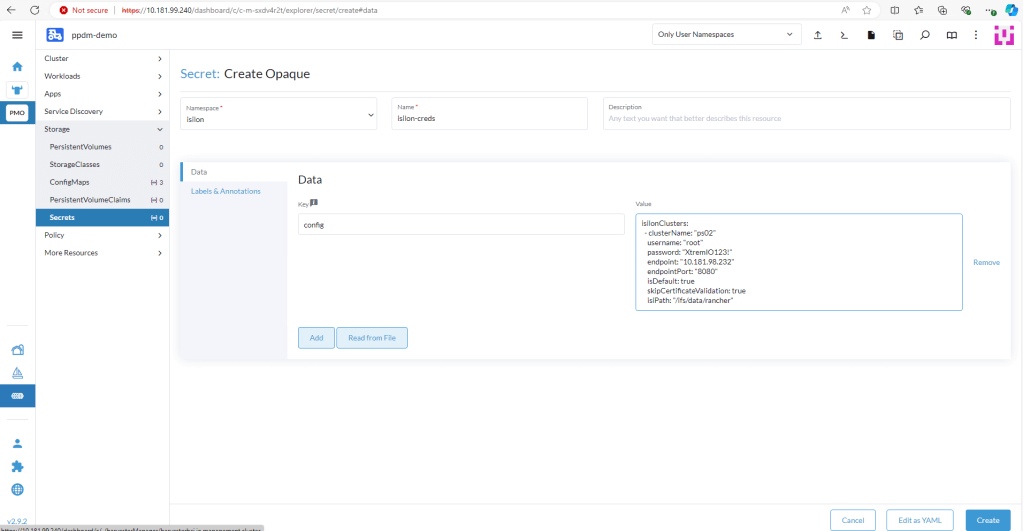
2. Create an opaque secret named “isilon-creds” in the newly created isilon namespace.
You really need to be careful of the syntax here. I will add a link at the bottom to the github for the detailed documentation and the source yaml file, but the following should work:
isilonClusters:
  - clusterName: "ps02"
    username: "root"
    password: "XXXXXXXX"
    endpoint: "10.181.98.232"
    endpointPort: "8080"
    isDefault: true
    skipCertificateValidation: true
    isiPath: "/ifs/data/rancher"
where the ‘Clustername’ is my Powerscale cluster name. The isiPath is my NFS share. Change the Data key to ‘config’ and click ‘Create’.
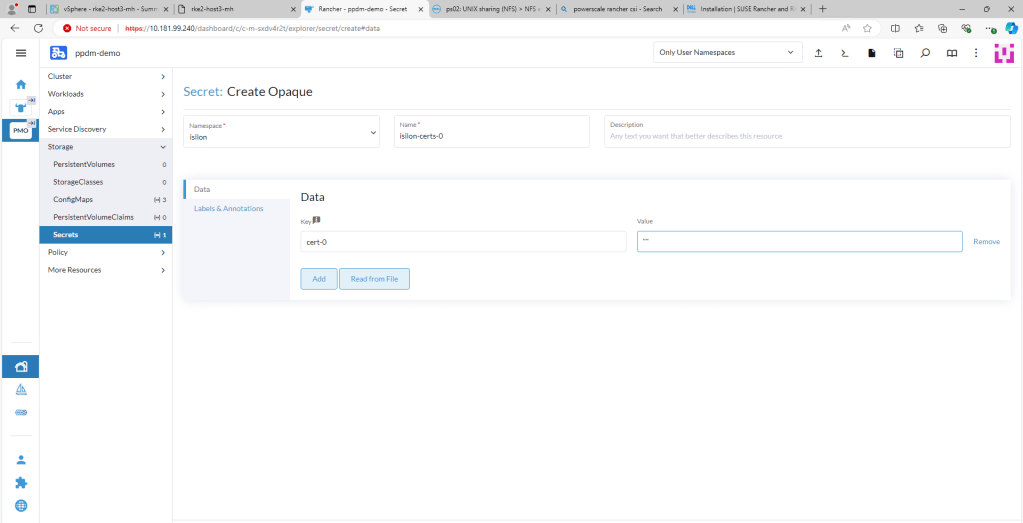
3. Create an Opaque Secret named isilon-certs-0 in the isilon namespace.
Again, syntax and case sensitivity are key or this will fail. Populate the value field with “”. The Data field key is ‘cert-0’ – case sensitive!
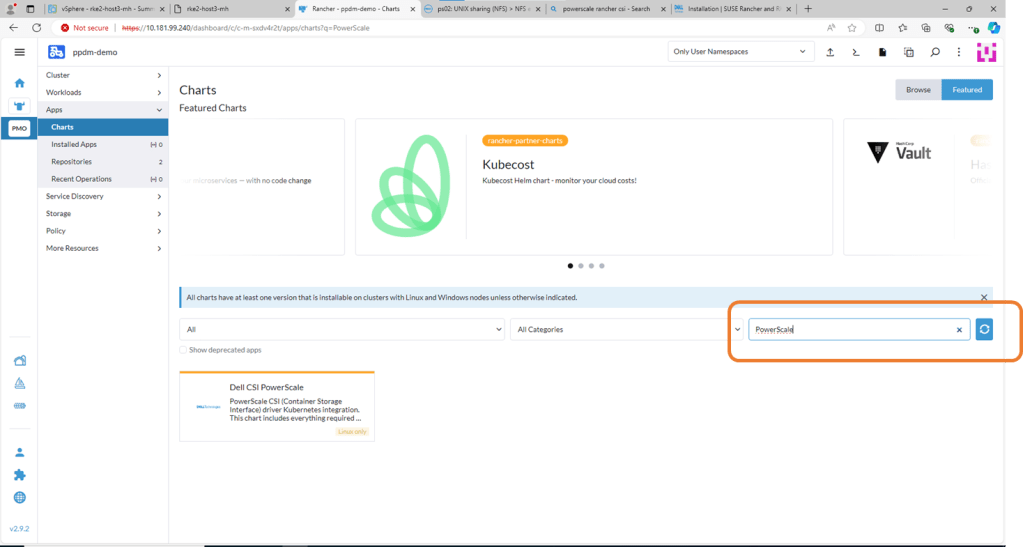
4. Install Powerscale CSI using HELM Chart
Navigate to Apps, then Charts and search for Powerscale. Click on Dell CSI for PowerScale.
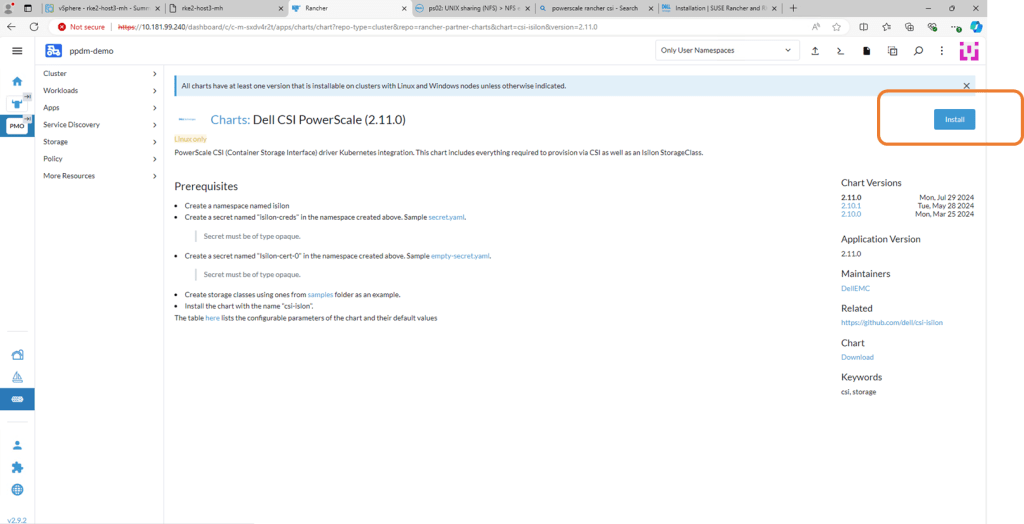
On the next screen, double check the prerequisites (which we have already done) and then click ‘Install’
Check the ‘Customize-Helm Options before Install and then ‘Next’. We need to change the ISI Path in the YAML Manifest.
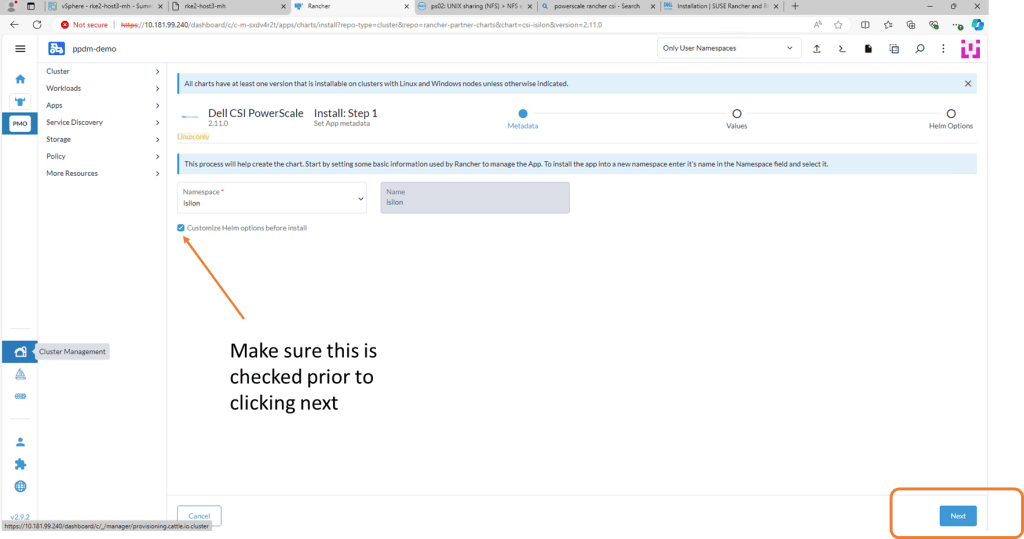
Edit the ISI Path to match the export you have created in PowerScale. Click Next and then ‘Install’.

Confirm the installation has been successful.
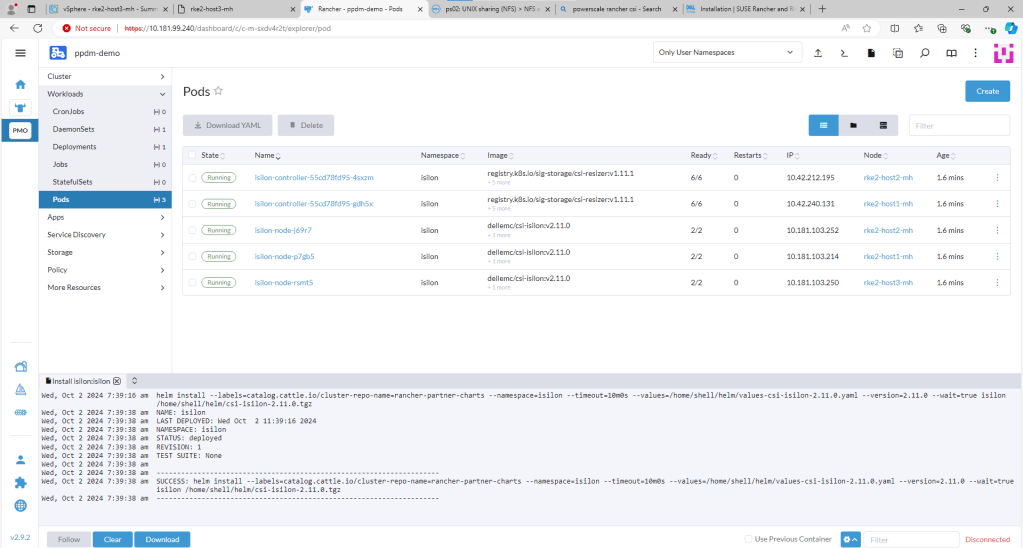
You can check this via Kubectl also by opening the Shell and running the ‘Kubectl get pods -n isilon’ command. All Pods should be in a Running state.

Step 3 : Deploy Demo App in New Namespace
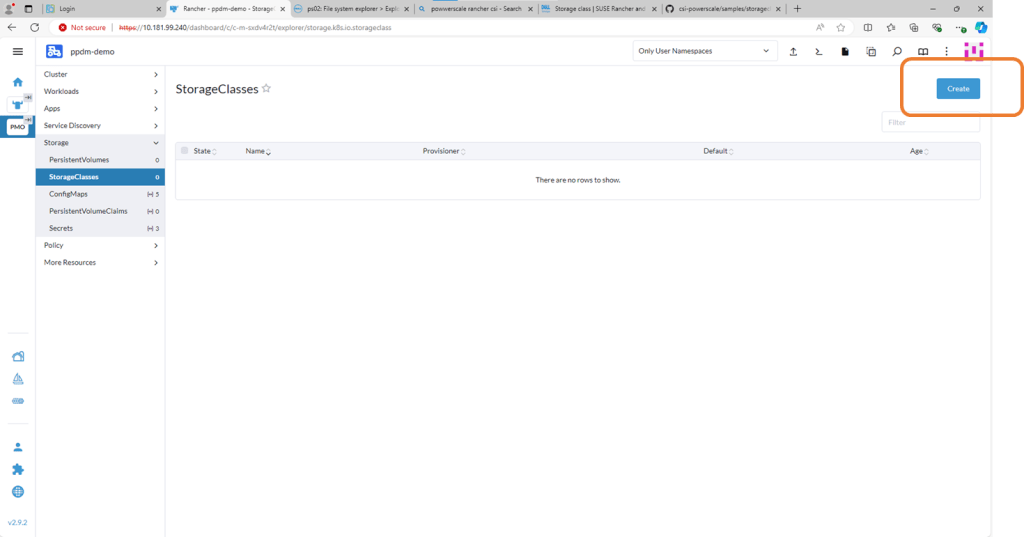
1. Create Storage Class
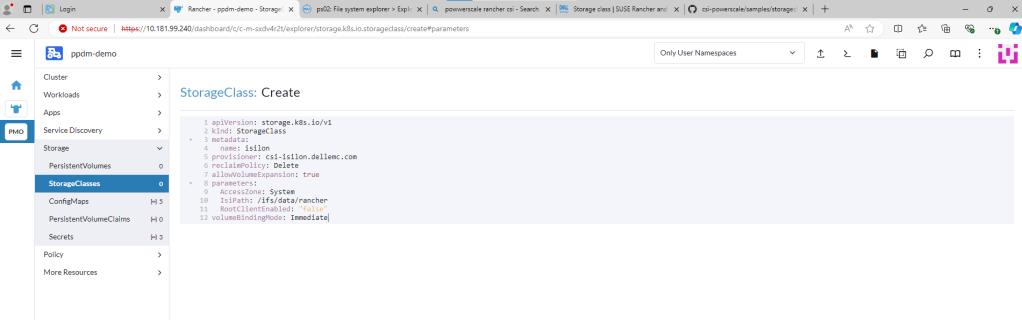
You can find the link to the sample storage class I configured here. For a bit of clarity I have redacted all the comments in the code. This is just a sample, you can change other parameters here such as the VolumeBindingMode etc. Just make sure the IsiPath matches the path configured in Powerscale.
apiVersion: storage.k8s.io/v1
kind: StorageClass
metadata:
  name: isilon
provisioner: csi-isilon.dellemc.com
reclaimPolicy: Delete
allowVolumeExpansion: true
parameters:
  AccessZone: System
  IsiPath: /ifs/data/rancher
  RootClientEnabled: "false"
volumeBindingMode: Immediate
Navigate to the StorageClasses tab and click ‘Create’. We will run through this step on the video in part 4 also.
Now we could do this via Kubectl, or through the menu or in my case I’m just going to copy and paste my YAML file above.

Delete the pre-populated YAML code and paste your snippet. Making sure we point to the correct ‘Isi’ path. Click ‘Create’. Job done!!

2. Create PersistentVolumeClaim
The following example is really simple, for more examples you can point back to the Dell Github. For the purposes of this demo, it is enough to understand that we need some mechanism for our user ( in this case pod) to request storage from the underlying storage provider i.e Powerscale. We do this via the PVC construct.
apiVersion: v1
kind: PersistentVolumeClaim
metadata:
  name: pod-1-claim
  namespace: dell-ppdm-demo
spec:
  accessModes:
    - ReadWriteOnce
  storageClassName: isilon
  resources:
    requests:
      storage: 5Gi
Again the process in Rancher is extremely straightforward. Navigate to the PersistentVolumeClaim tab, and from there click ‘Create’. On the next screen, click on the ‘Edit as YAML’ button.

Delete, the pre-populated code and paste our snippet above. Notice you will get an error as we have not yet created our new namespace “dell-ppdm-demo”. You can very quickly do this with kubectl directly from the console.

couldn’t be easier. One command!

Next back to our upload YAML again, this time no errors. This time it creates successfully and is automatically transitioned to ‘bound’ state.

3. Create application backed by Powerscale Persistent Storage.
This is as super simple Pod that I will create manually in the newly created namespace, backed by Powerscale persistent storage. It is enough to demo backup and recovery in part 4, the next and final part of this series.
I will deploy a little application that writes the time and date to a file every 5 seconds. enough to a) populate some data into the filesystem and b) give us a de-facto timestamp so that we can verify the recover sequence.
Navigate to Pods and then ‘Create’. Click ‘Edit as YAML’.

Delete the pre-existing YAML code and paste in the following. This will deploy a single POD into our new namespace, backed by Powerscale storage. Click ‘Create’.
apiVersion: v1
kind: Pod
metadata:
  name: dell-demo-1
  namespace: dell-ppdm-demo
spec:
  containers:
  - name: dellns-1
    image: centos
    command: ["/bin/sh"]
    args: ["-c", "while true; do echo $(date -u) >> /data/out.txt; sleep 5; done"]
    volumeMounts:
    - name: persistent-storage
      mountPath: /data
  volumes:
  - name: persistent-storage
    persistentVolumeClaim:
      claimName: pod-1-claim
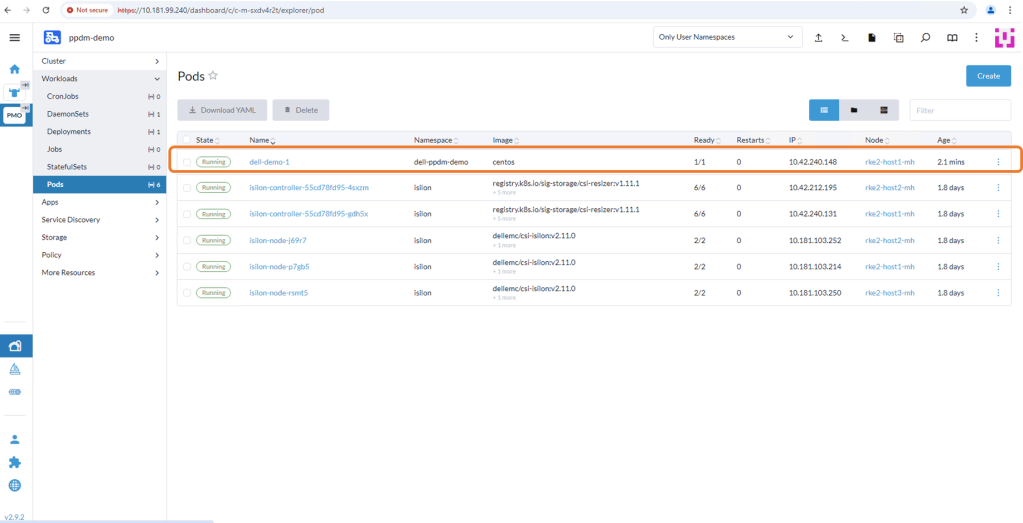
After a few seconds the Pod will deploy and you should see the following. Note, it is deployed in the ‘dell-ppdm-demo’ namespace.
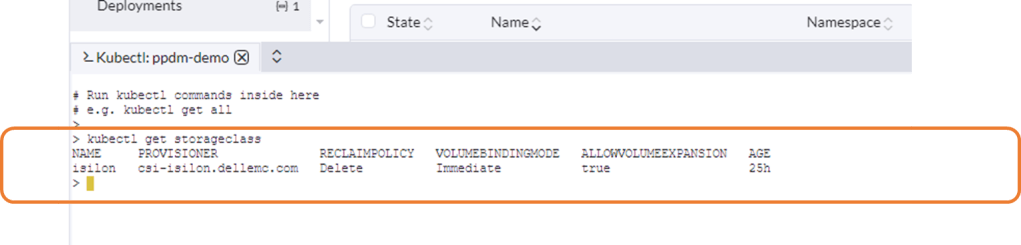
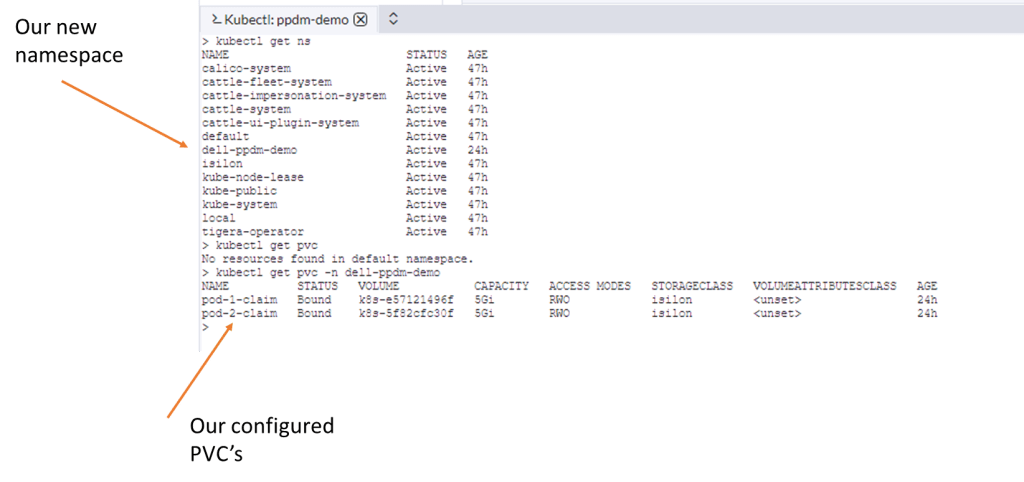
Let’s have a look via Kubectl to see the state of our PVC and the POD itself.
StorageClass looks good!
Our newly configured namespace and PVC’s…
Our Pod is up and running plus we are writing data.

We can browse to the OneFS interface to see the folder created (note the same name as the PVC) and that data is being injected into the file ‘out.txt’.

Up Next
In the next and final part of this series, we will discover our RKE2 Kubernetes cluster via PPDM and create a protection policy to backup the relevant namespaces, persistent volume claims etc. Of course at that point we will demo a failure and recovery and see everything in action.
DISCLAIMER
The views expressed on this site are strictly my own and do not necessarily reflect the opinions or views of Dell Technologies. Please always check official documentation to verify technical information.
#IWORK4DELL

[…] An application running in our environment in a new production namespace writing data to a PowerScale NFS target. Link to CSI configuration and demo application blog post here. […]
LikeLike